Are you a budding photographer or a seasoned pro looking to sell your stunning images? Depositphotos is a fantastic platform that allows you to upload and sell your photos, making it a great avenue for new contributors to share their work with the world. In this guide, we’ll walk you through the essential steps to get started, specifically focusing on how to create an account and upload your photos seamlessly. Let’s dive in!
Creating a Depositphotos Account
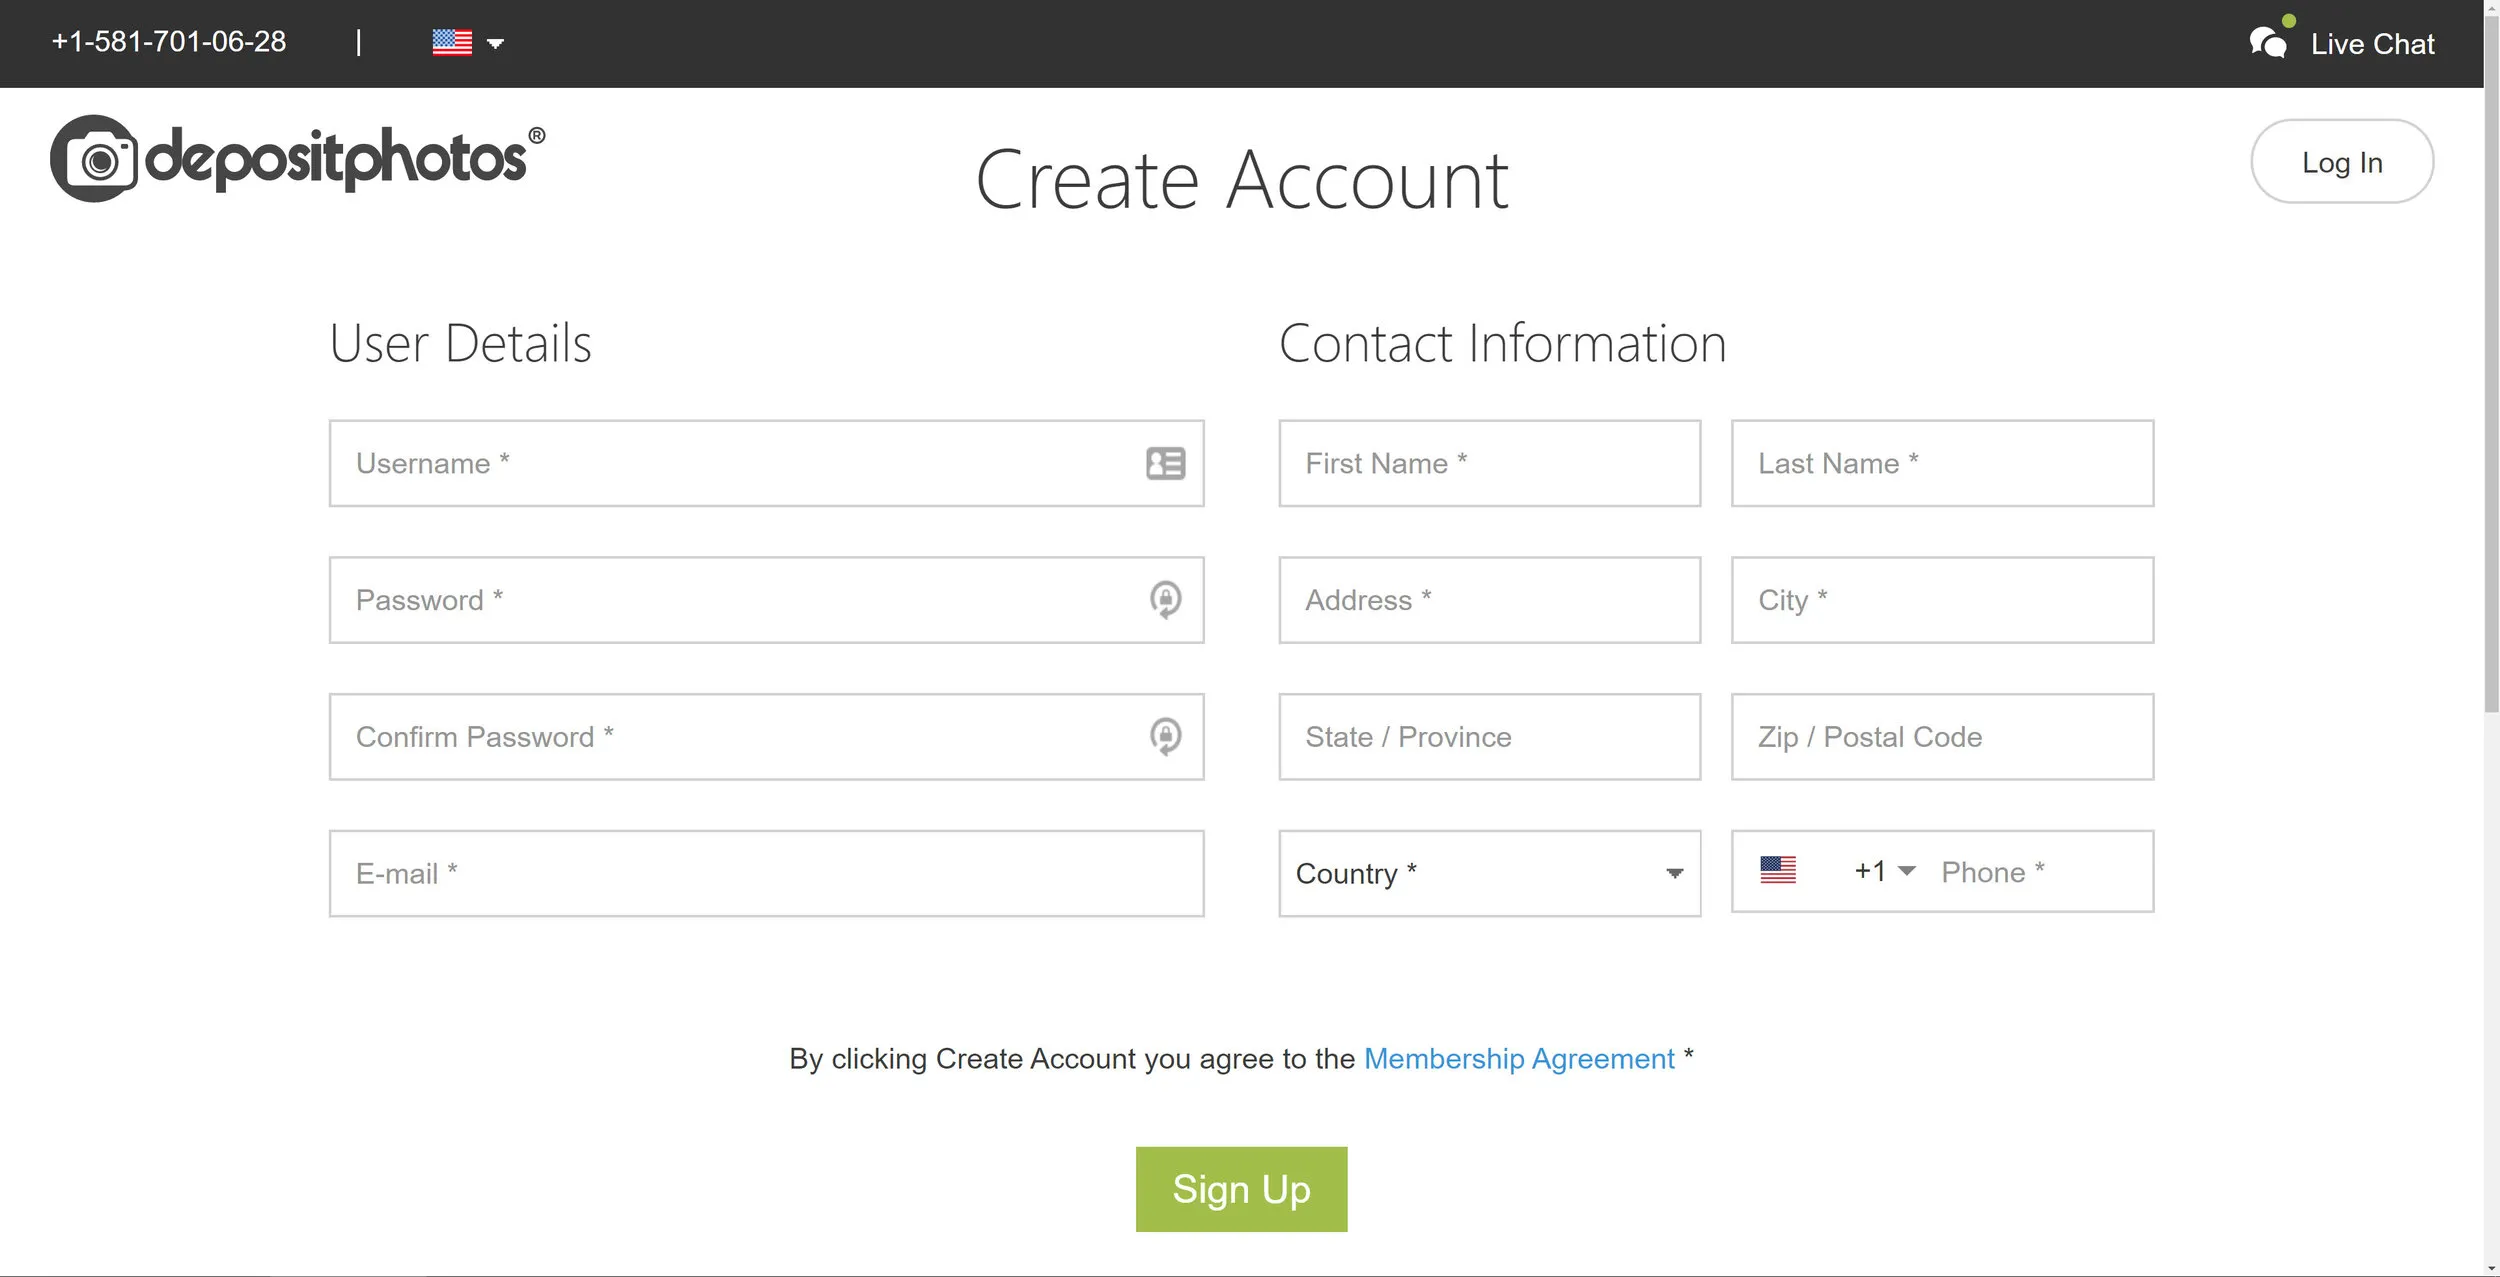
The first step in your journey as a contributor on Depositphotos is to create an account. This is a straightforward process, and I promise it won’t take much of your time. Here’s a step-by-step guide to help you get set up:
- Visit the Depositphotos Website: Go to depositphotos.com and look for the “Sign Up” button, usually found in the top right corner of the homepage.
- Choose Your Account Type: You can sign up as a contributor or as a buyer. Since we’re focusing on contributing, make sure to select the appropriate option.
- Fill Out Your Information: Provide your email address, create a password, and, if prompted, enter additional details like your name and location. Make sure your password is strong!
- Verify Your Email: Check your inbox for a verification email from Depositphotos. Click on the link in the email to confirm your account.
- Complete Your Profile: Once logged in, take some time to fill out your profile. Include a profile picture and a brief bio that showcases your photography journey.
- Read the Guidelines: Familiarize yourself with Depositphotos’ content guidelines. This will help you understand what types of images are in demand and increase your chances of success.
That’s it! You’re now ready to upload your photos and start sharing your creativity with a global audience. Remember, the more you engage with the platform, the better your experience will be. Happy uploading!
Also Read This: How Easy Is It to Make Money on Shutterstock and Tips for Success
3. Understanding Depositphotos Submission Guidelines
When it comes to uploading your photos to Depositphotos, understanding their submission guidelines is key to ensuring your images get accepted. These guidelines are in place to maintain a high standard of quality and relevance for the marketplace. So, let’s break them down!
Image Quality: Depositphotos expects high-resolution images that are clear, sharp, and free from noise. Aim for a minimum resolution of 3 MP, but higher is always better!
Content Restrictions: Make sure your photos don’t contain any copyrighted materials, trademarks, or identifiable faces unless you have the necessary model releases. It’s a good idea to familiarize yourself with their content policy to avoid any issues.
Image Formats: Depositphotos accepts JPEG files only, so ensure your images are saved in this format before uploading. Be cautious with compression settings; aim for high-quality output without excessive file size.
Keywording and Titles: Properly tagging your images with relevant keywords and crafting descriptive titles can significantly increase your visibility. Think like a buyer—what terms would they use to find your photos?
By adhering to these guidelines, you're setting yourself up for success on Depositphotos. Remember, each submission is a chance to showcase your talent, so take the time to understand and follow the rules!
Also Read This: Understanding the Maximum Length of YouTube Videos
4. Preparing Your Photos for Upload
Getting your photos ready for upload to Depositphotos is an exciting step in your journey as a contributor! But before you hit that upload button, there are several important things to consider to ensure your images shine.
Editing and Retouching: Always start with basic editing to enhance your images. Adjust the brightness, contrast, and saturation to make your photos pop. Tools like Adobe Lightroom or Photoshop are great for this. Just make sure you keep edits subtle—over-editing can lead to rejection!
File Naming: Use descriptive, keyword-rich file names. Instead of naming your file "IMG_1234.jpg," try something like "sunset-beach-vacation.jpg" to help with searchability.
Final Checks: Before uploading, double-check your images for any imperfections. Look out for dust spots, unwanted distractions, or any other elements that might detract from the overall quality.
Batch Uploading: If you have several images ready, consider batching your uploads. This can save you time and streamline the process. Just ensure each image meets the guidelines before uploading.
Metadata and Keywords: Prepare a list of keywords and a description for each photo in advance. This will help you quickly fill in the necessary information during the upload process, making it more efficient.
By taking the time to carefully prepare your photos, you're not just increasing the likelihood of acceptance but also enhancing your chances of making sales on Depositphotos. Happy uploading!
Also Read This: How to Embroider by Hand – Simple Techniques for Beginners
5. Step-by-Step Upload Process
Alright, let’s get into the nitty-gritty of uploading your photos to Depositphotos. It's a pretty straightforward process, but having a step-by-step guide can make it even easier. Here’s how you can get your stunning images up on the platform:
- Create an Account: If you haven’t done so already, start by signing up for a contributor account on Depositphotos. You’ll need to provide some basic information like your name, email address, and a password.
- Log In: Once your account is set up, log in to your contributor dashboard. This is where all the magic happens!
- Navigate to the Upload Section: Look for the “Upload” button in your dashboard. It’s usually prominently displayed, making it easy to find.
- Select Your Photos: Click on the “Upload” button, and a file dialog will pop up. Here you can select the photos you want to upload from your computer. You can choose multiple images at once to save time!
- Review Your Uploads: After selecting your photos, you’ll see a preview of each image. Take a moment to ensure everything looks good. If you find any issues, you can easily remove them from the upload queue.
- Hit Upload: Once you’re satisfied, click on the “Upload” button. The platform will start processing your images, so sit back and relax!
- Check Your Status: After the upload, your photos will be in the review queue. Keep an eye on your dashboard for updates on their approval status.
And there you have it! Follow these steps, and you’ll have your photos uploaded in no time. It’s all about making sure your images shine when they hit the Depositphotos marketplace!
Also Read This: How to Effectively Block Companies on LinkedIn for a Cleaner Feed
6. Tagging and Describing Your Photos
Now that your photos are uploaded, it’s time to give them the attention they deserve through tagging and descriptions. This is crucial because it helps potential buyers find your work. Let’s break down how you can effectively tag and describe your photos:
Tagging: When it comes to tagging, think of it as giving breadcrumbs that lead users to your images. Here’s how to do it right:
- Use Relevant Keywords: Choose keywords that accurately represent the content of your photo. For instance, if you uploaded a picture of a sunset over the ocean, tags like “sunset,” “ocean,” and “nature” are appropriate.
- Aim for Variety: Utilize a mix of broad and specific tags. This will help you reach a wider audience while still being relevant.
- Stay Within the Limit: Depositphotos often has a maximum number of tags allowed, so be sure to check that and use the space wisely.
Describing: Your description is equally important. It’s your chance to tell a story or provide context about your image:
- Be Descriptive: Clearly explain what’s happening in the photo. For example, rather than just stating “sunset,” you could say, “A breathtaking sunset over the Pacific Ocean, casting vibrant hues of orange and purple into the sky.”
- Include Emotion: If your photo evokes a feeling, mention that! For example, “This image captures the tranquility and beauty of a serene evening by the beach.”
- Use Proper Grammar: Make sure your descriptions are well-written. Clear, concise language will make your photos more appealing.
By taking the time to tag and describe your photos thoughtfully, you increase your chances of getting noticed by buyers. Remember, the better you present your images, the more likely they are to sell!
Also Read This: Ultimate Guide to Dulhan Makeup with a Bridal Makeup Tutorial
7. Reviewing Your Submissions
Once you've uploaded your photos to Depositphotos, the next crucial step is to review your submissions. This process is vital because it determines whether your images meet the platform's guidelines and quality standards.
After submission, your photos will be evaluated by the Depositphotos review team. They check for various criteria, including:
- Technical Quality: Is the photo sharp and well-exposed? Are there any distracting elements?
- Content Relevance: Does the image fit the needs of potential buyers? Is it unique and appealing?
- Compliance with Guidelines: Are your images adhering to Depositphotos’ submission requirements?
Typically, you'll receive feedback within a few days. If your submission is accepted, congratulations! Your images will be added to the Depositphotos library, and you'll start earning royalties when someone purchases them. If your images are rejected, don't be disheartened. Instead, take the feedback seriously and learn from it. Understand the reasons behind the rejection and consider revising the images or trying different ones next time.
It's also a good practice to periodically review your accepted submissions. Are there any images that aren't selling well? Maybe it's time to replace them with new, fresh content. Keep an eye on trends and adjust your portfolio accordingly!
Also Read This: How to Get a Job with Getty Images and Explore Career Opportunities
8. Tips for Success as a Contributor
Becoming a successful contributor on Depositphotos isn't just about uploading photos; it's about understanding the market, improving your skills, and engaging with the community. Here are some tips to help you thrive:
- Know Your Audience: Research what types of images are in demand. Browse the Depositphotos marketplace to see trending subjects and styles.
- Enhance Your Skills: Invest time in learning photography techniques, editing skills, and composition. The better your images, the higher your chances of acceptance.
- Keyword Wisely: Use relevant keywords when uploading your photos. Think about what potential buyers would search for and include those terms to improve visibility.
- Diversify Your Portfolio: Don’t limit yourself to one genre. Experiment with different styles, subjects, and formats to appeal to a broader audience.
- Stay Updated: Keep an eye on industry trends and seasonal themes. Tailoring your submissions to current events or holidays can boost your sales.
- Engage with the Community: Join forums and social media groups for stock photographers. Sharing experiences, tips, and feedback can help you grow.
By following these tips, you’ll be well on your way to building a successful portfolio on Depositphotos. Remember, persistence is key! Keep creating, learning, and adapting, and you’ll see your efforts pay off.
How to Upload Photos to Depositphotos for New Contributors
Depositphotos is a popular stock photo platform that allows photographers and artists to monetize their work by selling high-quality images. If you're a new contributor looking to upload your photos to Depositphotos, this guide will walk you through the process step-by-step.
Before you start, make sure your images meet the platform's quality standards. Here are some key requirements:
- Resolution: Images must have a minimum resolution of 3 MP.
- File Format: Accepted formats include JPEG and EPS.
- Content: Ensure that your images do not contain any copyrighted material.
Once you've prepared your images, follow these steps to upload them:
- Create an Account: Sign up for a contributor account on the Depositphotos website.
- Log In: Use your credentials to log into your contributor dashboard.
- Navigate to Upload: Click on the "Upload" button found in your dashboard.
- Select Files: Choose the images you want to upload from your computer.
- Add Metadata: Fill in the necessary details such as title, description, and keywords to help users find your images.
- Submit for Review: After uploading, submit your images for quality review by the Depositphotos team.
After submission, you will receive notifications regarding the approval status of your photos. Once approved, your images will be available for purchase on the platform, allowing you to earn money from your creative work.
Conclusion: By following these straightforward steps, new contributors can successfully upload their photos to Depositphotos and start their journey in the world of stock photography.