Making baby hair bands at home is a delightful and creative activity! Not only does it allow you to create personalized accessories for your little ones, but it also gives you the freedom to choose colors, patterns, and styles that suit their personality. Plus, it can be a fun bonding experience as you craft together. In this guide, we’ll walk you through the process of making adorable hair bands that are both comfortable and stylish for babies of all ages.
Materials Needed
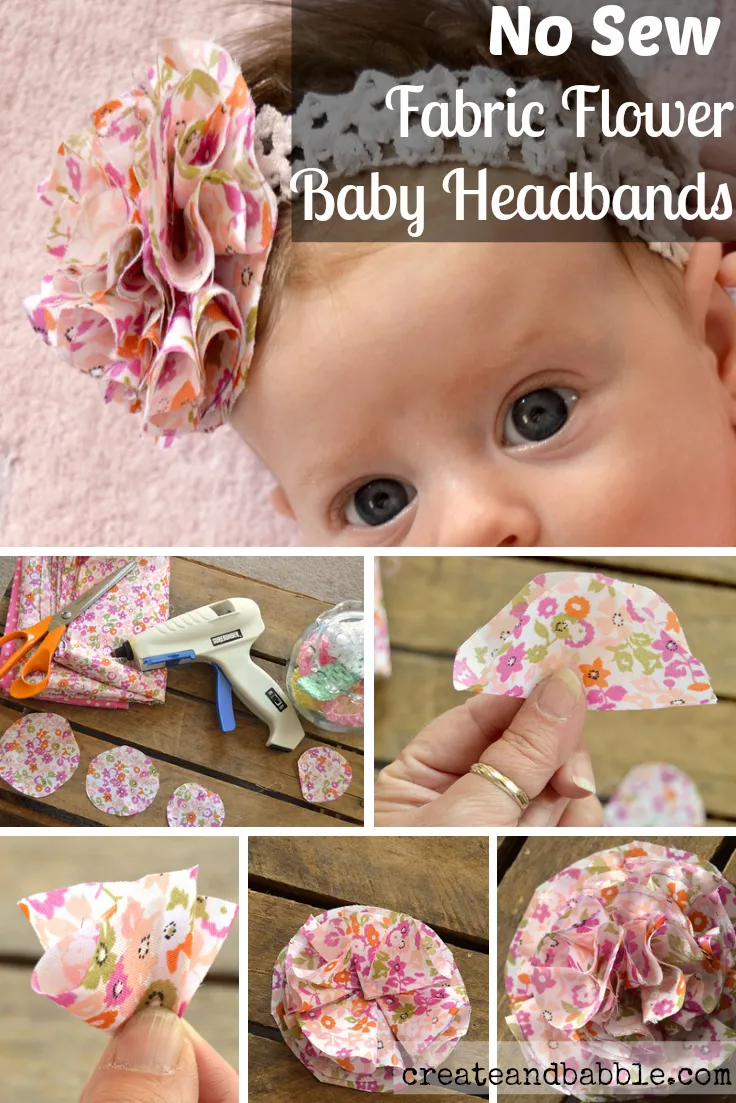
Before you get started on your DIY baby hair bands, gather the following materials. Having everything on hand will make the crafting process smooth and enjoyable.
- Elastic Band: Choose a soft, stretchy elastic that’s comfortable for your baby. A width of about 0.5 inches works well.
- Fabric: You’ll need some cute fabric to cover the elastic. Consider using cotton or jersey knit for comfort. Look for fun patterns or solid colors—your choice!
- Hot Glue Gun: This is essential for attaching fabric to the elastic. Make sure you have glue sticks as well.
- Scissors: A sharp pair will help you cut the fabric and elastic with ease.
- Measuring Tape: You'll want to measure the elastic to ensure a perfect fit for your baby’s head.
- Decorative Embellishments: Optional items like bows, flowers, or buttons can add a special touch to your hair bands.
With these materials ready, you'll be well-equipped to create beautiful baby hair bands that look adorable and feel comfy!
Also Read This: How to Watch Live Stream on Dailymotion
Step-by-Step Instructions
Creating adorable baby hair bands at home is a fun and rewarding project! Follow these simple steps to make your own customized hair accessories:
-
Gather Your Materials:
You'll need:
- Elastic bands (preferably 0.5 inches wide)
- Fabric of your choice (cotton works great)
- Scissors
- Hot glue gun or needle and thread
- Measuring tape
- Optional: embellishments like flowers, beads, or buttons
-
Measure and Cut the Elastic:
Measure the size of your baby's head. A typical measurement for infants is around 14-16 inches. Cut the elastic band to your desired length, adding an inch for overlap.
-
Prepare the Fabric:
Cut a piece of fabric that is about 4 inches wide and 12 inches long. This will be used to create a bow or decorative element for the hair band.
-
Make the Bow:
Fold the fabric in half lengthwise, then sew or glue along the open edge. Turn it inside out, and gather the middle to form a bow. Secure it with a small piece of elastic or thread.
-
Attach the Bow to the Band:
Use hot glue or sew the bow onto the center of the elastic band. Make sure it’s secure!
-
Final Touches:
Feel free to add embellishments to your hair band to make it extra special. Let everything dry completely if you used glue.
And there you have it! A cute, homemade baby hair band ready for your little one.
Also Read This: Fast Forward Videos on Dailymotion Without Losing Quality
Creative Variations
Once you get the hang of making basic baby hair bands, the creative possibilities are endless! Here are some fun variations to try:
-
Fabric Choices:
Experiment with different fabrics. Try using:
- Felt for a cozy feel.
- Denim for a trendy look.
- Sequins or glitter fabric for a touch of sparkle.
-
Patterns and Prints:
Select vibrant patterns like:
- Polka dots
- Floral designs
- Cartoon characters
-
Bow Styles:
Vary the bow styles, such as:
- Classic bow: Simple and elegant.
- Double bow: A larger, more playful option.
- Layered bows: Stack smaller bows for a fun look.
-
Personalization:
Add a personal touch by:
- Embroidering initials or a small design.
- Attaching a charm with your baby’s birthstone.
-
Seasonal Themes:
Design hair bands that celebrate the seasons, like:
- Pastel colors for spring.
- Fall leaves and pumpkins for autumn.
- Snowflakes for winter.
With these creative variations, your baby hair bands will be unique and stylish, perfect for any occasion!
Also Read This: Can I Delete YouTube from My TV and How to Manage Apps
Tips for Making Perfect Hair Bands
Creating baby hair bands at home can be a delightful and rewarding activity, but ensuring they're perfect involves a few handy tips. Here’s how to make your hair bands not just functional but also adorable!
- Choose the Right Materials: Select soft, stretchy materials like cotton or jersey fabric. Avoid anything too rough or stiff that might irritate your baby’s delicate skin.
- Measure Carefully: Use a measuring tape to get the right size for your baby’s head. A typical size for infants is around 14 inches in circumference, but always measure to be sure.
- Use Elastic: Incorporate elastic bands for stretch. This ensures the hair band stays snug without pulling too tightly on your baby’s head.
- Add a Fun Design: Personalize your hair bands with bows, flowers, or even small fabric animals. This adds charm and makes them visually appealing!
- Test for Comfort: After making a band, gently test it on your wrist to check for comfort and fit. Remember, if it feels tight on you, it might be too tight for your baby!
By following these tips, you'll be well on your way to crafting beautiful, comfy hair bands that your little one will love to wear.
Conclusion
Making baby hair bands at home is not only a creative endeavor but also a wonderful way to express your love and style for your little one. By using the right materials, measuring carefully, and adding personal touches, you can create unique accessories that are both practical and adorable.
With the tips shared in this article, you’re equipped to embark on this fun project. Remember, it’s all about experimenting and enjoying the process. Your baby will appreciate the effort, and you’ll cherish the memories of crafting together!
So grab your materials and get started! Soon enough, you’ll have a collection of delightful hair bands that your baby can wear with pride.