Making a star with paper is a delightful and creative activity that can be enjoyed by people of all ages. Whether you’re looking to decorate for a festive occasion, craft with kids, or simply want to explore your artistic side, creating paper stars is both fun and rewarding. In this guide, we’ll walk you through the steps to make stunning paper stars, ensuring you have a great time while unleashing your creativity!
Materials Needed
Before diving into the crafting process, it’s crucial to gather all the necessary materials. Here’s a handy list of what you’ll need:
- Paper: Choose your preferred type of paper. Construction paper, origami paper, or any colorful paper will work well. Aim for different colors to make your stars pop!
- Scissors: A good pair of scissors is essential for cutting your paper into the right shapes.
- Ruler: For measuring and ensuring your cuts are precise.
- Pencil: Use this for marking measurements or drawing designs on the paper before cutting.
- Glue or Tape: To secure the edges of your paper star. You might prefer glue sticks for a cleaner finish.
- Decorative Elements (optional): Glitter, stickers, or markers can be added to personalize your stars!
With these materials, you’ll be well-equipped to start your paper star crafting journey. Remember, the most important ingredient is your enthusiasm and creativity!
Also Read This: Importing Adobe Stock Photos into Photoshop for Seamless Editing
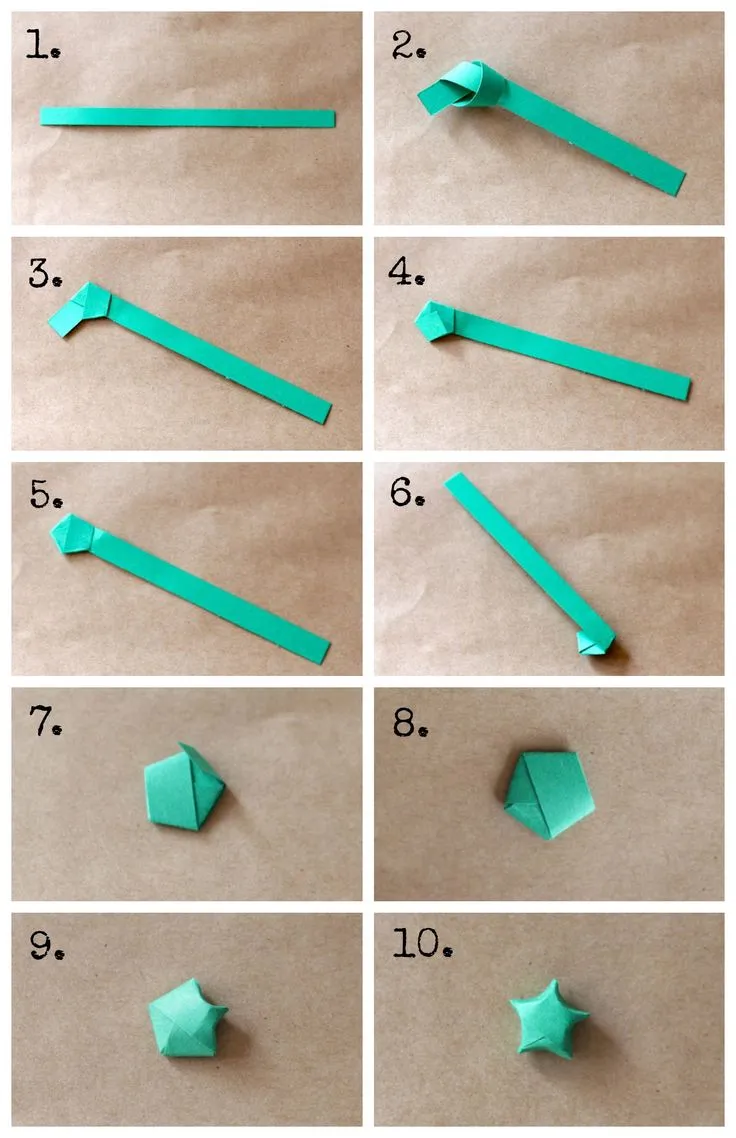
Step-by-Step Instructions
Creating a paper star is a fun and easy project that can brighten up any space! Let's walk through the process together, so you can craft your very own star.
- Gather Your Materials: You will need:
- Colored paper or craft paper
- Scissors
- Glue or tape
- Pencil
And there you have it! Your very own paper star, ready to decorate your space.
Also Read This: How Much Shutterstock Pays Per Photo and What You Need to Know
Tips for Perfecting Your Paper Star
Want to take your paper star-making skills to the next level? Here are some handy tips to ensure your stars are nothing short of spectacular:
- Choose Quality Paper: Use thicker paper for durability and a polished look. Glitter paper can add an extra sparkle!
- Practice Your Folds: Crisp and precise folds will make your star look more professional. A bone folder can help with this.
- Experiment with Sizes: Try varying the size of your squares. Smaller squares yield smaller stars, perfect for garlands!
- Add Personal Touches: Consider painting or drawing patterns on your paper before cutting. This makes each star unique.
- Hang with Style: Use fishing line or decorative string to hang your stars; they’ll look magical when they catch the light!
With these tips in mind, you're all set to create beautiful paper stars that will shine bright in any setting!
Also Read This: How to Remove the Shutterstock Logo from Your Images
Creative Variations of Paper Stars
Making paper stars is a delightful activity that can spark your creativity! Beyond the classic five-pointed star, there are numerous variations you can try. Here are some fun and unique ideas to explore:
- 3D Paper Stars: These stars add depth and dimension to your decor. You can create them by folding and layering pieces of paper, giving a beautiful pop-out effect.
- Origami Stars: Dive into the world of origami and craft intricate stars using techniques that involve precise folding. Origami stars can be both simple or complex, depending on your skill level.
- Twinkling Stars: Enhance your stars with glitter or metallic paper to make them shine! You can even add LED lights to create a magical twinkling effect.
- Star Garlands: Instead of standalone stars, why not string them together? Create a festive garland by linking multiple stars, perfect for parties or holiday decorations.
- Seasonal Themes: Customize your paper stars according to the season. Use autumn colors for fall stars, pastels for spring, and vibrant hues for summer. You can even incorporate holiday motifs, like snowflakes for winter!
With these creative variations, you can take your paper star-making to the next level and impress family and friends with your artistic flair!
Conclusion
In conclusion, making paper stars is not just a simple craft; it’s an opportunity to express your creativity and bring a touch of magic into your space. Whether you're crafting for a special occasion or just for fun, the process can be incredibly rewarding.
Remember, the variations of paper stars are limitless. You can experiment with different sizes, colors, and materials to create something truly unique. Don’t hesitate to involve family or friends in this activity; it’s a wonderful way to bond and share ideas!
So, gather your supplies, let your imagination run wild, and enjoy the art of making paper stars. Happy crafting!