Building a paper house is a delightful and engaging craft project that anyone can enjoy, whether you're an experienced crafter or just getting started. Not only is it a fantastic way to express your creativity, but it also offers a great opportunity to spend quality time with family and friends. In this tutorial, we'll walk you through the step-by-step process of creating your very own paper house. So grab your materials, unleash your imagination, and let’s create something wonderful together!
Materials Needed
To craft your paper house, you'll need a few basic materials. Don’t worry; you probably have most of these items lying around your home. Here's a simple list to get you started:
- Colored Paper: Choose various colors for the walls, roof, and details of your house. Construction paper works well!
- Scissors: A pair of sharp scissors will help you cut out shapes easily.
- Glue or Tape: Use white glue for a strong bond, or double-sided tape for a cleaner finish.
- Pencil: For sketching out your design before cutting.
- Ruler: To measure and create straight lines.
- Markers or Crayons: For adding fun details and decorations.
- Optional: Craft Stickers or Stamps: These can add extra flair to your house.
Here’s a handy table summarizing the materials:
| Material | Purpose |
|---|---|
| Colored Paper | Base for the house structure |
| Scissors | Cutting shapes and pieces |
| Glue or Tape | Assembly of the house |
| Pencil | Design sketching |
| Ruler | Measuring and straight lines |
| Markers or Crayons | Decoration |
| Craft Stickers or Stamps | Additional decoration (optional) |
With these materials in hand, you're ready to dive into the fun world of paper crafting! Let’s get started on building your paper house!
Also Read This: Does a VPN Work with YouTube TV
Step 1: Preparing the Paper
Alright, let’s dive into the first step of our paper house adventure! Preparing your paper is super important, and it’s actually quite fun. Here’s what you need to do:
- Gather Your Materials: You’ll need some sturdy paper. Construction paper works great, but you can also use cardstock if you want your house to be a bit more durable. Grab a pair of scissors, a ruler, a pencil, and some glue or tape.
- Choose Your Colors: Think about what colors you want your house to be. Do you want a classic white house or something vibrant like a blue or yellow cottage? Feel free to mix and match for a more creative touch!
- Size Matters: Decide how big you want your house to be. A good starting point is to cut your base piece around 10 inches by 10 inches. This will give you enough space to create walls and a roof.
- Cutting the Paper: Using your ruler and pencil, measure out your base and walls. For the walls, cut out four rectangles, each about 5 inches tall and 3 inches wide. For the roof, cut out two triangles that are about 5 inches tall and 4 inches wide at the base. This simple shape will give your house that classic look!
And voilà! You’ve prepped your paper, and you’re ready for the next step. Just remember, the more precise you are with your cuts, the better your house will look in the end!
Also Read This: Who is River on YouTube – Understanding the Popular Content Creator's Channel
Step 2: Creating the Base of the House
Now that your paper is all set, let’s build the base of your paper house! This is where the magic happens, and it’s surprisingly simple. Here’s how to get started:
- Lay Out the Base: Take the square piece of paper you cut earlier (10 inches by 10 inches). This will be the foundation of your house. Make sure it’s nice and flat on your working surface.
- Attach the Walls: Grab the four rectangles you cut for the walls. It’s time to glue them onto the edges of the base. Apply glue or tape to the bottom edge of each rectangle and stick them to the base. Make sure they stand upright!
- Secure the Corners: To make your house sturdy, press the corners where the walls meet. You might even want to add a bit of extra glue to the corners to ensure they’re well secured.
- Check Your Work: Stand back and take a look! Make sure everything is aligned and straight. If something seems off, don’t hesitate to adjust it a little. This is your creation after all!
Once the walls are up, you’re well on your way to crafting a delightful little paper house. How exciting is that? Next, we’ll be working on the roof, so keep that creative energy flowing!
Also Read This: Linkedin Top Companies to Grow Your Career
Step 3: Assembling the Walls
Alright, now that you have your walls ready, it’s time to put them together! This part can be super fun because you get to see your paper house taking shape. Here’s how to do it:
- Gather Your Walls: You'll want to make sure you have all four walls ready. Lay them out on a flat surface so you can see what you're working with.
- Choose a Strong Adhesive: Use a glue stick, white school glue, or double-sided tape. If you want a faster option, a hot glue gun could work wonders, but be cautious with it!
- Start with One Wall: Pick one wall to begin with—let's say the back wall. Apply glue along the edge where it will meet the side wall.
- Attach the Side Walls: Hold the side wall against the back wall and press firmly. It’s okay to take a moment to ensure they’re aligned correctly before the glue sets.
- Secure the Remaining Wall: Repeat the process with the other side wall and then attach the front wall. You should now have a box-like structure!
- Reinforce the Corners: To make sure your walls stay sturdy, add a little more glue to the corners and hold for a few seconds. You can even use small strips of paper to reinforce the joints if you feel it’s necessary.
And just like that, you’ve got the basic structure of your paper house. How exciting is that?
Also Read This: Premium Access: Freepik Premium Image Downloader
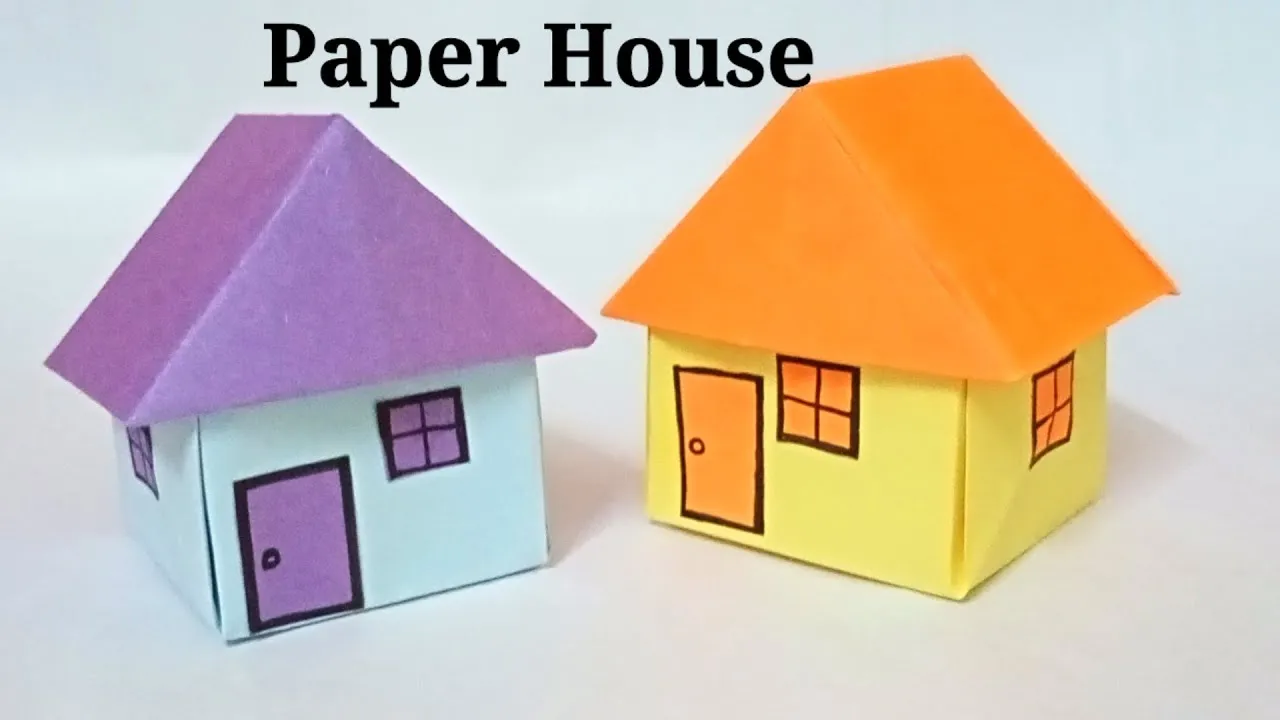
Step 4: Adding the Roof
Now that your walls are standing tall, it's time to give your house a cozy roof! This step is crucial because it adds character and keeps everything together.
- Prepare Your Roof Pieces: Depending on the design you want, you can create a flat roof or a pitched roof. For a pitched roof, cut two triangular pieces and two rectangular pieces that will serve as the roof panels.
- Fold the Roof Panels: If you’re going for a pitched roof, fold the triangular pieces along the center to create a peak. This will give your house that charming sloped look!
- Attach the Roof: Use glue to attach the roof panels to the top of your walls. If you have a pitched roof, glue the triangular pieces to the ends of the rectangular panels. Make sure it’s aligned properly so it looks neat.
- Hold and Secure: Just like with the walls, hold the roof pieces in place for a few seconds to let the glue set. You can even add some paper clips or weights to keep everything secure while it dries.
- Decorate the Roof: This is where you can have some fun! Use colored paper, stickers, or even markers to add shingles or patterns to your roof. Let your creativity shine!
And voila! You’ve successfully added a roof to your paper house. It’s starting to look like a real home now, isn’t it?
Also Read This: Shutterstock Review: Is It Worth Your Investment?
Step 5: Decorating Your Paper House
Now that you have your paper house constructed, it’s time to add some flair and personality to it! Decorating your paper house is where the real fun begins, and it gives you the chance to express your creativity. Here are some easy and exciting ways to decorate your paper house:
- Paint: Grab some watercolor or acrylic paints to add vibrant colors to your house. You can paint the walls, roof, and even add patterns like stripes or polka dots!
- Markers and Crayons: If you prefer a quick coloring method, markers and crayons are great. They dry fast, and you can easily create detailed designs.
- Stickers: Let’s face it—stickers make everything better! Use stickers to add windows, flowers, or even little animals around your house.
- Craft Paper: Use patterned craft paper to cover your roof or create decorative elements like flower pots or curtains. Just glue them on for a 3D effect!
- Glitter: For a magical touch, sprinkle some glitter on your painted areas or use glitter glue to create sparkly details.
Don’t forget to personalize your house! You can even make tiny furniture or little characters to place inside or around your house. This stage is all about having fun and letting your imagination run wild!
Conclusion
So there you have it—a complete step-by-step guide to making your very own paper house! From gathering materials to the final touches of decoration, each step is designed to spark creativity and provide an enjoyable crafting experience.
Remember, the beauty of crafting is that there are no mistakes—only happy accidents! Whether your house turns out simple or extravagant, the most important part is that you had fun creating it. Plus, this project is a wonderful way to spend time with friends or family, fostering togetherness through creativity.
We hope you’re inspired to try your hand at making a paper house. Don’t forget to share your creations with us! Happy crafting!