Have you ever seen a cake that’s not just delicious but also a visual delight? Enter the checkerboard cake! This stunning dessert is perfect for celebrations and is sure to impress your friends and family with its unique pattern and flavors. Imagine slicing into a cake and revealing a beautiful, alternating pattern of chocolate and vanilla layers—it’s not just a treat for the taste buds but also for the eyes!
In this tutorial, we’ll walk you through each step of creating your very own checkerboard cake, from baking the layers to assembling and decorating it. Whether you're a beginner or a seasoned baker, you’ll find tips and tricks to make this fun project easy and enjoyable. So, let’s get ready to unleash your inner baker and create something truly special!
Gathering Your Ingredients

Before diving into the baking process, it’s essential to gather all your ingredients. Having everything on hand will make the process smoother and more enjoyable. Here’s what you’ll need:
- For the Vanilla Cake Layers:
- 2 cups all-purpose flour
- 1 ½ cups granulated sugar
- ½ cup unsalted butter, softened
- 1 cup whole milk
- 3 ½ tsp baking powder
- 1 tsp vanilla extract
- ½ tsp salt
- 4 large eggs
- For the Chocolate Cake Layers:
- 1 ¾ cups all-purpose flour
- 1 ½ cups granulated sugar
- ½ cup unsalted butter, softened
- 1 cup whole milk
- 3 ½ tsp baking powder
- 1 cup unsweetened cocoa powder
- ½ tsp salt
- 4 large eggs
- For the Frosting:
- 1 cup unsalted butter, softened
- 4 cups powdered sugar
- ¼ cup heavy cream
- 1 tsp vanilla extract
- Optional: food coloring for decoration
Make sure to check your pantry for these items before starting. Having everything ready will ensure that your baking experience is as fun and seamless as possible!
Also Read This: Discover the Home of the Binghamton Rumble Ponies
Preparing the Cake Batter
Alright, let’s get our hands a little messy! Preparing the cake batter is a crucial step in making a fabulous checkerboard cake. You’ll want to make sure your ingredients are at room temperature for the best results. Here’s a simple breakdown of what you’ll need:
- 2 cups all-purpose flour
- 1 ½ teaspoons baking powder
- ½ teaspoon salt
- 1 cup unsalted butter, softened
- 2 cups sugar
- 4 large eggs
- 2 teaspoons vanilla extract
- 1 cup milk
- 1 cup cocoa powder (for the chocolate batter)
Now, let’s get to mixing! Start by preheating your oven to 350°F (175°C). In a medium bowl, whisk together the flour, baking powder, and salt. In a separate large bowl, cream the softened butter and sugar until it’s light and fluffy—about 3-5 minutes. Then, add the eggs one at a time, mixing well after each addition. Stir in the vanilla extract.
Next, alternate adding the flour mixture and milk to your butter mixture. Begin and end with the flour mixture. This helps create a smooth batter. Now, divide the batter into two bowls: leave one bowl as is for the vanilla cake and mix cocoa powder into the other bowl to make the chocolate batter. You’re now ready to create some cake magic!
Also Read This: Try Before You Buy: Exploring the Shutterstock Free Trial
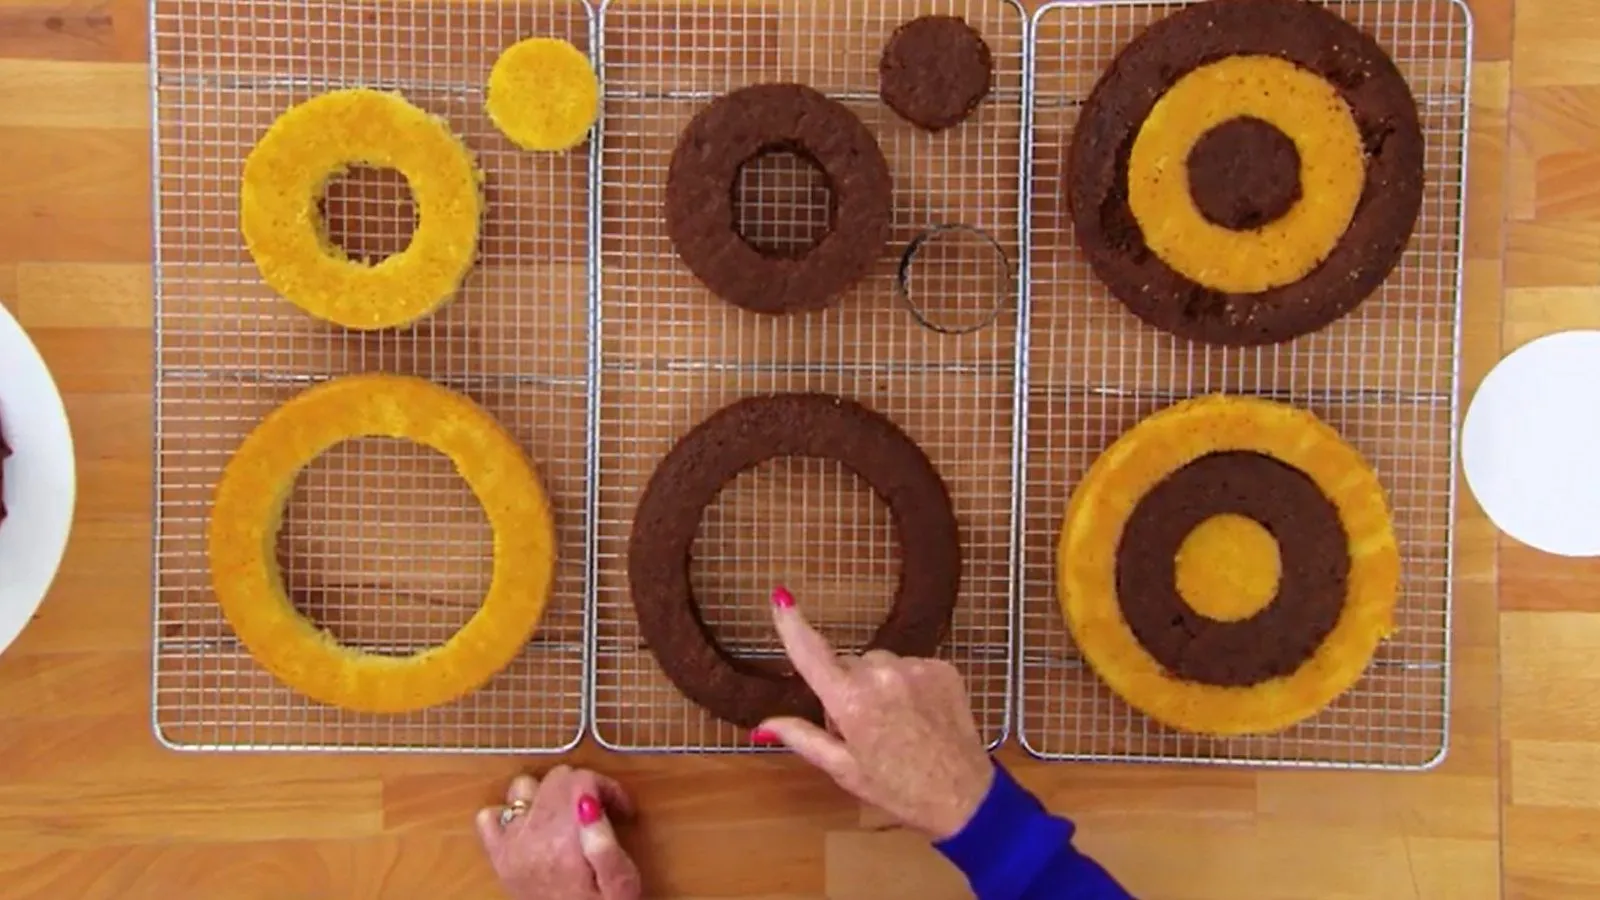
Creating the Checkerboard Pattern
This is where the fun really begins! Creating the checkerboard pattern is not only visually impressive but also surprisingly simple. You’ll need two 9-inch round cake pans for this part. Here’s a step-by-step guide:
- Start by greasing and flouring your cake pans to ensure easy removal.
- Use a measuring cup or a large spoon to drop alternating spoonfuls of vanilla and chocolate batter into the center of each pan.
- For the first layer, place a scoop of vanilla batter, followed by a scoop of chocolate batter right on top. Repeat this to create a circular pattern. Aim for about 3-4 alternating scoops.
- Once you’ve filled both pans, gently tap them on the counter to eliminate any air bubbles.
Now, it’s time to bake! Place the pans in your preheated oven and let them bake for about 25-30 minutes or until a toothpick inserted in the center comes out clean. Once done, allow them to cool completely before removing from the pans. You’ve just created a stunning checkerboard pattern that will wow anyone who gets a slice!
Also Read This: How to Share YouTube Videos on Instagram
Baking the Cake
So, you’ve prepped your batter, and now it's time to bake those lovely layers! Start by preheating your oven to 350°F (175°C). This step is crucial for achieving that perfect rise. While the oven is warming up, grab your two 9-inch round cake pans and grease them generously. You can use butter or cooking spray—whichever you prefer!
Next, pour your prepared batter into the pans. To create that iconic checkerboard look, you'll want to alternate your batters. Here’s how: use a large spoon or a scoop to place a dollop of one color in the center of each pan, then gently add a scoop of the other color around it. Repeat this until the pans are filled about halfway.
Now, it’s time to pop them into the oven! Bake for about 25-30 minutes, but keep an eye on them. You can check for doneness by inserting a toothpick into the center; if it comes out clean, they’re good to go! Once baked, let the cakes cool in the pans for about 10 minutes, then transfer them to wire racks to cool completely. Trust me, the wait will be worth it!
Also Read This: Exploring Exciting Animal Adventures and Valuable Life Lessons on Dailymotion
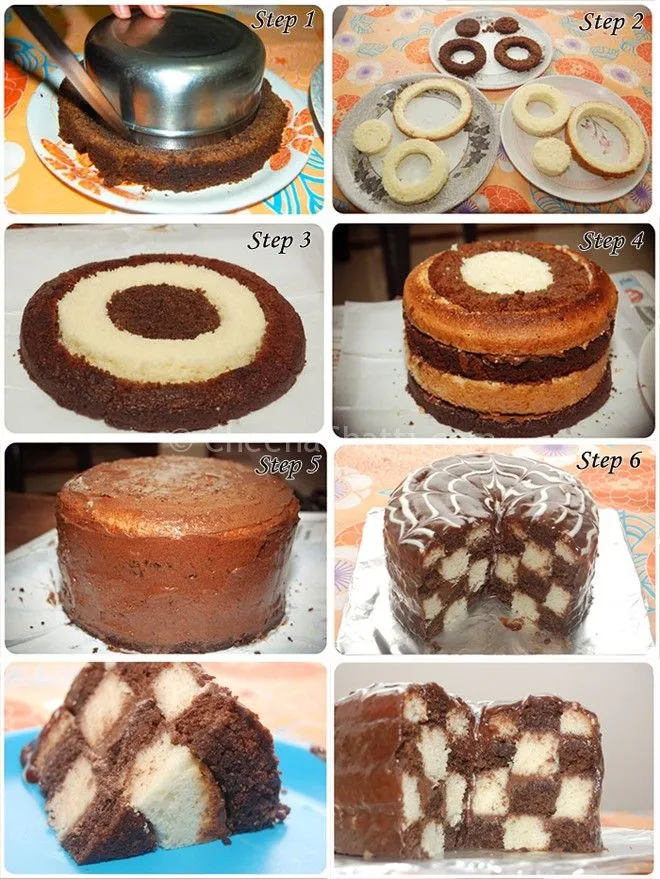
Assembling and Frosting the Cake
Now that your cake layers are cool, it’s assembly time! Start by leveling the tops of your cakes with a serrated knife if they’ve domed. This ensures a nice, even stack. Next, place one layer on your cake stand or serving plate and spread a generous layer of frosting on top. You can use store-bought frosting or whip up your own for a personal touch!
Now, here comes the fun part. Carefully place the second layer on top and gently press down. It’s a good idea to apply a thin layer of frosting around the entire cake, known as a crumb coat. This helps seal in any loose crumbs. After this, chill the cake for about 30 minutes to set the crumb coat.
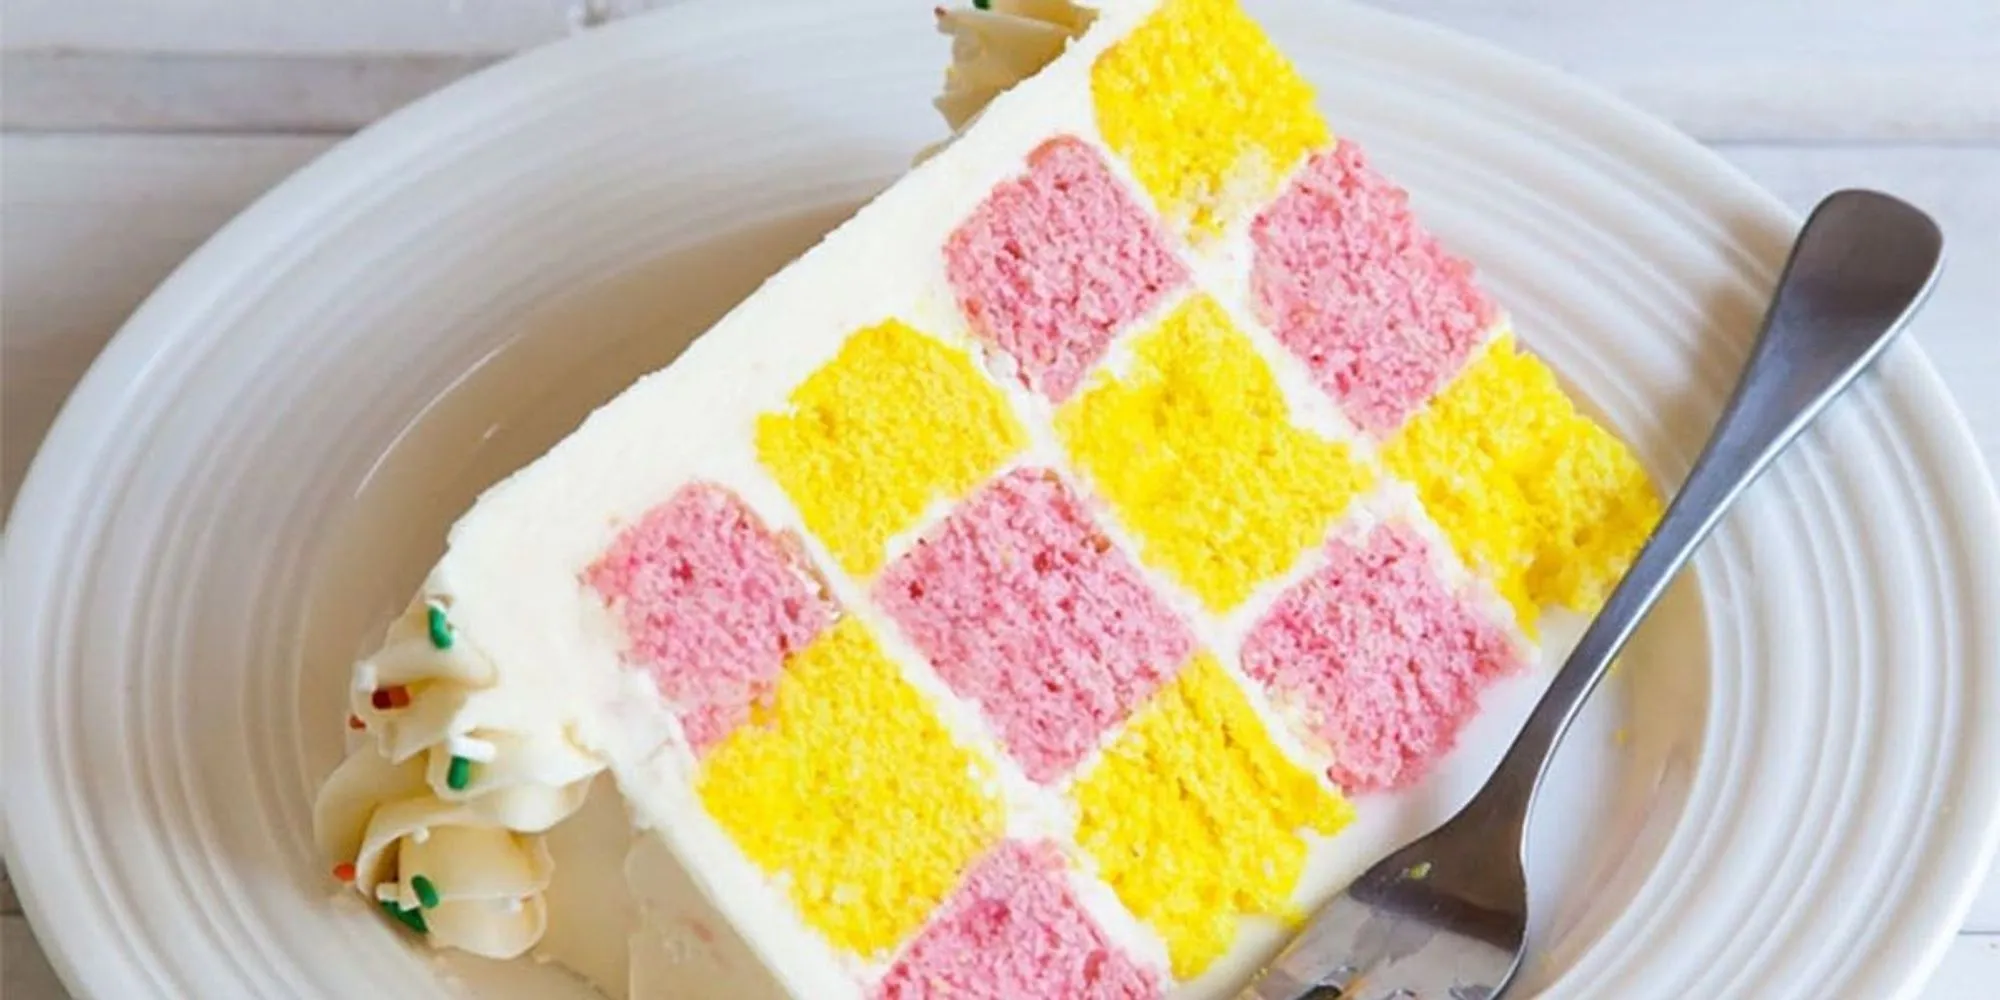
Once chilled, it’s time for the main event! Frost the cake with a thicker layer of your favorite frosting. You can get creative here—try piping designs, adding sprinkles, or even drizzling chocolate. Remember, the presentation matters! To show off that checkerboard pattern, slice a piece to reveal the beautiful layers inside. Enjoy your masterpiece!
Also Read This: Everything You Need to Know About LinkedIn Pulse
Tips for a Perfect Checkerboard Cake
Making a checkerboard cake is a delightful way to impress friends and family, but a few tips can help ensure your cake turns out perfectly every time. Here are some tried-and-true tips to elevate your baking game:
- Use the Right Pans: Invest in a set of checkerboard cake pans or use two round pans of the same size. This will help you get even layers and the perfect checkerboard pattern.
- Chill the Batter: After mixing your batters, let them chill in the refrigerator for about 30 minutes. This will help them hold their shape better when you layer them.
- Measure Carefully: Use a food scale to measure your ingredients. This can make a significant difference in the texture of your cake.
- Use a Toothpick: Before removing the cakes from the oven, insert a toothpick into the center. It should come out clean to ensure your cakes are fully baked.
- Level Your Cakes: Once baked, let the cakes cool completely, then use a serrated knife to level the tops. This ensures that your cake layers stack evenly.
- Experiment with Flavors: Don’t be afraid to mix things up! Try different flavors for each layer, like chocolate and vanilla, or even lemon and lavender.
By following these tips, you'll be well on your way to creating a stunning checkerboard cake that tastes as good as it looks!
Conclusion and Next Steps
Congratulations on completing your checkerboard cake journey! This fun baking project not only results in a visually stunning dessert but also provides a fantastic opportunity to hone your baking skills. Here’s a quick recap and some next steps:
- Share Your Creation: Once your cake is complete, don’t forget to snap some photos! Share them on social media and tag your baking buddies.
- Try New Variations: Now that you’ve mastered the classic checkerboard cake, explore new flavors and fillings. How about a red velvet and cream cheese combo?
- Watch Tutorials: If you’re eager to learn more, check out tutorials on Dailymotion for visual guidance on making unique cakes.
- Host a Baking Party: Invite friends over for a baking party. Everyone can create their own checkerboard cakes, and you can have fun decorating together!
With a little practice and creativity, you’ll become a checkerboard cake pro in no time. Happy baking!