Creating a bun with long hair can be one of the most versatile and stylish hairdos you can master. Whether you're getting ready for a casual day out, a formal event, or just want to keep your hair neatly out of your face, a bun is the perfect solution. In this guide, we'll walk you through the simple steps to achieve a polished bun, along with tips and tricks to make the process seamless and enjoyable. Let’s dive in and get you bun-ready!
Gathering Your Supplies
Before you start styling, it’s essential to gather all the necessary supplies. Having everything within arm's reach will make the process smoother and more enjoyable. Here’s a comprehensive list of what you'll need:
- Hairbrush or Comb: A good brush or comb is vital for detangling your hair and ensuring a smooth finish.
- Hair Ties: Invest in a few strong, elastic hair ties. Depending on your hair's thickness, you might need more than one to secure your bun tightly.
- Bobby Pins: These are lifesavers! They help keep your bun in place, especially if you have layers or shorter strands.
- Hair Spray: A light hold hairspray can help control flyaways and maintain your bun throughout the day.
- Optional Accessories: Consider adding decorative elements like hairbands, clips, or ribbons for a personalized touch.
Once you have gathered these supplies, you’re all set to start creating your bun! Remember, the right tools can make a significant difference in how your final look turns out. So, let’s get ready to style!
Also Read This: Learn to Play the Happy Birthday Tune on Guitar with Dailymotion Assistance
Preparing Your Hair

Before diving into the art of bun-making, it's essential to start with well-prepared hair. The way you prep your locks can make a world of difference in how your bun turns out. Here are some handy tips to ensure your hair is ready for styling:
- Clean and Dry: Begin with freshly washed and completely dry hair. If your hair is too oily or dirty, the bun might not hold properly.
- Brush It Out: Use a wide-tooth comb or a brush to gently detangle any knots. This step is crucial to avoid any bumps in your bun.
- Apply Product: Depending on your hair type, apply a bit of mousse or styling cream for added hold. For those with fine hair, a volumizing spray can work wonders!
- Heat Styling: If you want a sleek look, consider straightening or curling your hair beforehand. This can add texture, making it easier to style.
- Optional: Texturizing Spray: For those with silky or slippery hair, a light texturizing spray can help grip your hair better when forming the bun.
Once you’ve prepped your hair, you’ll be ready to move on to the fun part – creating the perfect bun!
Also Read This: Obtaining 123RF Premium Cookies for Free: How-To
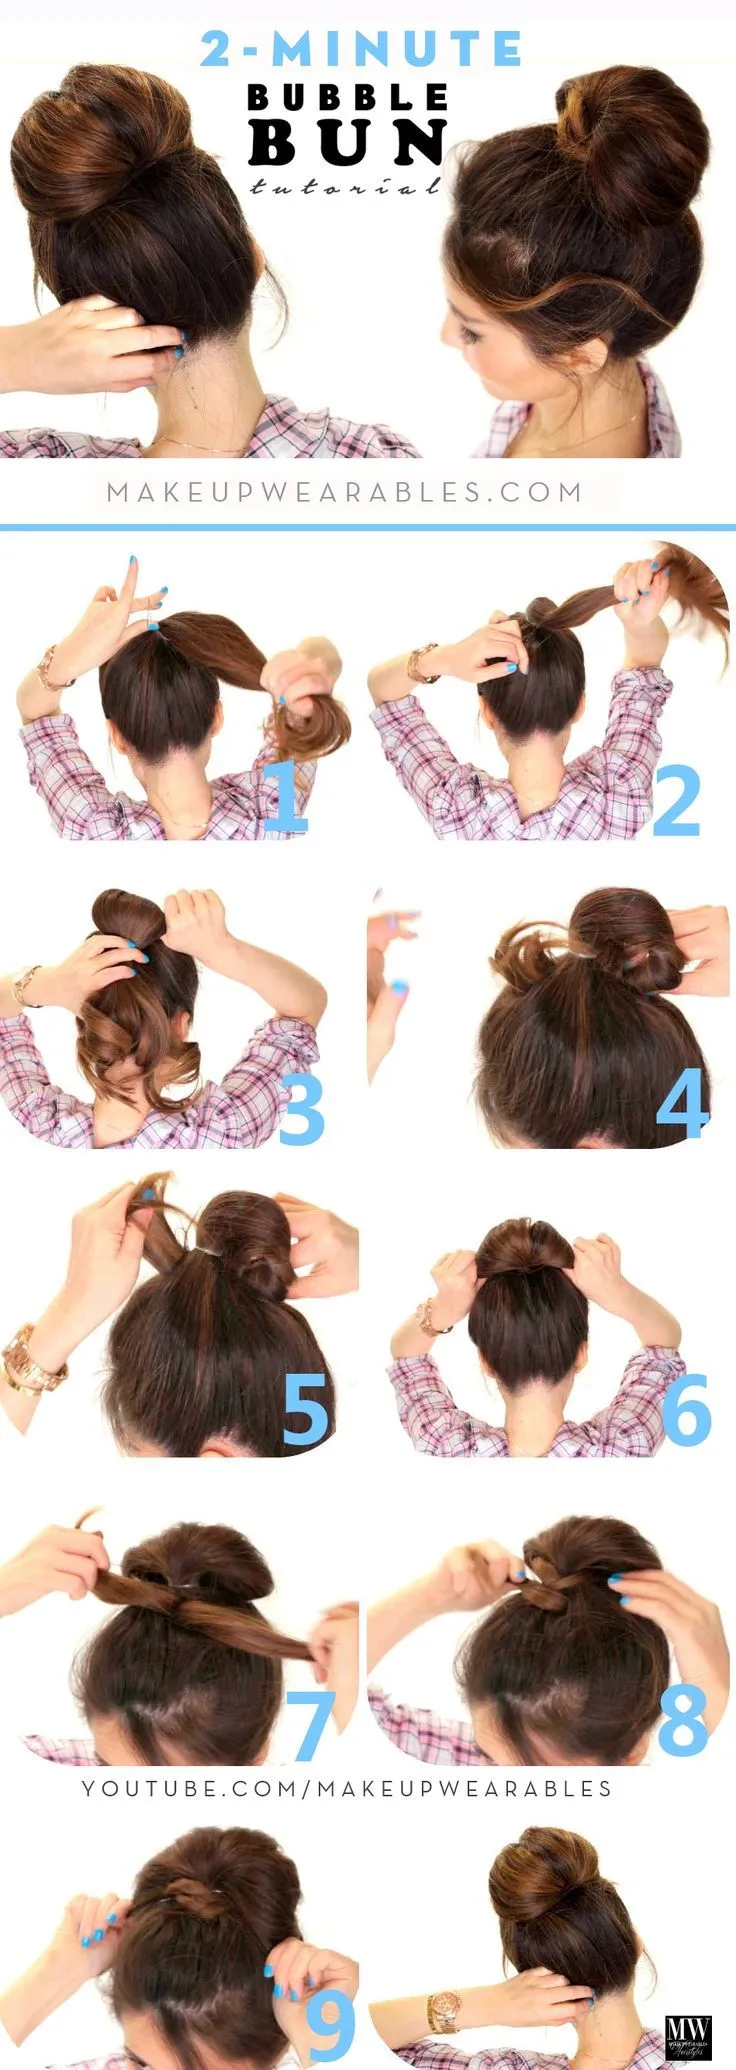
Step-by-Step Guide to Creating a Perfect Bun
Now that your hair is prepped and primed, let's dive into the step-by-step process of creating a beautiful bun. Follow these simple instructions, and you'll have a stunning bun in no time!
- Gather Your Hair: Pull all your hair back into a high or low ponytail, depending on your preference. Use a soft hair tie to secure it.
- Twist the Ponytail: Take your ponytail and twist it around itself. The tighter you twist, the neater your bun will look.
- Wrap It Up: Wrap the twisted ponytail around the base of the ponytail to form a bun shape. Make sure to tuck in the ends securely.
- Secure the Bun: Use bobby pins to secure the bun in place. Make sure to pin it at various angles for the best hold.
- Add Finishing Touches: If you want a polished look, use a light hairspray to hold everything in place. For a looser, more casual bun, gently pull on the edges for a relaxed vibe.
And voilà! You’ve just created a beautiful bun that’s perfect for any occasion. Whether you’re heading to work, a casual outing, or a fancy event, this style is versatile and chic!
Also Read This: Where to Find Your Liked Videos on the YouTube App
5. Styling Tips for a Long-Lasting Bun
Creating a bun that not only looks fabulous but also lasts throughout the day can be a bit of a challenge, especially with long hair. Here are some tried and tested tips to ensure your bun stays put:
- Start with Clean, Dry Hair: For the best results, start with freshly washed and completely dry hair. Dirty or damp hair tends to be more slippery, making it harder for your bun to hold.
- Use the Right Products: Consider using a light mousse or styling gel before you start. This adds texture and grip, helping your bun stay in place longer.
- Opt for Hair Ties that Don't Slip: Invest in good-quality hair ties designed for updos. Avoid those that are too smooth as they tend to slide out easily.
- Tease for Volume: If you want a fuller bun, gently tease the crown of your hair before gathering it into a ponytail. This adds volume and helps your bun look more substantial.
- Secure with Bobby Pins: Once your bun is in place, use bobby pins to secure it. Make sure to insert them in an 'X' pattern for better hold.
- Finish with Hairspray: A light mist of hairspray can lock everything in place. Just be careful not to overdo it; you want your hair to feel natural, not stiff.
With these tips in your back pocket, you’ll be able to rock a bun that lasts from morning meetings to evening outings!
Also Read This: How to Effectively Invite People on LinkedIn
6. Common Mistakes to Avoid
While making a bun may seem straightforward, there are a few common mistakes that can turn a chic hairstyle into a hot mess. Here’s what to watch out for:
- Skipping the Prep: Going straight to styling without prepping your hair can lead to a limp bun. Always start with clean, dry hair and the right products.
- Ignoring Hair Texture: Not all hair types respond the same way to styling techniques. If you have fine hair, you might need more product for hold, while coarse hair may require less.
- Over-tightening: While it’s important for your bun to be secure, making it too tight can lead to discomfort and headaches. Find a balance that feels good.
- Forgetting About Layers: If your hair has layers, make sure to secure shorter strands properly. Leaving them out can create an unkempt look.
- Not Using Enough Pins: A common mistake is underestimating the number of bobby pins you’ll need. Always have extras on hand for touch-ups!
- Neglecting Maintenance: If you plan to wear your bun all day, check in on it periodically. A quick adjustment can make a world of difference.
Avoiding these pitfalls will help you achieve a polished and enduring bun that keeps you looking fabulous all day long!
How to Make a Bun with Long Hair
If you have long hair and are looking for a stylish and practical way to manage it, making a bun is a great option. A bun can be worn in various settings, whether casual, professional, or formal, and can be easily customized to suit your personal style.
Here’s a step-by-step guide to creating a beautiful bun with long hair:
- Gather Your Supplies:
- Hairbrush or comb
- Hair tie (preferably one that matches your hair color)
- Bobby pins
- Hair spray (optional)
- Hair accessories (optional)
- Prepare Your Hair:
Start by brushing your hair to remove any tangles. If your hair is clean and smooth, the bun will have a neater appearance.
- Ponytail Creation:
Gather all your hair at the crown of your head or wherever you prefer your bun to sit. Secure it with a hair tie, making sure it’s tight enough to hold the hair but not so tight that it causes discomfort.
- Twist and Wrap:
Take the ponytail and twist it gently. Once twisted, wrap it around the base of the ponytail to form a bun.
- Secure the Bun:
Use bobby pins to secure the bun in place. Insert them in a crisscross pattern for extra hold.
- Add Finishing Touches:
If desired, use hair spray to keep everything in place and add any hair accessories for a more polished look.
With these simple steps, you can effortlessly create a chic bun that keeps your long hair stylishly managed. Feel free to experiment with different styles, such as a messy bun or a sleek top knot, to find the look that best suits your personality.
Conclusion: Mastering the art of making a bun with long hair not only enhances your style but also offers a practical solution for managing your hair on busy days.