As a photographer you might be looking for ways to streamline the photo delivery process. Personally I rely on Lightroom for editing and ShootProof for sharing images with clients. The real magic happens when you connect the two! It not only saves time and eliminates repetitive tasks but also ensures that our beloved high quality edits are readily accessible to clients. In this guide I'll take you through the steps to seamlessly integrate both platforms and make communication between them a breeze.
Why Connect Lightroom to ShootProof?

Let me share a quick tale with you. In the early days of my journey I would export my pictures from Lightroom by hand and then upload them to ShootProof. It was quite a hassle, to put it mildly. Just picture investing hours refining a collection of photos only to dedicate even more time to a task that seems like it should be done automatically. It was then that I discovered the possibility of connecting Lightroom to ShootProof and it truly revolutionized everything for me.
Here are a few compelling arguments for why you might want to explore the connection between the two.
- Time-saving: No more exporting images to your desktop and then uploading them. Just send them straight from Lightroom to ShootProof.
- Consistency: You ensure that the exact version of the image you see in Lightroom is what your clients will get in ShootProof.
- Efficient Workflow: You can organize galleries directly within Lightroom, making it easy to keep track of your projects.
- Client Satisfaction: Faster delivery means happier clients, and that’s what we all aim for, isn’t it?
Believe me once you link them together, youll question how you ever managed without this arrangement. Its like streamlining your own process by eliminating the intermediary!
Also Read This: Easy and Effective Method to Curl Hair with Foam Rollers
Setting Up ShootProof Integration in Lightroom
Now that you understand the importance of this connection lets dive into the setup process. Its easier than you might imagine. I had my doubts too initially but after going through it I discovered just how user friendly it is.
Here’s a detailed walkthrough on how to connect Lightroom with ShootProof:
- Install the ShootProof Plugin: Start by heading to the ShootProof website and downloading the Lightroom plugin. You’ll find it under the 'Integrations' section. Once downloaded, install it in Lightroom through the Plugin Manager.
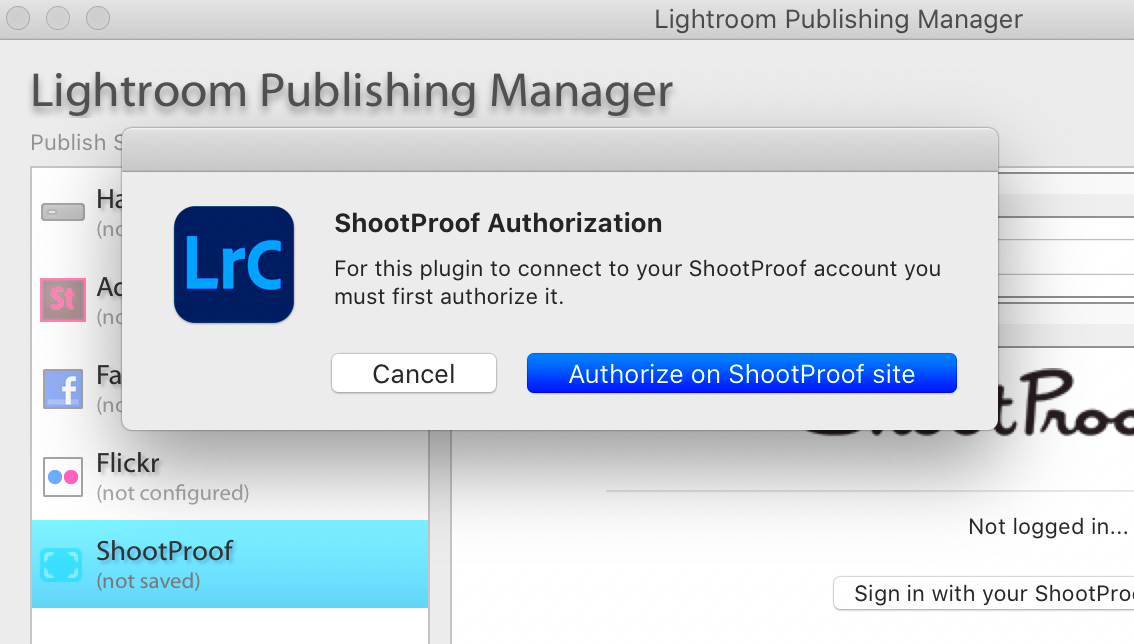
- Connect Your ShootProof Account: Open Lightroom, go to 'File' and then 'Plugin Manager.' Find the ShootProof plugin and click 'Add.' You’ll need to log in with your ShootProof credentials to complete the connection.
- Set Preferences: After linking, configure your export settings in Lightroom. Choose your preferred resolution, watermark options, and folder structures for organizing galleries. It’s these small tweaks that make all the difference in maintaining your workflow.
- Test the Integration: Once everything is set, test the integration by exporting a few images to ShootProof. If they appear there seamlessly, congratulations—you’ve successfully linked the two platforms!
I can still recall the moment I managed to sort my ShootProof galleries directly from Lightroom it was as if I had discovered a boost in efficiency. Nowadays I can't fathom approaching my work differently.
Also Read This: Canva Image Framing
How to Export Photos from Lightroom to ShootProof

Okay, after connecting Lightroom and ShootProof the next step is to effortlessly transfer your stunning edited images from Lightroom to ShootProof. I can still recall the moment I discovered this process it felt like I had unlocked the secret to working smarter not harder. Its quite straightforward but I continue to be pleasantly surprised by how seamless it is each time I do it.
Here’s how to do it:
- Select Your Images: Start by selecting the photos you’ve finished editing. You can either select individual photos or an entire collection.
- Open the Export Dialog: Once your images are selected, go to 'File' in the top menu and click on 'Export.' This will open up the export settings window.
- Choose ShootProof as the Destination: In the export settings, you’ll see an option for 'ShootProof.' Select this as your destination. It might feel odd at first because we’re so used to exporting to folders, but trust me, this is where the magic begins.
- Configure Export Settings: Lightroom will now ask you for your gallery and album preferences in ShootProof. Choose where you want the images to go—whether it’s an existing gallery or a new one.
- Hit Export: After you’ve configured your settings, just hit that export button. Lightroom will work its behind-the-scenes magic, and in no time, your photos will be sitting pretty in ShootProof, ready for client viewing.
It’s just as seamless as it sounds. Every time I use this method to export, I can’t help but feel like I’ve saved myself a ton of time. And the cherry on top? Your clients get to view the images faster which is always a plus!
Also Read This: How to Download a Clip from a YouTube Video
Customizing Export Settings for ShootProof
Tinkering with export settings might seem a bit complicated but it’s the key to ensuring everything appears perfect. Back when I began I didn’t pay much attention to these settings yet now they’ve turned into my special touch for presenting photos without having to do any extra work post editing.
When tailoring your export settings pay attention to the following aspects
- Resolution: You can decide whether you want high-res images for printing or smaller, web-friendly versions. I usually go with high-res for client downloads and low-res for previews. It’s about knowing what works for each situation.
- Watermarking: I’ve made it a habit to add my signature watermark for preview galleries. In Lightroom, you can customize this and ensure it’s consistent across your uploads. Watermarking protects your work, and let’s be honest, a little branding never hurt!
- Metadata: Decide whether you want to include camera info or location data in your export. For some shoots, this is helpful, especially if your clients are photographers or media outlets.
- File Naming: Lightroom lets you rename files during the export process. I always recommend using a custom naming system like ClientName_Date_Session. It makes things easier to track, especially when you’re dealing with a lot of images.
These small tweaks really impact the outcome. They guarantee that your photos not only appear their but are also safeguarded and convenient to handle once they’re uploaded to ShootProof. Whenever I export using my personalized preferences I feel confident that I’m showcasing my work.
Also Read This: How to Download YouTube Videos to Your iPhone Camera Roll
Organizing Your ShootProof Galleries from Lightroom
As photographers we understand that staying organized is crucial to our success. When I began managing my ShootProof galleries straight from Lightroom everything became so much smoother. In the past I would upload photos to ShootProof and then painstakingly set up albums and galleries which was a process. However now I handle all the organization within Lightroom itself saving me a ton of trouble.
Here’s how I do it:
- Create a Collection in Lightroom: Before you export, I recommend creating a collection for your shoot. This keeps things tidy, especially when you're working with hundreds of photos. Lightroom collections translate directly into ShootProof galleries, which is super convenient.
- Organize by Event or Client: For example, if I’m doing a wedding, I’ll create a 'Wedding Collection' in Lightroom and divide it by categories like Ceremony, Reception, or Portraits. Once uploaded, ShootProof will automatically mirror this organization. No need to redo anything!
- Set Tags and Flags: Lightroom allows you to add tags and flags, which are then carried over into ShootProof. I use flags for 'client favorites' or 'preview selections.' This way, the client can quickly find what’s important, and I don’t have to manually create these categories later on.
- Edit and Update Galleries: Here’s the beauty of it—you can make updates to your gallery directly from Lightroom. If you’ve edited a few more images, you don’t need to go back and forth between platforms. Just hit 'Export' again, and Lightroom will automatically update the ShootProof gallery.
To be frank this system has had an impact on me. It has helped me save hours and more importantly it has provided me with the reassurance that my galleries are consistently organized. Additionally clients appreciate the tidy and polished appearance of galleries that are well arranged enhancing their overall viewing experience.
- Q: Can I export videos from Lightroom to ShootProof?
A: Unfortunately, Lightroom’s integration with ShootProof is currently limited to photos only. If you have videos to share, you’ll need to upload them manually through ShootProof. - Q: How many images can I export at once?
A: There isn’t a strict limit, but exporting large numbers of high-res images can take longer depending on your system’s performance and internet speed. I once exported over 500 images in one go, but I always recommend breaking them up into smaller batches for smoother processing. - Q: What if I need to delete an image from ShootProof after exporting?
A: You can always delete an image directly from ShootProof without affecting your Lightroom catalog. If you re-export the gallery, the deleted image will not be re-added unless you select it again in Lightroom. - Q: Do watermarks transfer over when exporting?
A: Yes, any watermark you apply in Lightroom will carry over when you export to ShootProof. I love this feature because it saves me from having to reapply watermarks after uploading.
Final Thoughts on Using Lightroom with ShootProof
Connecting Lightroom with ShootProof has truly transformed my approach to managing client galleries. Prior to discovering this integration I used to upload photos by hand and it could be quite a tedious chore after a day of editing. Now I find it incredibly convenient that everything syncs effortlessly with just a few clicks. This streamlined process has not only boosted my efficiency but also freed up more time for me to focus on the creative side of photography instead of getting caught up in details. I frequently recommend this setup to fellow photographers because once you experience that seamless workflow it's challenging to revert back.
If you’re hesitating to use this integration I recommend giving it a shot. I know how it feels to be unsure about its impact but believe me the time you save justifies the slight learning curve. Moreover ShootProofs features work seamlessly with Lightroom enabling you to not only edit and export but also effortlessly manage client galleries.
Ultimately, it comes down to streamlining your workflow. The more we focus on the nitty gritty details, the more time we can dedicate to perfecting our craft. Personally, I find that using Lightroom and ShootProof together has transformed my approach and I believe it will do the same for others as well.