Your Behance feed serves as an exhibition of your creativity rather than simply a compilation of your work. I recall the anticipation and uncertainty I felt when setting up my Behance account for the first time regarding how to showcase my projects. It didn't take me long to realize that the way you organize your feed can greatly influence how others view your talents and artistic flair.
When potential clients or partners check out your social media profile they should get a glimpse of your identity as a creative. Its a chance to share a narrative not only through your creations but also in how you showcase them. A thoughtfully arranged profile captures viewers attention keeps them interested and motivates them to delve deeper into your portfolio. Keep in mind that impressions count and your profile is frequently the initial thing people notice. By focusing on the aesthetics of your feed you're not merely highlighting your work but also establishing your personal brand.
Getting Started with Editing Your Behance Feed
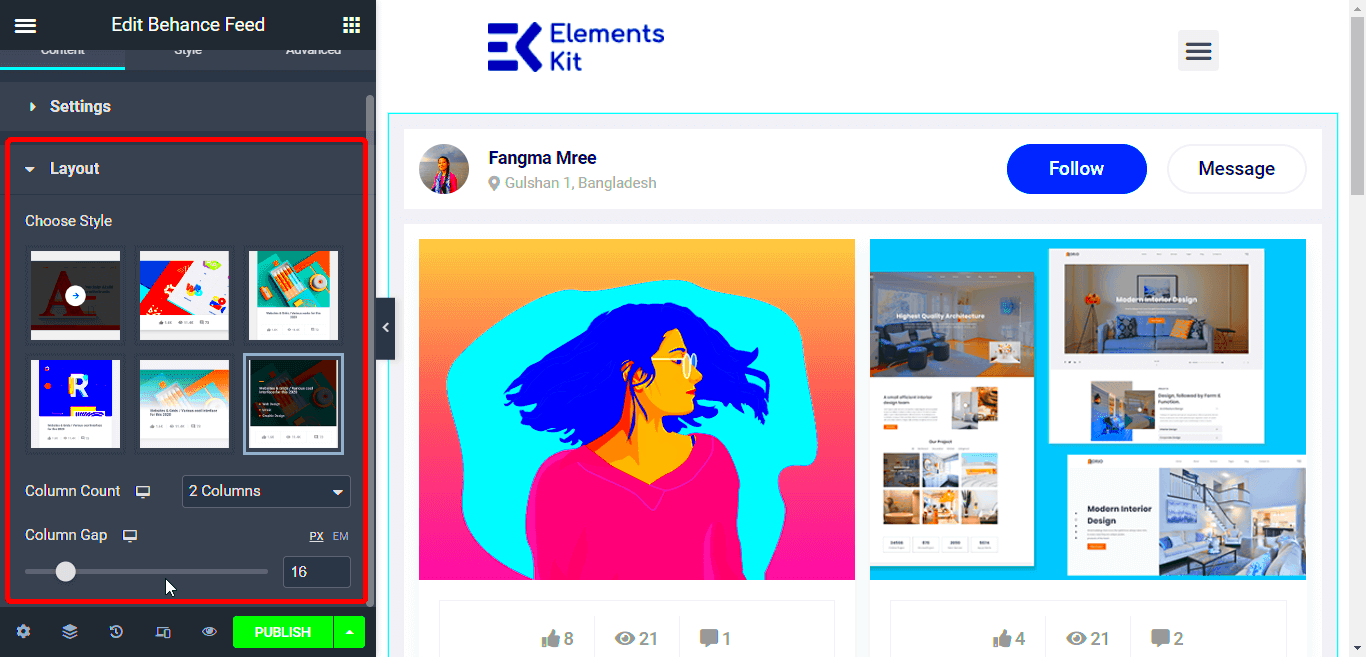
Revamping your Behance feed could seem daunting initially but if you break it down into steps you can actually find the process quite enjoyable. Begin by signing in to your account and heading over to your profile. This is where the fun starts.
- Review Your Existing Projects: Take some time to look at your current projects. Which ones resonate with you the most? Which pieces do you think show your best work? It’s all about showcasing the right projects.
- Plan Your Layout: Think about the overall layout of your feed. Consider how you want to arrange your projects. A well-thought-out arrangement can guide your viewers through your creative journey.
- Update Your Project Thumbnails: Thumbnails are the first things people see. Make sure they are eye-catching and representative of your work. A good thumbnail can significantly increase clicks on your projects.
- Check Your Privacy Settings: Before publishing, make sure your settings are appropriate for what you want to share. Decide if you want your projects to be public or private.
Curating your feed should be an experience. Its an opportunity to look back on how you have evolved as a creator. Every adjustment you make brings you closer to showcasing your true self to others.
Also Read This: Getting more appreciations on Behance
How to Customize Your Projects for Better Presentation
Personalizing your projects is the perfect opportunity to showcase your creative flair. Its not merely about adding pictures but rather crafting a unique experience for your viewers. I discovered this lesson through my initial project release which I approached without much consideration. The outcome was lackluster and devoid of character failing to capture my true essence.
Here are a few suggestions to assist you in tailoring your projects to suit your needs.
- Use High-Quality Images: Always upload high-resolution images. The quality of your visuals speaks volumes about your professionalism.
- Write Engaging Descriptions: Tell the story behind your project. What inspired you? What challenges did you face? Personal anecdotes can add depth to your work.
- Incorporate Process Shots: Showing your process can engage viewers. Include behind-the-scenes images that highlight your techniques and thought process.
- Choose the Right Tags: Tags help categorize your projects and make them more discoverable. Use relevant keywords that reflect the essence of your work.
- Engage with Your Audience: Encourage viewers to leave comments or ask questions. Interaction can lead to valuable feedback and connections.
Keep in mind that tailoring your projects is all about showcasing your work in a manner that strikes a chord with both you and your viewers. Its an opportunity to reflect your uniqueness and inventiveness. So take it slow, try out different ideas and feel free to reveal your authentic self through what you create.
Also Read This: Importing Music from YouTube into Premiere Pro
Tips for Organizing Your Work Effectively
When I began using Behance I discovered that being organized is crucial for showcasing my work effectively. I recall dedicating time to go through numerous projects to decide what to highlight. It was a bit daunting, akin to wandering aimlessly in a maze without a guide. As time went on I realized that having a structured profile can significantly impact how others view your artistic path.
Here are some helpful suggestions to assist you in getting your tasks in order.
- Group Similar Projects: Consider creating collections of related work. For instance, if you’re a graphic designer, you could group branding projects together and separate illustration pieces. This makes it easier for viewers to find what they’re interested in.
- Use Descriptive Titles: Choose project titles that clearly describe your work. A good title can spark curiosity and encourage viewers to click through.
- Create a Visual Flow: Think about the order in which you want your projects to appear. Start with your strongest work to grab attention and follow up with a variety of projects that showcase your range.
- Regularly Update Your Feed: Don’t let your feed stagnate. Update it with new work and refresh older projects to keep everything current and reflective of your latest skills.
- Get Feedback from Peers: Sometimes, we’re too close to our work to see it objectively. Ask fellow creatives for their input on your organization. Their fresh perspective can provide valuable insights.
In the end, tidying up your work goes beyond looking good; it’s about leading your viewers on a seamless and captivating path through your artistic process.
Also Read This: Can I Add My NBA League Pass to YouTube TV and Watch My Games
Using Tags and Categories to Enhance Visibility
While tags and categories may appear to be trivial aspects they hold great importance in determining the visibility of your creations on Behance. When I began tagging my projects I had no idea of the impact these small words could have. I recall sharing a project without any tags and it felt like echoing in an empty space—my work got buried among a sea of others. Discovering the art of using tags, was a turning point for me.
Here are some suggestions for utilizing tags and categories to boost your visibility.
- Be Specific: Use tags that accurately describe your project. Instead of just “design,” consider “branding design” or “poster design.” The more specific, the better.
- Research Popular Tags: Explore Behance to see which tags are trending in your field. Incorporating popular tags can increase your chances of being discovered.
- Limit Your Tags: While it’s tempting to use as many tags as possible, quality over quantity matters. Aim for 5 to 10 relevant tags that encapsulate your work.
- Consistent Categories: If you have a mix of work—like photography, graphic design, and illustration—consider using consistent categories across your projects. This helps maintain a cohesive look.
- Update Tags as Needed: As your style evolves, revisit your older projects and update tags to reflect your current work better.
When you use tags and categories carefully, you're not only boosting your presence but also helping people to resonate with your distinct flair and perspective.
Also Read This: How to Add a Divider in Behance
Making the Most of Your Profile Settings
Your Behance profile serves as a card in the digital realm giving potential clients and collaborators their initial glimpse of you. I remember when I rushed to create mine only to discover later that I hadn't revealed much about who I am. It felt lacking as if I had overlooked introducing myself in a way. With time I came to understand that investing effort in polishing your profile settings can lead to prospects.
Here’s a guide on how to optimize your profile settings for maximum benefit.
- Add a Professional Profile Picture: Choose a clear, friendly photo that reflects your personality. A smiling face makes your profile approachable and relatable.
- Write a Compelling Bio: Your bio should tell your story. Highlight your skills, experience, and what inspires you as a creative. Keep it concise but informative.
- Include Links to Your Other Work: If you have a personal website or social media profiles, link them in your bio. This allows viewers to explore more of your work and connect with you.
- Set Your Availability: If you’re open to freelance work or collaborations, let people know. Update your profile regularly to reflect your current status.
- Privacy Settings Matter: Review your privacy settings to ensure you’re sharing what you want. Decide what parts of your profile are public and what can remain private.
When you take the time to personalize your profile settings, you’re not simply displaying your creations; you’re encouraging people to connect with your artistic path. Keep in mind that your profile serves as a mirror of who you are, so make sure it leaves a lasting impression!
Also Read This: Making Money on Dailymotion for Content Creators
Engaging with Your Audience through Comments and Feedback
Interacting with your audience on Behance plays a role in nurturing your creative community. I distinctly remember the excitement and nerves I felt when I received my first comment on a project. It was a validating moment that someone recognized and valued my work. However that initial excitement soon gave way to the realization of the importance of sustaining that connection.
By interacting with your audience you not only foster connections but also create avenues for fresh possibilities. Here are a few strategies to engage with your audience more effectively.
- Respond Promptly: When someone comments on your work, make it a habit to reply as soon as you can. A simple “Thank you” or “I appreciate your thoughts” goes a long way in showing that you value their input.
- Encourage Discussion: Ask open-ended questions in your project descriptions to invite feedback. For example, “What do you think about the color choices?” This can lead to a lively discussion and shows you’re open to different perspectives.
- Show Appreciation: If someone provides constructive criticism, thank them for their insights. You don’t have to agree with everything, but acknowledging their opinion can foster a positive environment.
- Share Other Creatives’ Work: Don’t just focus on your own projects. Engage with others by commenting on their work and sharing it with your network. This creates a sense of community.
- Host Q&A Sessions: If you feel comfortable, consider hosting a Q&A session in your comments section. This allows your audience to ask questions directly and makes you more approachable.
Engagement goes both ways. When you join in discussions you enhance not your own experience but also that of your listeners. Keep in mind that each remark presents a chance to establish a connection!
Also Read This: Understanding Why Scammers Favor Telegram for Their Schemes
Frequently Asked Questions about Editing Your Behance Feed
When it comes to curating your Behance profile there are a few things to consider especially if you’re just starting out. I recall feeling overwhelmed by the array of options and configurations unsure about the purpose of each feature and how to showcase my projects in the best light. Here are some frequently asked questions that could assist you in maneuvering through this journey.
- How do I add new projects? To add a new project, log into your account and click on the “Create a Project” button. Follow the prompts to upload images, write descriptions, and customize your settings.
- Can I rearrange my projects? Yes, you can! Simply drag and drop your projects in the order you prefer within your profile. This allows you to showcase your best work upfront.
- What should I include in my project description? A good project description should include the inspiration behind the work, the process, and any challenges you faced. It adds depth and context to your visuals.
- How can I improve my visibility on Behance? Use relevant tags, share your projects on social media, and engage with other users. The more active you are, the more likely your work will be seen.
- Is it possible to edit a project after it's published? Absolutely! You can go back and edit any project by clicking on the “Edit” button. This is useful for making updates or correcting details.
Check out these commonly asked questions to gain clarity on how to edit your Behance feed. Keep in mind that each inquiry presents a chance for personal development and knowledge expansion!
Wrapping Up Your Behance Feed Editing Journey
As you wrap up the editing process for your Behance feed take a moment to appreciate your accomplishments. I can still recall the sense of fulfillment I experienced when I was able to arrange my feed just as I envisioned it. It felt akin to completing a puzzle where every piece seamlessly fit together. Your feed serves as a mirror, of your artistic journey highlighting your evolution and unique flair.
Here are a few final thoughts to consider:
- Celebrate Your Progress: Look back at your earlier projects and appreciate how far you’ve come. Every artist has a unique journey, and it’s essential to acknowledge your growth.
- Stay Open to Change: Your style will evolve, and so should your feed. Regularly revisit and update your projects to reflect your current skills and interests.
- Keep Engaging: The editing process doesn’t stop here. Continue to engage with your audience and the creative community. The connections you build will enrich your experience.
- Seek Inspiration: Never stop exploring. Look at other artists’ feeds for inspiration and ideas. It can reignite your creativity and motivate you to try new things.
- Enjoy the Journey: Remember that your creative journey is unique to you. Enjoy the process of sharing your work and connecting with others.
Finishing up your editing process marks the start of fresh possibilities. Embrace the thrill and continue pushing the limits of your creativity. Your Behance profile serves as a platform for showcasing your artistry so let it shine with color!