In the early days of my photography adventure I didn't think much about using a proper invoice template. I would just write everything down in a notebook assuming that would suffice. But I soon came to understand that a meticulously designed invoice not showcases professionalism but also smoothens out the payment process. Clients value transparency and a well crafted invoice simplifies their comprehension of the services provided.
Using a template can be a real time and energy saver, especially when juggling multiple clients. It helps maintain consistency in your invoices reinforcing your brand image. Plus it gives you more room to channel your creativity without getting caught up in the nitty gritty of paperwork.
In addition in this era, a carefully crafted invoice can boost your image. It reflects your commitment to your work and appreciation for your customers. After all, impressions count and an invoice is often the initial interaction that shapes your clients perception of you.
Steps to Create Your Invoice Template in ShootProof
Making an invoice template in ShootProof is a simple task that can be done by following these easy steps.
- Log into your ShootProof account and navigate to the invoicing section.
- Click on the option to create a new invoice template.
- Choose a layout that suits your style, whether it's minimalistic or detailed.
- Input your business information, including your logo, name, and contact details.
- Add relevant fields such as client information, services rendered, and payment terms.
- Save the template, and it’s ready to be used for future invoices.
I still vividly recall the moment I crafted my very own invoice template. It was such a feeling to possess a piece of paper that showcased my brand identity. And let me tell you the rush of satisfaction I experienced when I submitted my initial formal invoice to a client was absolutely thrilling!
Also Read This: Understanding Dailymotion as a Video Sharing Platform
Customizing Your Template for Unique Branding
Your invoice format ought to showcase the essence of your brand. Tailoring it not only contributes to establishing a distinct image but also adds a touch to your invoices. Here are some suggestions on how you can make your invoice template more personal.
- Logo and Colors: Incorporate your logo and use colors that represent your brand.
- Fonts: Choose fonts that align with your style. A creative font can add a personal touch.
- Brand Message: Include a short tagline or message that reflects your business philosophy.
For example I made the choice to include a touch note at the end of my invoices expressing my gratitude to clients for their support. It helps establish a bond and shows that they are appreciated.
Make sure your template stays polished and user friendly. An overcrowded layout can confuse clients, so it's important to strike a balance between visual appeal and clear communication. With time you'll come to realize that a meticulously branded invoice plays a role in shaping your business identity.
Also Read This: Best Adobe Stock Downloader Tools: Enhancing Your Image Acquisition Process
Adding Items and Pricing to Your Invoice
As a photographer I pay attention to every detail when it comes to billing my clients. I had an epiphany about this when a client expressed their appreciation for the transparency in my pricing. It dawned on me that providing a breakdown of services and their corresponding costs not only helps clients understand what they are paying for but also fosters trust.
When including products and their costs on your bill keep the following points in mind
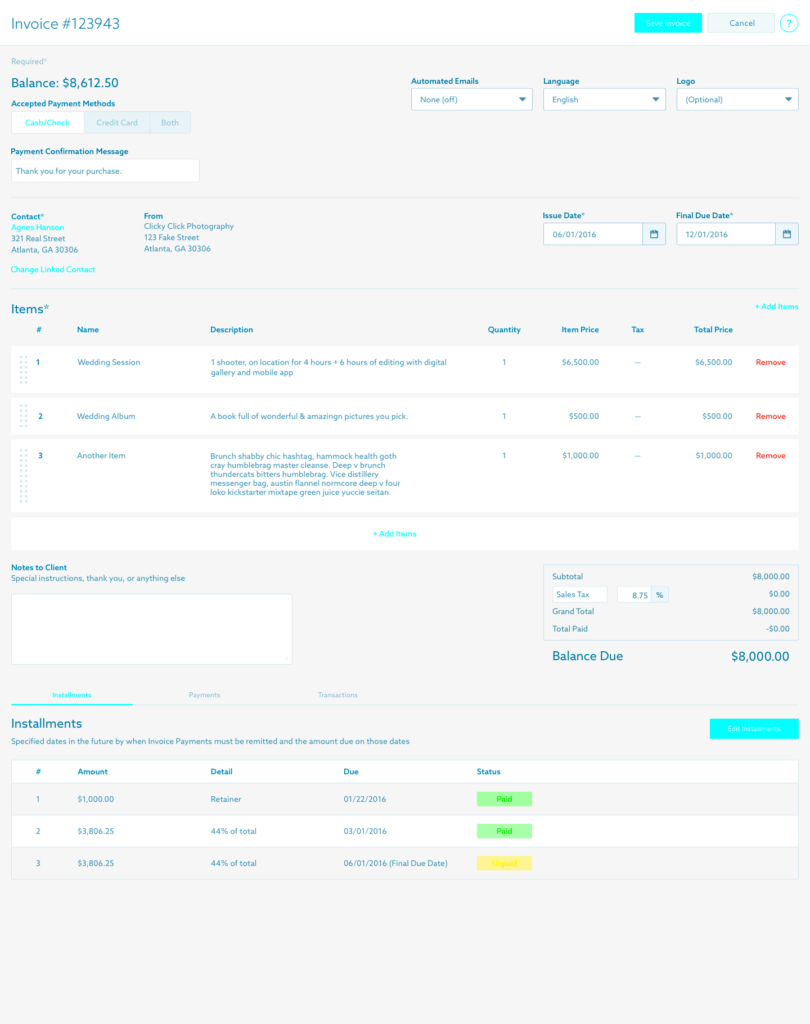
- Item Descriptions: Provide clear descriptions for each service or product. Instead of just listing "Wedding Shoot," you might say "Full-Day Wedding Photography Package." This helps clients understand exactly what they are receiving.
- Pricing: Be transparent about your pricing. If there are any additional costs, like travel fees or prints, make sure to list them separately. Clients appreciate knowing where their money is going.
- Discounts: If you offer any discounts, clearly state them on the invoice. A line like "10% Discount for Early Payment" can encourage timely payments.
From what I have seen adding a personal touch such as a note expressing gratitude to the client for their support can really make an impact. It transforms a regular invoice into something unique and unforgettable.
Also Read This: Creating a Stunning French Braid Tutorial on Dailymotion
Previewing and Saving Your Invoice Template
After creating your invoice template you should take a moment to preview and save it. I still recall the blend of anticipation and anxiety I experienced during my first attempt. Would everything be in order? Previewing is crucial to confirm that your efforts yield positive results.
Here’s a handy guide on how to take a sneak peek at your invoice template and save it for future use.
- Preview the Layout: Check if all elements are properly aligned and visually appealing. Look for any text that might be cut off or improperly formatted.
- Check for Errors: Review all the information for accuracy. Mistakes in client names, pricing, or services can lead to confusion.
- Make Adjustments: If you notice anything amiss, go back to the editing section and make the necessary changes. Don’t hesitate to tweak the layout if it doesn’t feel right.
- Save the Template: Once you’re satisfied, save the template. Make sure to choose a name that’s easy to remember for future reference.
The moment I saved my initial template, a wave of satisfaction surged through me. It felt akin to crafting a work of art that would embody my dedication and ingenuity.
Also Read This: How to Watch Donât Breathe 2 Online Free on Dailymotion
Sending Invoices to Your Clients
While sending invoices may appear to be a straightforward job it holds significance in the realm. I have come to realize that the presentation of an invoice can influence the dynamics of your client relationships. My approach to this responsibility has transformed, as the years have gone by.
When it comes to sending out your invoices here are a few steps you might want to keep in mind.
- Choose the Right Method: Decide whether to send your invoice via email or through an invoicing platform. Email gives a personal touch, while platforms often provide tracking features.
- Craft a Message: Include a friendly note in your email. Something like, "Thank you for the opportunity to work with you! I've attached the invoice for your review." It helps set a positive tone.
- Follow Up: If you haven’t received payment after a week, don’t hesitate to send a gentle reminder. A friendly nudge can go a long way.
Once I missed reaching out to a client and it had consequences for me. I realized how crucial it is to be proactive when it comes to communication. Sending invoices isn't solely about asking for payment; it's also about staying connected with your clients. Show consideration and politeness in every interaction and you'll foster enduring relationships.
Also Read This: How to Change Family Filter on Dailymotion for Safe Viewing
Common Issues and Troubleshooting Tips
While exploring the intricacies of invoicing I faced some hurdles. Each obstacle brought me insights on how to handle invoices more effectively. Whether you're a beginner or a seasoned pro being aware of challenges can help you save time and avoid unnecessary stress.
Here are some common issues you may encounter along with suggestions for resolving them.
- Incorrect Client Information: Double-check the client’s name and contact details. It’s easy to make a typo, and sending an invoice to the wrong person can create confusion. Always confirm details before hitting send.
- Formatting Issues: Sometimes, your carefully designed invoice may look different when opened by the client. To avoid this, always preview the invoice before sending and consider using standard file formats like PDF that maintain formatting.
- Missing Items or Prices: It’s crucial to ensure that all services rendered are listed accurately. If you realize something is missing, reach out to the client promptly, apologize, and send a corrected invoice.
- Delayed Payments: If you notice that payments are taking longer than expected, don't hesitate to follow up with a friendly reminder. It shows professionalism and reinforces your commitment to good business practices.
I remember a moment when I sent an invoice without including my payment information. It was quite an awkward situation! This taught me the importance of being in communication. By taking these steps you can make your invoicing process smoother and more polished.
Also Read This: How to Add Someone on My Hero Ultra Rumble
Frequently Asked Questions about Invoice Templates in ShootProof
When it comes to making and handling invoices people often have questions. I’ve noticed that answering these inquiries not only assists you but also supports fellow photographers who may be facing similar challenges. Here are some commonly asked questions about invoice templates in ShootProof:
- How do I create a new invoice template? Simply log in to your ShootProof account, go to the invoicing section, and select the option to create a new template. Follow the prompts to customize it to your liking.
- Can I edit an existing template? Yes, you can easily edit any existing templates by navigating to your saved templates and making the necessary changes. Just remember to save your updates!
- What if I want to add a discount? You can include discounts directly in your template by adding a line item for it, making it clear to your clients how much they’re saving.
- Is it possible to send invoices directly from ShootProof? Absolutely! ShootProof allows you to send invoices directly from the platform, making it seamless and convenient.
By addressing these inquiries I gained insights into my billing procedure. Every question highlights a shared issue and having the information at hand can greatly enhance your efficiency.
Wrapping Up Your Journey to Creating an Invoice Template
As you wrap up your process of designing an invoice template take a moment to acknowledge your achievements. I recall feeling a surge of satisfaction when I crafted a refined invoice that showcased my brand and made my clients feel appreciated. It goes beyond simply sending out invoices; it involves establishing an impression that builds trust.
Consider the following as you wrap up:
- Review and Revise: Don’t hesitate to revisit your template after using it for a while. Gather feedback from clients and make adjustments to improve clarity and presentation.
- Stay Consistent: Ensure that your branding is consistent across all templates and documents. This helps reinforce your identity in your clients’ minds.
- Maintain a Positive Relationship: Remember that each invoice is an opportunity to communicate with your clients. A friendly follow-up can strengthen your relationship and encourage repeat business.
Crafting an invoice template goes beyond being a simple chore; it's a crucial move towards elevating your photography venture. Embrace the process, gain insights from every encounter and continuously enhance your methods. Remember, it's the nuances that truly matter!