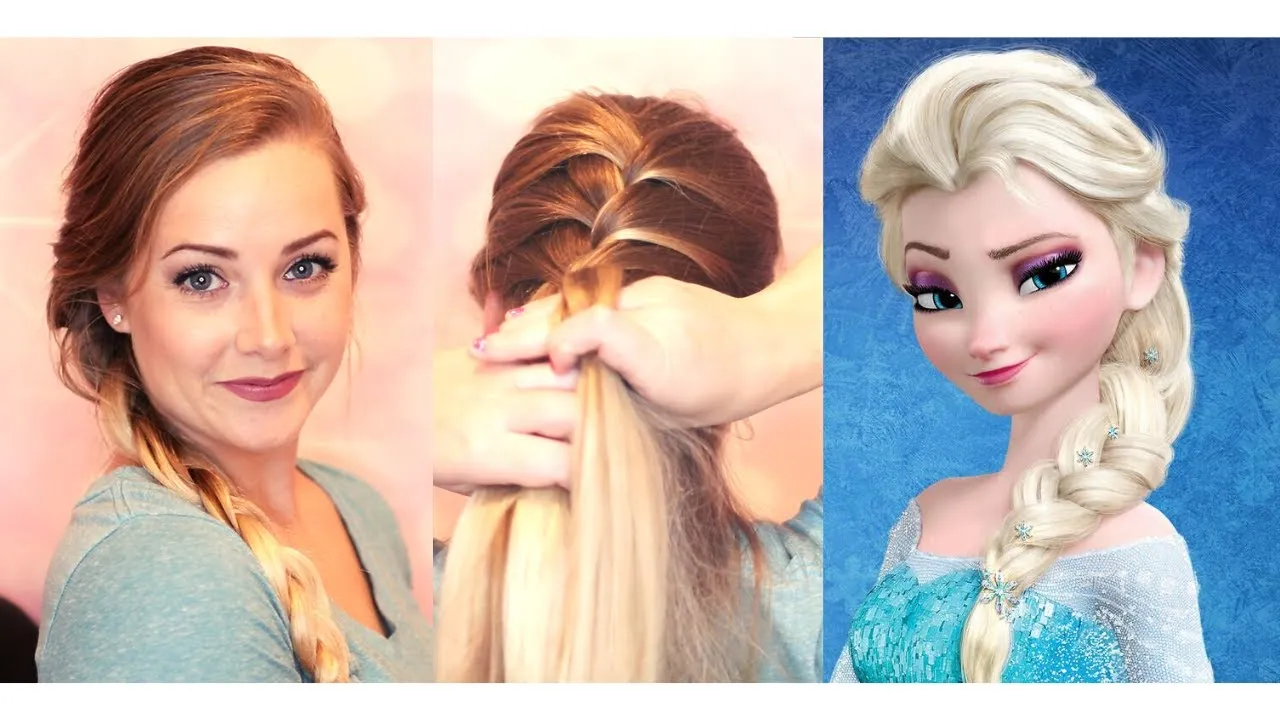
If you're a fan of Disney's Frozen, you probably admire Elsa's stunning braid. This iconic hairstyle not only looks beautiful but is also surprisingly easy to achieve. In this tutorial, we'll walk you through the steps to create your very own Elsa braid, perfect for a costume party, a fun day out, or even just to feel a little magical in your everyday life. Whether you have long, medium, or even slightly shorter hair, you can adapt the technique to suit your style. So, grab your tools, and let's unleash your inner ice queen!
Tools and Supplies Needed
Before we dive into the tutorial, you'll want to gather a few essential tools and supplies. Having everything prepared will make the process smoother and more enjoyable. Here’s what you’ll need:
- Hairbrush: A good-quality hairbrush is crucial for detangling your hair and ensuring a smooth finish.
- Hair ties: You’ll need a couple of elastic hair ties to secure the braid. Clear or matching hair ties work best.
- Bobby pins: These will help secure any loose strands and keep your braid looking neat.
- Hair spray (optional): If you want to make your braid last longer, a light mist of hairspray can help hold everything in place.
- Texturizing spray (optional): This can add some grip to your hair, making it easier to braid, especially if your hair is very smooth or slippery.
Once you have all your supplies ready, you're just a few steps away from rocking that gorgeous Elsa braid. It’s all about having the right tools and a bit of patience. So, let's get started on this fun hairstyling journey!
Also Read This: How to Share a Post on LinkedIn for Maximum Engagement
Step-by-Step Guide to Creating the Elsa Braid
Creating an Elsa braid is not only fun but also a fantastic way to channel your inner Ice Queen! Follow this simple step-by-step guide to achieve that stunning look:
- Preparation: Start with clean, dry hair. If your hair is a bit too smooth, consider using a texturizing spray to add some grip.
- Sectioning: Part your hair down the middle or slightly to one side, depending on your preference. This will be the base for your braid.
- Start the Braid: Gather a section of hair from the front (by your forehead) and divide it into three equal parts. This will be the beginning of your braid.
- French Braid Technique: Begin braiding by crossing the right section over the middle, then the left section over the new middle. As you braid, add small sections of hair from the sides into the braid. Keep it tight at the top and gradually loosen as you work downward.
- Continue Braid: Once you reach the nape of your neck and have incorporated all your hair, continue braiding the three sections until you reach the ends.
- Secure the Braid: Use a clear hair tie or a decorative scrunchie to secure the end of your braid. For a more relaxed look, gently tug at the braid to loosen it up a bit.
- Finishing Touches: Finish with a light mist of hairspray to keep everything in place. You can also add some sparkly hair accessories for that extra Elsa flair!
Also Read This: Expert Tips on Making Money with Shutterstock
Tips for Perfecting Your Elsa Braid
Now that you know how to create the Elsa braid, let’s perfect it! Here are some handy tips to ensure your braid looks flawless:
- Practice Makes Perfect: Don’t get discouraged if it doesn't look perfect the first time. Keep practicing, and you'll get the hang of it!
- Use the Right Products: Consider using a smoothing serum before you start braiding. This helps to tame any frizz and gives your braid a polished look.
- Adjust the Tightness: Depending on your style preference, you can experiment with how tight or loose you braid your hair. A looser braid gives a more relaxed vibe, while a tighter braid looks more structured.
- Accessorize: Adding some small hairpins or a decorative clip can elevate the look and give it that magical touch.
- Get Creative: Try incorporating other styles, like fishtail sections or adding color with hair chalk, to make the braid your own!
- Practice on Different Hair Types: If you have different hair textures at your disposal (like straight, wavy, or curly), practice on those to see how the braid adapts!
With these tips, you’re well on your way to slaying the Elsa braid with confidence! Remember, the key is to have fun and express your unique style!
Also Read This: How to Obtain Rights for Using Getty Images in Your Projects
5. Styling Variations and Ideas
Once you've mastered the classic Elsa braid, why not explore some stylish variations to keep things fresh and fun? Here are a few creative ideas to inspire your next look:
- Fishtail Braid: Add a twist to your Elsa braid by transforming it into a fishtail braid. This intricate style gives off a whimsical vibe and is perfect for special occasions.
- Side Braid: Instead of the traditional back braid, try a side braid for a more relaxed and casual look. This works beautifully for both everyday wear and laid-back events.
- Half-Up, Half-Down: Combine the elegance of an Elsa braid with the playfulness of loose hair. Pull the top section into a braid while letting the rest flow freely. It’s a great balance of sophistication and fun!
- Accessorized Braid: Get creative with accessories! Use ribbons, flowers, or even hairpins to embellish your braid. This not only adds a personal touch but also elevates your overall style.
- Messy Braid: For a more bohemian look, loosen the braid and pull out a few strands to create a messy effect. This style is perfect for festivals or sunny days out.
Feel free to mix and match these ideas! The beauty of hairstyling is that there are no strict rules—just go with what feels right for you!
6. Conclusion and Final Thoughts
Creating an Elsa braid is not just about achieving a pretty hairstyle; it’s about embracing your creativity and expressing your personal style. Whether you’re preparing for a themed party, a casual day out, or just want to feel a little extra fabulous, this braid can be your go-to look.
By following the tutorial and experimenting with various styling options, you’ll not only master the Elsa braid but also gain confidence in your hairstyling abilities. Remember, practice makes perfect! Don’t be discouraged if it doesn’t turn out exactly as you envisioned on your first try.
So grab your hair ties and bobby pins, and get ready to rock that beautiful braid! And most importantly, have fun with it! After all, hairstyling is all about enjoying the process and showcasing your unique flair.
Happy braiding!