Are you ready to dive into the magical world of cake decorating? Creating a stunning Rapunzel cake is not just about baking; it's about bringing a fairy tale to life! Whether it's for a birthday party or a themed celebration, this cake can be the centerpiece of joy and creativity. The vibrant colors, enchanting details, and whimsical design will surely capture the hearts of both kids and adults alike.
In this guide, we’ll walk you through the essential steps to craft an awe-inspiring Rapunzel cake that will leave everyone spellbound. From understanding the basic elements of cake decorating to incorporating elements that reflect the beloved princess's story, you’ll learn to transform a simple cake into a magical masterpiece. Let’s get started on this sweet adventure!
Gathering Your Supplies
To create your Rapunzel cake, having the right supplies is essential. Here’s a detailed list of what you’ll need:
- Cake Ingredients:
- 2-3 layers of cake (vanilla or chocolate)
- Buttercream frosting (purple for Rapunzel's dress)
- Fondant (multiple colors, especially yellow for hair and green for vines)
- Tools:
- Cake pans (6-inch or 8-inch)
- Offset spatula for frosting
- Rolling pin for fondant
- Decorating tools (piping bags, tips)
- Flower cutters (for making edible flowers)
- Food coloring (gel for vibrant colors)
- Decorative Elements:
- Edible glitter (for some magical sparkle)
- Royal icing (for added decoration and stability)
- Small figurines (like Rapunzel and her tower, optional)
Gathering these supplies in advance will make the decorating process smoother and more enjoyable. Don’t forget to set up a clean and organized workspace where you can unleash your creativity without any distractions!
Also Read This: How to Use Getty Images Without a Watermark
Baking the Perfect Cake Base
Creating a stunning Rapunzel cake starts with a solid foundation, and that foundation is the cake base itself. Choosing the right cake flavor and ensuring it’s perfectly baked sets the stage for your masterpiece.
Here are some tips to help you bake the perfect cake base:
- Select Your Cake Flavor: Vanilla, chocolate, or lemon are popular choices. Vanilla tends to be a crowd-pleaser and pairs well with various fillings.
- Use Quality Ingredients: Always opt for fresh, high-quality ingredients. This makes a noticeable difference in taste and texture.
- Measure Accurately: Baking is a science! Use a kitchen scale for more precision, especially with dry ingredients like flour and sugar.
- Room Temperature Ingredients: Make sure your butter, eggs, and milk are at room temperature. This helps them combine more easily and results in a fluffier cake.
- Preheat Your Oven: Don’t skip this step! A properly preheated oven ensures even baking.
Once you’ve baked your cake, let it cool completely before moving on to the decorating stage. This helps prevent melting your hard work when you add frosting and fondant.
Also Read This: Master Football Skills Like Messi with Dailymotion Tutorials
Preparing the Fondant and Decorations
Now that your cake base is ready, it’s time to dive into the fun part: preparing the fondant and decorations! Fondant allows you to create that smooth, professional finish that makes your cake truly magical.
Here’s how to get started:
- Select Your Fondant: You can buy pre-made fondant or make your own using marshmallows, powdered sugar, and water. Don’t forget to choose vibrant colors that reflect Rapunzel’s theme, like purple and yellow!
- Color the Fondant: If you’re using white fondant, divide it into portions and add gel food coloring to achieve your desired shades. Knead until the color is uniform.
- Roll Out the Fondant: Dust your surface with cornstarch to prevent sticking. Roll out your fondant to about 1/8 inch thickness for easy handling.
To create decorations:
- Rapunzel’s Braids: Roll fondant into long, thin strands to mimic Rapunzel’s iconic hair.
- Flowers: Use small cutters or molds to create delicate flowers. Dust them with edible glitter for an enchanting touch!
- Details: Use edible markers or food gel to paint on details, like Rapunzel's face or castle elements.
With your fondant and decorations ready, you’re now all set to assemble your stunning Rapunzel cake! Enjoy the process and let your creativity shine.
Also Read This: Bootlegging Getty Images Legal Risks and Copyright Violations to Avoid
Assembling the Rapunzel Cake
Assembling your Rapunzel cake is where the magic really begins! This step is all about bringing together all the delicious components you've baked and decorated. Here’s a simple guide to help you create a beautiful masterpiece:
- Layering: Start with your first layer of cake. Place it on your cake board or plate. Spread a generous amount of frosting on top. This will act as the glue for the next layer!
- Adding Layers: Repeat the process with each layer of cake. If you're using different flavors or colors, alternate them for a stunning visual effect. Make sure to press down gently after adding each layer to keep everything stable.
- Crumb Coat: Once all the layers are stacked, apply a thin layer of frosting all over the cake. This is called the crumb coat, and it helps to seal in crumbs and make your final frosting layer smooth and clean.
- Chill: Pop the cake into the fridge for about 30 minutes. This helps your crumb coat set, making it easier to apply the final layer of frosting.
- Final Frosting: Once chilled, add another layer of frosting over the crumb coat. Use a spatula or a cake scraper to create a smooth finish. Feel free to add texture if you want something more whimsical!
And just like that, you have a beautifully assembled cake ready for the fun details!
Also Read This: A Complete Guide to Uninstalling Fortiguard Downloader
Adding Details and Finishing Touches
Now that your cake is assembled, it’s time to let your creativity shine with the details and finishing touches! This is where you can really bring the Rapunzel theme to life. Here’s how to do it:
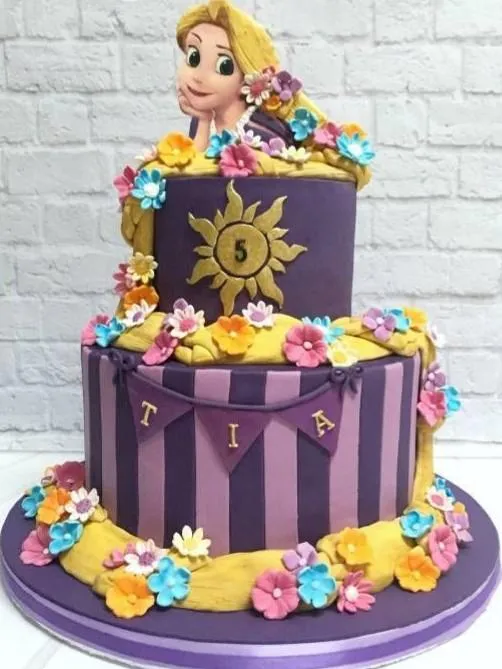
- Colorful Fondant: Use colored fondant to create Rapunzel’s iconic tower and her flowing hair. Roll out the fondant and shape it into bricks or a braid for the hair. Secure these pieces with a little frosting.
- Edible Decorations: Add flowers, butterflies, or tiny figurines to enhance the fairytale vibe. You can use edible glitter for some extra sparkle!
- Topper: Consider a themed cake topper featuring Rapunzel herself. This can be a cute figurine or even a handmade sugar piece.
- Piping Details: Use a piping bag to add decorative borders or accents around the base of the cake. Swirls, rosettes, or even gold luster dust can elevate your cake.
- Final Touches: Step back and look at your cake. Sometimes, less is more! Make sure everything is balanced, and don’t hesitate to make small adjustments.
Once you’re satisfied with your design, it’s time to show off your stunning Rapunzel cake! Just don’t forget to snap a few pictures before it disappears!
Also Read This: Comprehensive Guide to Crafting Wool Flowers with Dailymotion Assistance
7. Sharing Your Creation on Dailymotion
Once you've crafted your stunning Rapunzel cake, it’s time to show it off! Sharing your creation on Dailymotion can be a fun way to engage with your audience and inspire fellow cake enthusiasts. Here are some steps to get you started:
- Record Your Process: Capture the entire baking and decorating process on video. You can use your smartphone or a camera. Make sure to include key moments like mixing the batter, frosting the cake, and adding those intricate details that make your cake unique.
- Edit Your Video: Use simple editing software to cut out unnecessary parts and add some fun music or voice-over commentary. Keeping it engaging will hold your viewers’ attention!
- Create a Dailymotion Account: If you don’t have one yet, sign up on Dailymotion. It’s free and easy! Make sure to choose a username that reflects your baking passion.
- Upload Your Video: Follow the platform’s instructions to upload your video. Don’t forget to write a catchy title and a descriptive caption. You can even include tips that you learned while making the cake.
- Engage with Your Audience: Once your video is live, watch for comments and feedback. Engage with viewers by responding to their questions or encouraging them to share their creations!
Sharing on Dailymotion not only showcases your talent but also connects you with a community of cake lovers. So, don’t be shy—let your creativity shine!
8. Conclusion and Tips for Future Cake Projects
Creating a stunning Rapunzel cake is not just a baking endeavor; it's an opportunity to express your creativity and share joy with others. As you wrap up this project, here are a few key takeaways and tips for your future cake endeavors:
- Practice Makes Perfect: Don’t be discouraged if your first few attempts don’t turn out as expected. Each cake is a learning experience, and improvement comes with practice.
- Plan Ahead: Always sketch your design beforehand and gather all necessary ingredients and tools. This will save you time and minimize stress while baking.
- Experiment with Flavors: While the design is important, don’t shy away from experimenting with different flavors and fillings to make your cake uniquely yours!
- Document Your Process: Take notes or photos of each step. This not only helps you remember what worked and what didn’t but also provides great content for future sharing.
- Stay Inspired: Follow other bakers, join online groups, and keep exploring new techniques and trends in cake decorating.
Remember, every cake you create is a masterpiece in its own right. Enjoy the journey and have fun baking!