Have you ever wondered how you could harness the sun's energy right from your backyard? Creating a small solar panel might sound like a daunting task, but it's easier than you think! DIY solar panels not only help you save on electricity bills but also contribute to a more sustainable planet. In this guide, we'll walk you through the essentials of building your very own solar panel, step by step. Whether you're a seasoned DIYer or a curious beginner, this project can provide you with a fun and educational experience.
Materials Needed for Your Solar Panel Project
Before you dive into the project, it’s crucial to gather all the necessary materials. Here’s a comprehensive list to get you started:
- Solar Cells: The heart of your panel. Look for monocrystalline or polycrystalline cells based on your budget and efficiency needs.
- Glass Sheet: A transparent cover to protect the solar cells while allowing sunlight to pass through. Tempered glass is a great option.
- Plywood or Aluminum Frame: This will serve as the base of your solar panel. Plywood is easier to work with, while aluminum is more durable.
- Soldering Kit: Necessary for connecting the solar cells together. Make sure to have solder, soldering iron, and flux on hand.
- Wire: Use copper wire for the connections between the cells, and a thicker gauge wire to connect to your battery or inverter.
- Silicone Sealant: To weatherproof the panel and ensure everything stays in place.
- Diodes: To prevent backflow of current, especially if you’re connecting multiple panels.
- Multimeter: This is essential for testing the voltage and ensuring everything is working correctly.
By gathering these materials ahead of time, you'll be well-equipped to tackle your DIY solar panel project with confidence. Remember, preparation is key to a successful build!
Also Read This: Using Getty Images Legally and Free for Your Website or Blog
Step-by-Step Instructions to Build Your Solar Panel
Building your own small solar panel can be a fun and rewarding project! Let’s break it down into easy-to-follow steps:
- Gather Your Materials: You'll need the following items:
- Solar cells (6-10 cells depending on desired output)
- Wire (preferably 18-gauge)
- Soldering iron and solder
- Wood or plastic board (for mounting)
- Diode (to prevent backflow of current)
- Clear acrylic sheet (for protection)
- Sealant (like silicone or epoxy)
Also Read This: Envato Elements vs iStock: Comparing two popular platforms for creative assets.
Testing Your Solar Panel
Once you've built your solar panel, it’s crucial to test it to ensure it’s working properly. Here’s how you can do it:
- Check Connections: Before testing, make sure all your connections are secure. Loose wires can lead to inefficient performance.
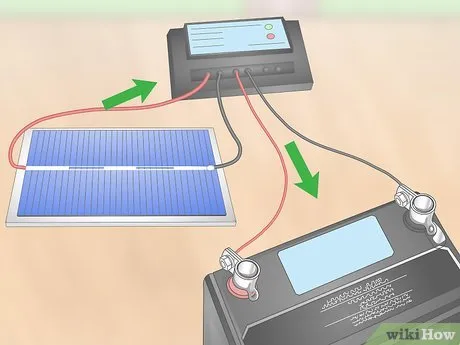
- Use a Multimeter: Set your multimeter to the DC voltage setting. Connect the multimeter leads to the output wires of your solar panel. You should see a reading that indicates voltage output.
- Test in Sunlight: Place your solar panel in direct sunlight. This will give you the most accurate reading of its performance. Ideally, you want to see a voltage that matches or exceeds the rated output of your solar cells.
- Load Testing: To further test, connect a small load (like a LED light) to your panel. Observe how it performs; if the light turns on brightly, your panel is functioning well!
- Document Your Findings: Keep track of your voltage readings and the performance of your load. This will help you understand how effective your DIY solar panel is and whether any adjustments are needed.
By following these steps, you can not only build your own solar panel but also ensure it’s working efficiently. Happy solar crafting!
Also Read This: Mastering My Hero Ultra Rumble: Team Up with Friends for Victory
5. Tips for Optimizing Solar Panel Efficiency
Maximizing the efficiency of your small solar panel can significantly enhance its performance and the energy it generates. Here are some valuable tips to help you get the most out of your DIY solar project:
- Angle and Orientation: Properly positioning your solar panel is crucial. Ensure it faces south (in the Northern Hemisphere) or north (in the Southern Hemisphere) at an angle that matches your latitude for optimal sunlight exposure.
- Keep it Clean: Dust, dirt, and debris can block sunlight. Regularly clean your solar panels with a soft cloth or sponge and mild soap to maintain maximum efficiency.
- Temperature Matters: Solar panels operate best in cooler temperatures. If possible, install your panels in a way that allows for air circulation to help dissipate heat.
- Monitor Performance: Use a solar power meter to track the energy your panels generate. This can help you identify any issues or changes in efficiency over time.
- Use Quality Materials: Invest in high-quality cells and components. Cheaper materials might save money upfront but can lead to inefficiencies or failures in the long run.
By following these tips, you can enhance the energy output of your DIY solar panel and enjoy the benefits of renewable energy even more!
Also Read This: How to Fix YouTube Closed Captions Not Working
6. Common Mistakes to Avoid in DIY Solar Projects
While embarking on a DIY solar panel project can be rewarding, there are several common pitfalls that can hinder your success. Avoid these mistakes to ensure your project runs smoothly:
- Ignoring Local Regulations: Before starting your project, check local building codes and regulations. Failing to comply can lead to fines or having to dismantle your setup.
- Inadequate Planning: Don’t rush into building without a solid plan. Sketch out your design, calculate your energy needs, and ensure you have all necessary materials before beginning.
- Neglecting Safety Precautions: Always prioritize safety. Wear protective gear, work in a well-ventilated area, and handle electrical components with care to prevent accidents.
- Underestimating Costs: DIY doesn’t always mean cheap. Accurately estimate costs for materials and tools to avoid budget surprises later on.
- Overlooking Maintenance: Like any other system, solar panels require maintenance. Regular checks and cleaning are essential to ensure longevity and efficiency.
Avoiding these common mistakes can make your DIY solar project a success, transforming your space into a green energy haven!
How to Create a Small Solar Panel with This Simple DIY Guide
If you're interested in harnessing solar energy for small projects or to power devices, creating your own small solar panel can be a rewarding experience. This DIY guide will walk you through the essential steps needed to construct a solar panel that can help you understand the fundamentals of solar energy while saving you money.
Materials Needed
- Solar cells (monocrystalline or polycrystalline)
- Wood or plastic backing board
- Wiring (copper or silicone insulated)
- Diode (to prevent backflow of current)
- Glass or clear acrylic sheet (for protection)
- Silicone sealant (for weatherproofing)
- Multimeter (for testing voltage)
Step-by-Step Instructions
- Design Your Panel: Determine the size of your solar panel based on how many solar cells you plan to use.
- Prepare the Backing Board: Cut your wood or plastic board to the desired dimensions.
- Connect the Solar Cells: Lay the solar cells on the backing board and connect them in series or parallel, depending on your voltage requirements.
- Attach the Diode: Connect the diode to the positive terminal to prevent backflow of electricity.
- Seal the Panel: Cover your solar cells with glass or acrylic and apply silicone sealant to protect against weather conditions.
- Test Your Panel: Use a multimeter to check the voltage output of your solar panel.
Creating a small solar panel is not only a fun DIY project but also an excellent way to learn about renewable energy. By following these steps, you can produce a functional solar panel that can power small devices or contribute to your energy needs.
Conclusion and Next Steps for Solar Enthusiasts
Once you have successfully built your small solar panel, consider exploring larger solar projects or integrating battery storage to maximize your energy efficiency. Continue to educate yourself about solar technologies and their applications in everyday life.