Telegram Channels are a fantastic way to broadcast messages to a large audience. Unlike regular chats, where you can have back-and-forth conversations, channels allow you to share updates, news, and content with followers without them being able to respond directly. This means you can maintain a clear, organized flow of information. Whether you’re a business wanting to communicate with customers or an individual sharing your passions, Telegram channels offer a streamlined method to reach people.
Benefits of Creating a Private Channel
Creating a private Telegram channel comes with a plethora of benefits that cater to both personal and professional needs. Here are some of the key advantages:
- Control Over Membership: In a private channel, you can selectively add members. This is perfect for groups that discuss sensitive topics or for businesses wanting to limit access to exclusive content.
- Enhanced Privacy: Unlike public channels, a private channel keeps your conversations secure. Only invited members can see the content, safeguarding your discussions from outside interference.
- Focused Communication: With no public comments, members can focus solely on the information shared, ensuring they receive the message without distractions.
- Exclusive Content: You can share special offers, updates, or insights that are only available to members, fostering a sense of community and exclusivity.
- Analytics and Insights: Telegram provides useful insights about your audience, helping you understand what content resonates with them and how to tailor your messaging accordingly.
Overall, a private Telegram channel can be an effective tool for creating a close-knit community while maintaining the privacy and focus necessary for productive interactions.
Also Read This: Troubleshooting Why You Canât Comment on YouTube Videos
Step-by-Step Guide to Creating Your Private Channel
Creating a private Telegram channel is a straightforward process that you can complete in just a few minutes. Follow these easy steps and you'll be up and running in no time!
- Open Telegram: Launch the Telegram app on your device. You can use it on your smartphone, tablet, or desktop.
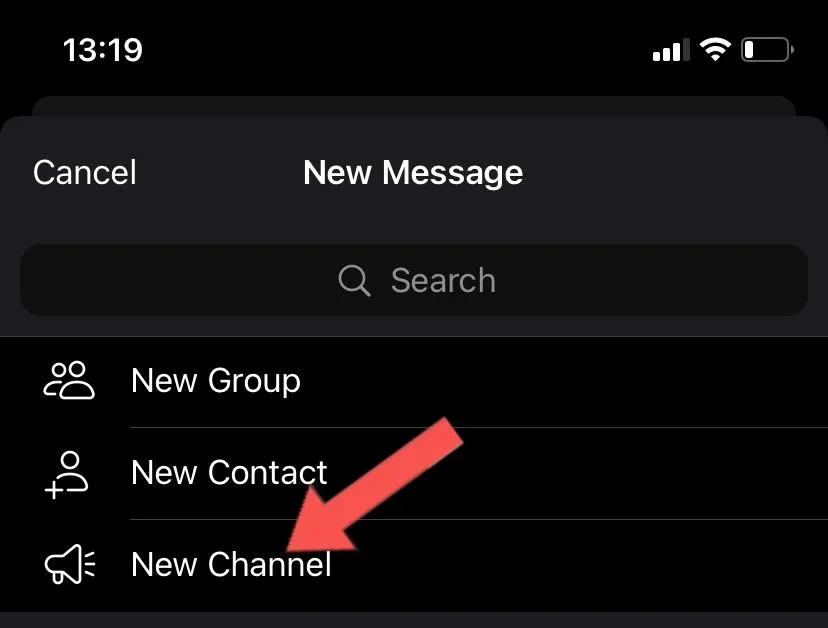
- Create a New Channel: Tap on the pencil icon (✏️) usually located in the bottom right corner. Select “New Channel” from the options.
- Channel Details: Give your channel a catchy name and a brief description. This helps potential members understand what your channel is about. For example, if you’re creating a channel for book lovers, you might name it “Daily Book Recommendations” and describe it as “A space for book enthusiasts to discover and share their favorite reads.”
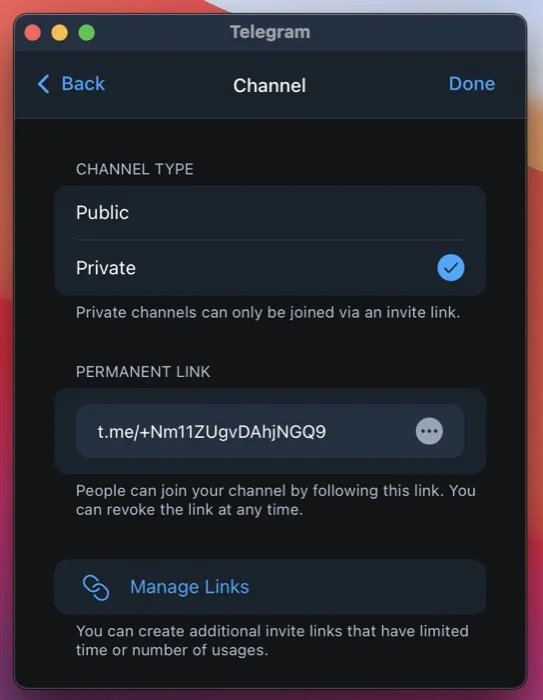
- Select Privacy Settings: You’ll be prompted to choose between a public or private channel. Select “Private Channel.” This means only invited members can view the content.
- Invite Members: After creating the channel, you can start inviting members. You can add contacts directly or share an invite link with others.
- Customize Channel Settings: Once your channel is created, you can customize settings such as notifications, channel photo, and more. This is your chance to make your channel truly yours!
And there you have it! Your private Telegram channel is now ready for you to start sharing and engaging with your selected audience.
Also Read This: Understanding Contributor Earnings at 123RF
Setting Up Channel Permissions and Privacy Settings
After creating your private Telegram channel, it's crucial to set the right permissions and privacy settings to ensure a safe and engaging environment for your members. Here’s how you can do that:
- Access Channel Settings: Go to your channel, tap on the channel name at the top, and select “Edit.” This will take you to the settings menu.
- Manage Permissions: Under the “Permissions” section, you can choose what members can do. You can set options like:
- Send Messages
- Invite to Channel
- Pin Messages
Decide what you want your members to have access to based on your channel's purpose.
| Admin Role | Permissions |
|---|---|
| Full Admin | All permissions including adding/removing members |
| Moderator | Can delete messages and manage members |
| Content Creator | Can only send messages |
By following these steps, you’ll ensure that your private Telegram channel remains a secure and enjoyable space for everyone involved.
Also Read This: Understanding Adobe Stock Video Costs and Licensing
5. Inviting Members to Your Private Channel
Once you've set up your private Telegram channel, the next step is to invite members. This is where the fun begins! You can invite friends, family, or colleagues who share your interests. Here’s how to do it:
- Open Your Channel: Go to your Telegram app and navigate to the channel you created.
- Tap on the Channel Name: At the top of your channel, click on the name to access the channel settings.
- Select “Add Members”: Here, you can either invite people from your contacts or send them an invite link.
- Using Invite Links: If you prefer a more casual approach, you can generate an invite link. Just click on “Invite to Group via Link,” and you’ll get a shareable link that anyone can use to join your channel.
Don’t forget to mention your channel to potential members! A little excitement goes a long way. You might say something like:
"Hey! I just launched a private Telegram channel about travel tips. Join us for exclusive insights and discussions!"
Also Read This: Create Canvas Paintings with Templates from Canva
6. Managing Your Private Channel Effectively
Running a private Telegram channel is not just about creating it; it’s also about managing it well. Here are some tips for effective management:
- Set Clear Guidelines: Establish rules for the channel to keep discussions respectful and on-topic. Share these guidelines in a pinned message.
- Engage Regularly: Consistency is key. Post updates, share relevant content, and engage with your members to keep the conversation flowing.
- Utilize Polls and Quizzes: Use Telegram’s built-in features like polls and quizzes to gather feedback and encourage participation.
- Monitor Activity: Keep an eye on the conversations and member interactions. If someone is being disruptive, don’t hesitate to remove them.
- Celebrate Milestones: Whether it’s reaching a certain number of members or a special event, celebrate it with your channel! This builds community and keeps everyone motivated.
With these strategies, you can create a thriving environment where members feel valued and engaged. Enjoy the journey of managing your private channel!
How to Create a Private Telegram Channel with Ease
Creating a private Telegram channel is a straightforward process that allows you to share messages, media, and files with a select group of people without the distractions of a public forum. This guide will walk you through the steps to set up your channel quickly and efficiently.
Step-by-Step Guide
- Open Telegram: Launch the Telegram app on your device. If you haven't installed it yet, download it from the App Store or Google Play Store.
- Create a New Channel:
- On the main chat screen, tap on the pencil icon (or "New Message" button).
- Select "New Channel."
- Set Channel Information:
- Enter a name for your channel.
- Add a description that outlines the purpose of your channel.
- Select Privacy Settings: Choose "Private Channel." This means only invited members can access the channel.
- Invite Members: You can add members from your contacts or share a private link with others to join.
- Create Your Channel: Tap on "Create" to finalize the setup of your private channel.
Managing Your Private Channel
Once your channel is created, you can manage it easily:
- Post Content: Share text, images, videos, and files easily.
- Admin Controls: Assign admin roles to trusted members for better management.
- Engagement Features: Utilize polls, quizzes, and feedback options to engage your members.
Conclusion and Final Tips
Creating a private Telegram channel is a simple yet effective way to communicate with a select audience. Always ensure you regularly update your members with relevant content and maintain privacy by managing your member list diligently. Remember to utilize the engagement features to keep your audience active and involved!