Creating a website has never been easier, especially with the tools offered by Google. Whether you want to showcase your portfolio, start a blog, or launch a small business, Google provides user-friendly options that cater to everyone, regardless of technical know-how. In this guide, we’ll explore how you can leverage Google’s resources to build a stunning website for free. Let’s dive in!
Benefits of Creating a Website with Google
When you choose Google as your platform for website creation, you unlock a plethora of advantages. Here are some standout benefits:
- User-Friendly Interface: Google’s website builders, like Google Sites, are designed for simplicity. You don’t need to be a tech wizard to create a professional-looking website. Just drag and drop elements, customize text, and you’re good to go!
- Free Hosting: One of the best parts? You won’t have to spend a dime on hosting. Google gives you free hosting with their services, which means you can focus on creating content rather than worrying about costs.
- Integration with Google Tools: Google offers seamless integration with other tools like Google Drive, Google Maps, and Google Analytics. This means you can easily embed documents, maps, and track your website's performance all in one place.
- Responsive Design: Websites created with Google automatically adjust to different screen sizes. Your site will look great on desktops, tablets, and smartphones without any extra effort.
- Collaboration Features: Working with a team? Google Sites allows multiple users to collaborate in real-time. You can all edit, comment, and publish changes together, making it perfect for group projects.
In summary, building a website with Google not only saves you time and money but also provides a host of features that cater to your needs. So why wait? Start creating your free website today!
Also Read This: How to Remove YouTube from Roku Devices
Step-by-Step Guide to Making a Free Website

Creating a free website using Google is a straightforward process, perfect for beginners or anyone looking to establish an online presence without spending a dime. Let's break it down step-by-step:
- Sign in to Google: First, you’ll need a Google account. If you don’t have one, it's easy to create. Simply go to the Google sign-up page.
- Access Google Sites: Once signed in, go to Google Sites. This platform allows you to create a website quickly.
- Create a New Site: Click on the “+” button or “Create” to start a new project. You’ll be directed to a blank canvas ready for customization.
- Choose a Layout: Google offers various layout options. You can select a blank template or use a pre-designed one that suits your vision.
- Add Content: Use the sidebar to add text, images, videos, and more. Click on the “Insert” menu and choose what you want to include.
- Customize Your Site: Adjust colors, fonts, and styles to match your brand. You can also add navigation links for easy access to different pages.
- Preview Your Site: Before publishing, click on the preview icon (looks like an eye) to see how your site looks on different devices.
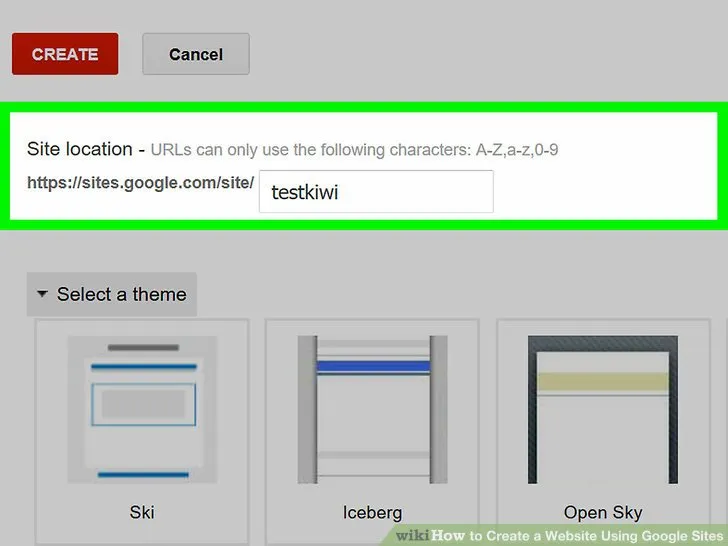
- Publish Your Site: When you’re satisfied, hit “Publish.” You’ll choose a web address, and just like that, your site is live!
Also Read This: How to Make Money on Behance
Choosing the Right Template for Your Website
The template you choose can make a significant difference in how visitors perceive your website. Here’s how to select the right one:
- Identify Your Purpose: Decide what your website will focus on. Will it be a portfolio, blog, or business site? This will guide your template choice.
- Consider Your Audience: Tailor your design to appeal to your target audience. A creative portfolio might benefit from a sleek, minimalist template, while a business site may need a more professional look.
- Check for Responsiveness: Ensure the template looks good on mobile devices. Google Sites automatically optimizes for mobile, but it’s always good to double-check.
- Explore Customization Options: Some templates allow for greater customization. Look for templates that let you easily change colors, fonts, and layouts.
- Read Reviews: If available, read user reviews or testimonials on specific templates. Feedback can provide insights into usability and design effectiveness.
Remember, the right template not only enhances your website's aesthetic but also improves user experience. Take your time to explore and select the one that feels just right!
Also Read This: Ultimate Guide to Crafting Rubber Bracelets
5. Adding Content to Your Website
Now that you’ve set up your Google website, it’s time to fill it with engaging content! Think of content as the heart of your website; it’s how you communicate with your visitors. Here’s how to effectively add content:
- Text: Start by drafting clear and concise text. Use headings and subheadings to organize your content. For example, if you’re writing about your favorite hobbies, you might have sections like "Gardening," "Photography," and "Travel."
- Images: Visuals can make your website pop! Upload high-quality images that relate to your content. For instance, if you're discussing travel, include stunning photos from your adventures.
- Videos: Want to keep your audience engaged? Embed videos! Google Sites allows you to add YouTube videos easily. This is perfect for tutorials or vlogs.
- Links: Include links to credible sources or related sites to provide additional value. For example, if you mention a gardening technique, link to a reputable gardening blog.
Remember, maintaining a balance between text and visuals is key. Aim for a clean layout that’s easy to read and navigate!
Also Read This: Inspiring and Educating All Ages Through Creative Stories on Dailymotion
6. Customizing Your Website's Design
Once your content is in place, it’s time to make your website visually appealing! Customizing your design helps convey your brand personality and keeps your visitors interested. Here are some tips to get started:
- Choose a Template: Google Sites offers several templates. Pick one that resonates with your theme. For a personal blog, a simple and clean layout might work best.
- Color Scheme: Select colors that reflect your style. Use tools like Adobe Color to create a palette. Stick to 2-3 primary colors for consistency.
- Fonts: Choose easy-to-read fonts. Google Fonts provides a variety of options. Pair a decorative font for headings with a simple one for body text.
- Layouts: Adjust sections and widgets to create a unique flow. Google Sites allows drag-and-drop functionality, making it easy to rearrange elements.
- Mobile Optimization: Ensure your design looks great on mobile devices. Preview your site on different screen sizes to check for responsiveness.
Investing time in customization not only enhances aesthetics but also improves user experience. Your website should feel like an extension of your personality!
Also Read This: Understanding Fortiguard Downloader DLP Services
7. Publishing Your Website
Once you've crafted your website using Google Sites, the next exciting step is publishing it for the world to see! The publishing process on Google Sites is straightforward and user-friendly. Here’s how you can do it:
- Click on the Publish Button: In the upper right corner of your Google Sites editor, you’ll notice a big blue “Publish” button. Give it a click!
- Choose Your Web Address: You’ll be prompted to select a web address for your site. Google will suggest a URL based on your site’s name, but you can customize it to reflect your brand or topic.
- Privacy Settings: Decide whether you want your site to be public (accessible to anyone) or private (just for selected people). If you choose public, anyone can find your site through search engines.
- Final Review: Before hitting the final “Publish” button, take a moment to review your content. Ensure images are loaded, links work, and everything looks just right.
- Publish! Once you’re satisfied, click the “Publish” button again. Voila! Your website is live and ready for visitors!
Remember, you can always edit and republish your website as you wish. Google Sites allows you to make changes on the fly, ensuring your content stays fresh and relevant.
Also Read This: VectorStock Is the Ultimate Creative Tool for Every Designer
8. Tips for Promoting Your Website
Congratulations on publishing your website! Now comes the fun part: getting people to visit it. Promoting your site effectively can make all the difference. Here are some practical tips to get you started:
- Utilize Social Media: Share your website on platforms like Facebook, Instagram, Twitter, and LinkedIn. Create engaging posts that highlight interesting content from your site.
- SEO Optimization: Use relevant keywords throughout your content to improve your website's visibility on search engines. Tools like Google Keyword Planner can help you discover popular search terms.
- Join Online Communities: Participate in forums or groups related to your website’s niche. Share your insights and occasionally link back to your site when it’s contextually appropriate.
- Network with Other Bloggers: Collaborate with other website owners by guest posting or exchanging links. This can bring in new visitors who are already interested in your topic.
- Email Marketing: If you have a mailing list, send out newsletters featuring your latest content. Encourage subscribers to share your website with their friends and family.
Remember, consistent promotion is key. Monitor your website’s traffic to see what strategies work best and adjust your approach accordingly. Happy promoting!
How to Create a Free Website Using Google
Creating a website has never been easier, especially with the tools provided by Google. Whether you want to showcase your portfolio, share your thoughts through a blog, or promote a small business, Google offers a straightforward way to build a free website. Follow these steps to get started:
- Create a Google Account: If you don’t have a Google account, start by signing up for one at Google Accounts.
- Access Google Sites: Visit Google Sites. This is where you can create and manage your website.
- Start a New Site: Click on the “+” button to create a new site. You will be taken to a blank canvas where you can design your site.
- Choose a Template: Browse through the available templates. Select one that suits your needs, or start from scratch.
- Customize Your Site:
- Add Content: Use text boxes, images, and videos to add content to your site.
- Change Layout: Drag and drop elements to rearrange your layout easily.
- Set Up Navigation: Organize your pages for better user experience.
- Publish Your Site: Once satisfied with your design, click the “Publish” button. Choose a web address and share your site with the world!
With Google Sites, you can create a professional-looking website without any coding knowledge. The platform is user-friendly and offers ample customization options to suit various purposes.
Conclusion: Google provides a versatile and accessible platform to create a free website, making it an excellent choice for anyone looking to establish an online presence without incurring costs.