Creating a Facebook ID is a straightforward process, especially when you have a simple guide to follow. For Urdu speakers, understanding the steps in your native language makes the experience even smoother. In this post, we’ll walk you through the entire process, ensuring that even those who are new to technology can easily create their own Facebook account. Let’s dive right in!
Step-by-Step Guide to Creating a Facebook ID
Creating a Facebook ID is quick and easy. Just follow these steps:
-
Visit the Facebook Website:
Open your preferred web browser and go to www.facebook.com.
-
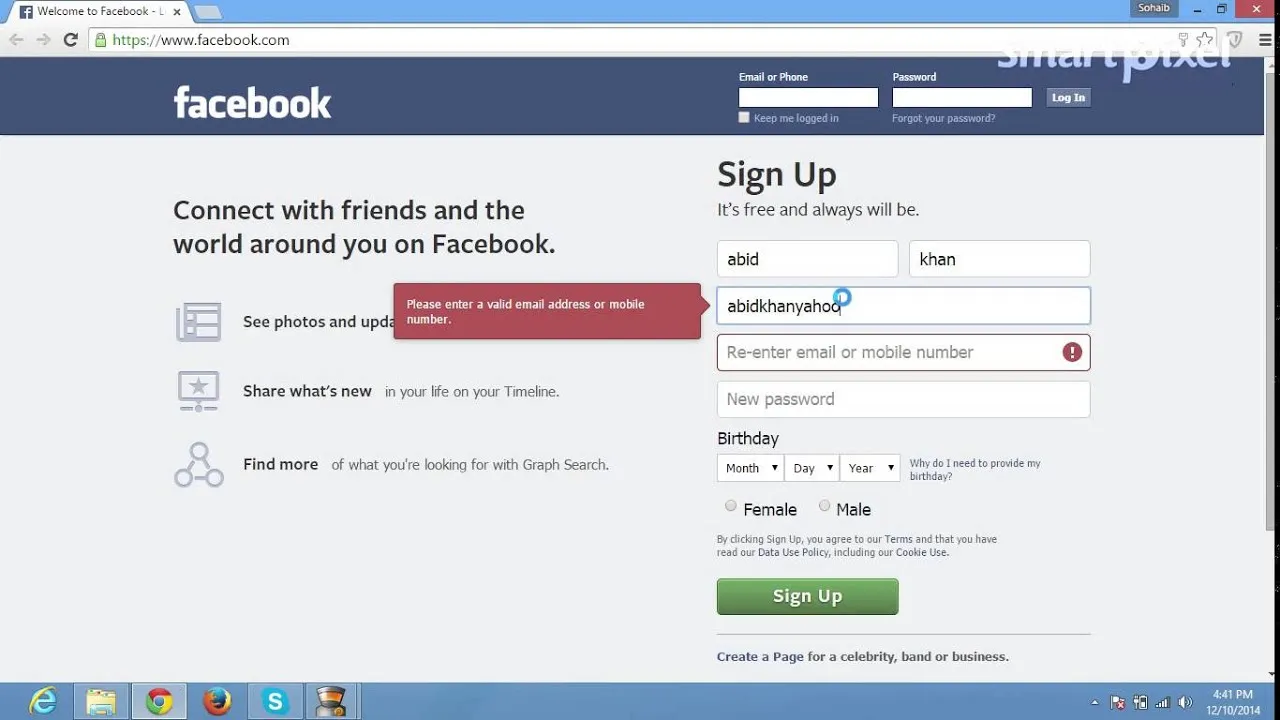
Fill Out the Sign-Up Form:
You’ll see a sign-up form on the homepage. Fill in the following details:
- First Name: Enter your first name.
- Last Name: Enter your last name.
- Email or Phone Number: Use a valid email address or mobile number.
- Password: Create a strong password to secure your account.
- Date of Birth: Select your date of birth from the dropdown menus.
- Gender: Choose your gender.
-
Click on Sign Up:
Once you’ve filled out the form, click the green “Sign Up” button.
-
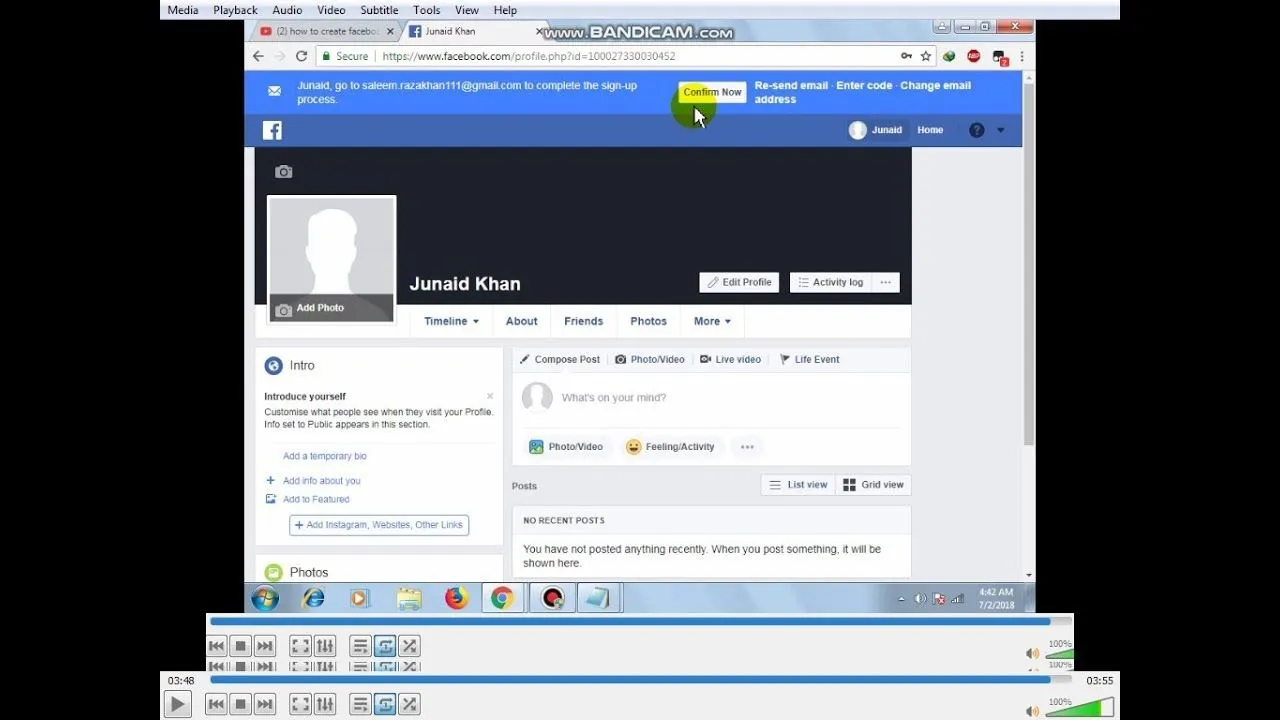
Verify Your Account:
Facebook will send a verification code to your email or phone. Enter this code in the designated field to verify your account.
-
Complete Your Profile:
After verification, you’ll be prompted to complete your profile by adding a profile picture, bio, and friends. This step can help make your Facebook experience more engaging.
Congratulations! You have successfully created your Facebook ID. Now, you can start connecting with friends and family, sharing updates, and exploring the platform. Happy Facebooking!
Also Read This: How Much Money Gained from Shutterstock
Choosing the Right Information
When creating a Facebook ID, it's essential to provide accurate and appropriate information. This ensures that your account remains secure and that you can access all of Facebook's features without any issues.
Here are a few key points to consider while choosing the right information:
- Full Name: Use your real name as it appears on your identification documents. Facebook aims to create a safe community, so using a real name helps in maintaining authenticity.
- Email Address: Choose an email address that you frequently use. This will be important for account recovery and notifications. Ensure it’s an address you have access to.
- Phone Number: Adding a phone number is beneficial for security reasons. You can enable two-factor authentication for an extra layer of protection.
- Birth Date: Provide your correct birth date. This is essential for age verification and to ensure you see appropriate content on the platform.
- Profile Picture: Use a clear and recent photo of yourself. This helps friends recognize you and adds a personal touch to your profile.
By taking time to choose the right information, you set a solid foundation for your Facebook experience. Remember, accuracy is key!
Also Read This: Are You Ready to Rumble?
Verifying Your Account
Once you've created your Facebook ID, the next step is account verification. This process helps protect your account from unauthorized access and ensures you can recover it easily if needed.
Here’s a straightforward guide on how to verify your account:
- Email Verification: After signing up, Facebook will send a verification link to the email address you provided. Click on this link to confirm your email. This step is crucial for account security and recovery.
- Phone Number Verification: If you added a phone number, Facebook might send you a code via SMS. Enter this code to verify your phone number. This adds a layer of security and helps in case you forget your password.
- Identity Verification: In some cases, Facebook may ask for additional verification to ensure that you are who you claim to be. This might include uploading a form of ID or answering security questions.
Verifying your account not only enhances your security but also enables you to recover your account if you ever lose access. It’s a small step that makes a big difference!
Also Read This: How to Obtain High-Quality Photos from Getty Images
5. Setting Up Your Profile
Once you've created your Facebook ID, the next step is to set up your profile. This is where you get to express yourself and let your friends know who you are. Here’s how you can do it:
- Add a Profile Picture: Choose a clear and friendly photo of yourself. This will help your friends recognize you easily.
- Cover Photo: Select a beautiful cover photo that reflects your personality. It could be a scenic view or a picture of a memorable moment.
- Fill Out Your Bio: Write a short bio about yourself. Include your interests, hobbies, and anything else fun that you want to share.
- Work and Education: Adding your workplace and school can help connect you with classmates and colleagues. It’s a great way to rekindle old friendships!
- Contact Information: You can add a phone number or email, but remember to keep your privacy in mind.
Take your time personalizing your profile. The more authentic you are, the more connections you’ll make!
Also Read This: Behance project views increase tutorial
6. Privacy Settings and Security
Now that your profile is set up, let’s talk about an essential aspect of Facebook: privacy and security. Protecting your personal information is crucial. Here’s how you can ensure your Facebook experience is safe:
- Review Privacy Settings: Go to Settings & Privacy > Settings > Privacy. Here, you can control who sees your posts, who can send you friend requests, and more.
- Limit Profile Visibility: Change your profile visibility to 'Friends' or 'Only Me' if you want to keep your information more private.
- Enable Two-Factor Authentication: This adds an extra layer of security. Whenever you log in from a new device, a code will be sent to your phone.
- Be Cautious About Friend Requests: Only accept requests from people you know to avoid unwanted connections.
- Regularly Check Login Alerts: Facebook can notify you of any unrecognized logins. Keep an eye on these alerts to catch any suspicious activity.
By taking these steps, you can enjoy a safer and more secure Facebook experience. It’s all about balancing social interaction with privacy!
How to Create a Facebook ID in Urdu
فیس بک ایک مشہور سوشل میڈیا پلیٹ فارم ہے جہاں لوگ اپنے دوستوں اور خاندان کے ساتھ جڑ سکتے ہیں، معلومات شیئر کر سکتے ہیں، اور دنیا بھر میں نئے لوگوں سے مل سکتے ہیں۔ اگر آپ فیس بک پر اپنا اکاؤنٹ بنانا چاہتے ہیں تو اس گائیڈ میں مرحلہ وار طریقہ کار دیا گیا ہے کہ آپ کس طرح ایک فیس بک آئی ڈی بنا سکتے ہیں۔
ضروریات
- ایک فعال ای میل ایڈریس یا موبائل نمبر
- انٹرنیٹ کنکشن
- کچھ بنیادی معلومات (جیسے نام، تاریخ پیدائش وغیرہ)
فیس بک آئی ڈی بنانے کا طریقہ
- سب سے پہلے فیس بک کی ویب سائٹ پر جائیں: www.facebook.com
- ہوم پیج پر، آپ کو "اکاؤنٹ بنائیں" کا بٹن نظر آئے گا، اس پر کلک کریں۔
- اپنے بارے میں معلومات درج کریں:
فیلڈ تفصیل پہلا نام اپنا پہلا نام درج کریں آخری نام اپنا آخری نام درج کریں ای میل یا موبائل نمبر ایک فعال ای میل یا موبائل نمبر درج کریں پاس ورڈ ایک مضبوط پاس ورڈ منتخب کریں تاریخ پیدائش اپنی تاریخ پیدائش درج کریں جنس اپنا جنس منتخب کریں - تمام معلومات درست درج کرنے کے بعد "اکاؤنٹ بنائیں" پر کلک کریں۔
- آپ کے فراہم کردہ ای میل یا موبائل نمبر پر ایک تصدیقی کوڈ بھیجا جائے گا۔ اسے درج کریں۔
- اب آپ کا فیس بک اکاؤنٹ تیار ہے! آپ اپنی پروفائل کو مکمل کر سکتے ہیں اور دوستوں کو شامل کر سکتے ہیں۔
فیس بک آئی ڈی بنانا ایک سادہ اور تیز عمل ہے، اور اس گائیڈ کے ذریعے آپ آسانی سے اپنا اکاؤنٹ بنا سکتے ہیں۔ اب آپ اپنے دوستوں کے ساتھ جڑنے اور سوشل میڈیا کا لطف اٹھانے کے لیے تیار ہیں!