Creating a cardboard dollhouse is not only a fun and engaging project but also a fantastic way to unleash your creativity! Whether you're crafting it for a child or simply indulging in a nostalgic hobby, this step-by-step tutorial will guide you through the entire process. You’ll be amazed at how easy it is to turn simple cardboard into a beautiful and functional dollhouse. So, grab your supplies, and let’s get started on this delightful DIY adventure!
Materials Needed
Before diving into the tutorial, let’s make sure you have everything you need. Here’s a handy list of materials that will help you create your very own cardboard dollhouse:
- Cardboard: You can use old boxes, cereal boxes, or any sturdy cardboard. The thickness is important for stability.
- Scissors: A good pair of scissors will help you cut through the cardboard easily.
- Craft Knife: For more precise cuts, a craft knife is ideal, but be sure to use it safely!
- Glue: A strong adhesive like white craft glue or a hot glue gun will hold everything together.
- Tape: Masking or duct tape can be useful for quick fixes or temporary holds.
- Ruler: To ensure straight edges and accurate measurements.
- Pencil: For marking your cuts and measurements.
- Paint or Markers: To decorate your dollhouse and give it some character.
- Craft Paper or Fabric: For creating wallpaper or flooring inside your dollhouse.
- Decorative Items: Miniature furniture, dolls, and any embellishments to personalize your space.
Gathering these materials will set you up for success as you embark on this creative journey. Once you have everything, you're ready for the fun part—building your dollhouse!
Also Read This: Download Shutterstock Images Without Watermark: A How-To Guide
Step 1: Planning Your Dollhouse Design
Before diving into the fun part of crafting your cardboard dollhouse, it’s essential to take a moment to plan your design. This step might seem a bit tedious, but trust me, it’s worth it! A well-thought-out plan will save you time and help you avoid mistakes later on.
Start by envisioning the style of your dollhouse. Do you want it to be a charming cottage, a modern apartment, or perhaps a whimsical castle? Here are some things to consider:
- Size: How big do you want your dollhouse to be? Think about the space you have available for it.
- Rooms: Decide how many rooms you want. Common options include a living room, kitchen, bedroom, and bathroom. Sketch them out on paper!
- Layout: Consider how the rooms will be arranged. Will they be on a single level, or do you want multiple floors? A simple blueprint can help visualize the layout.
- Doors and Windows: Think about where you want to place doors and windows. These details can really bring your design to life!
Once you've got a clear idea in your mind, grab a pencil and paper, and sketch a rough draft of your dollhouse. Don’t worry if it’s not perfect; it’s just a guideline! If you're feeling adventurous, you can also use design software to create a more detailed plan.
Remember, this dollhouse is all about your creativity, so let your imagination run wild! The more detailed your plan is, the easier the next steps will be.
Also Read This: Step by Step Guide to Making Bracelets with String
Step 2: Cutting the Cardboard
Now that you’ve got your design sketched out, it’s time to put those plans into action by cutting the cardboard! This part can be a bit tricky, but with a little patience and the right tools, you'll be crafting in no time.
Here’s what you’ll need:
- Cardboard sheets (recycled boxes work great!)
- Sharp utility knife or scissors
- Ruler
- Pencil
Follow these steps to cut your cardboard:
- Measure and Mark: Using your ruler, measure out the dimensions of each wall, floor, and roof section according to your design. Mark these measurements clearly with your pencil.
- Cutting Time: Carefully cut along the lines you’ve marked. If you’re using a utility knife, make sure to press down firmly and cut in a single motion for clean edges. For smaller pieces, scissors might be easier to manage.
- Check the Fit: After cutting each piece, do a quick fit test. Make sure everything aligns properly. If something seems off, don't hesitate to trim it a bit more.
Once all your pieces are cut, you should have a collection of walls, floors, and roofs ready to be assembled. Just remember to take your time and be careful with the cutting tools. Safety first! With your pieces ready, you’re one step closer to creating your fabulous cardboard dollhouse!
Also Read This: How to Get Featured on Behance Gallery
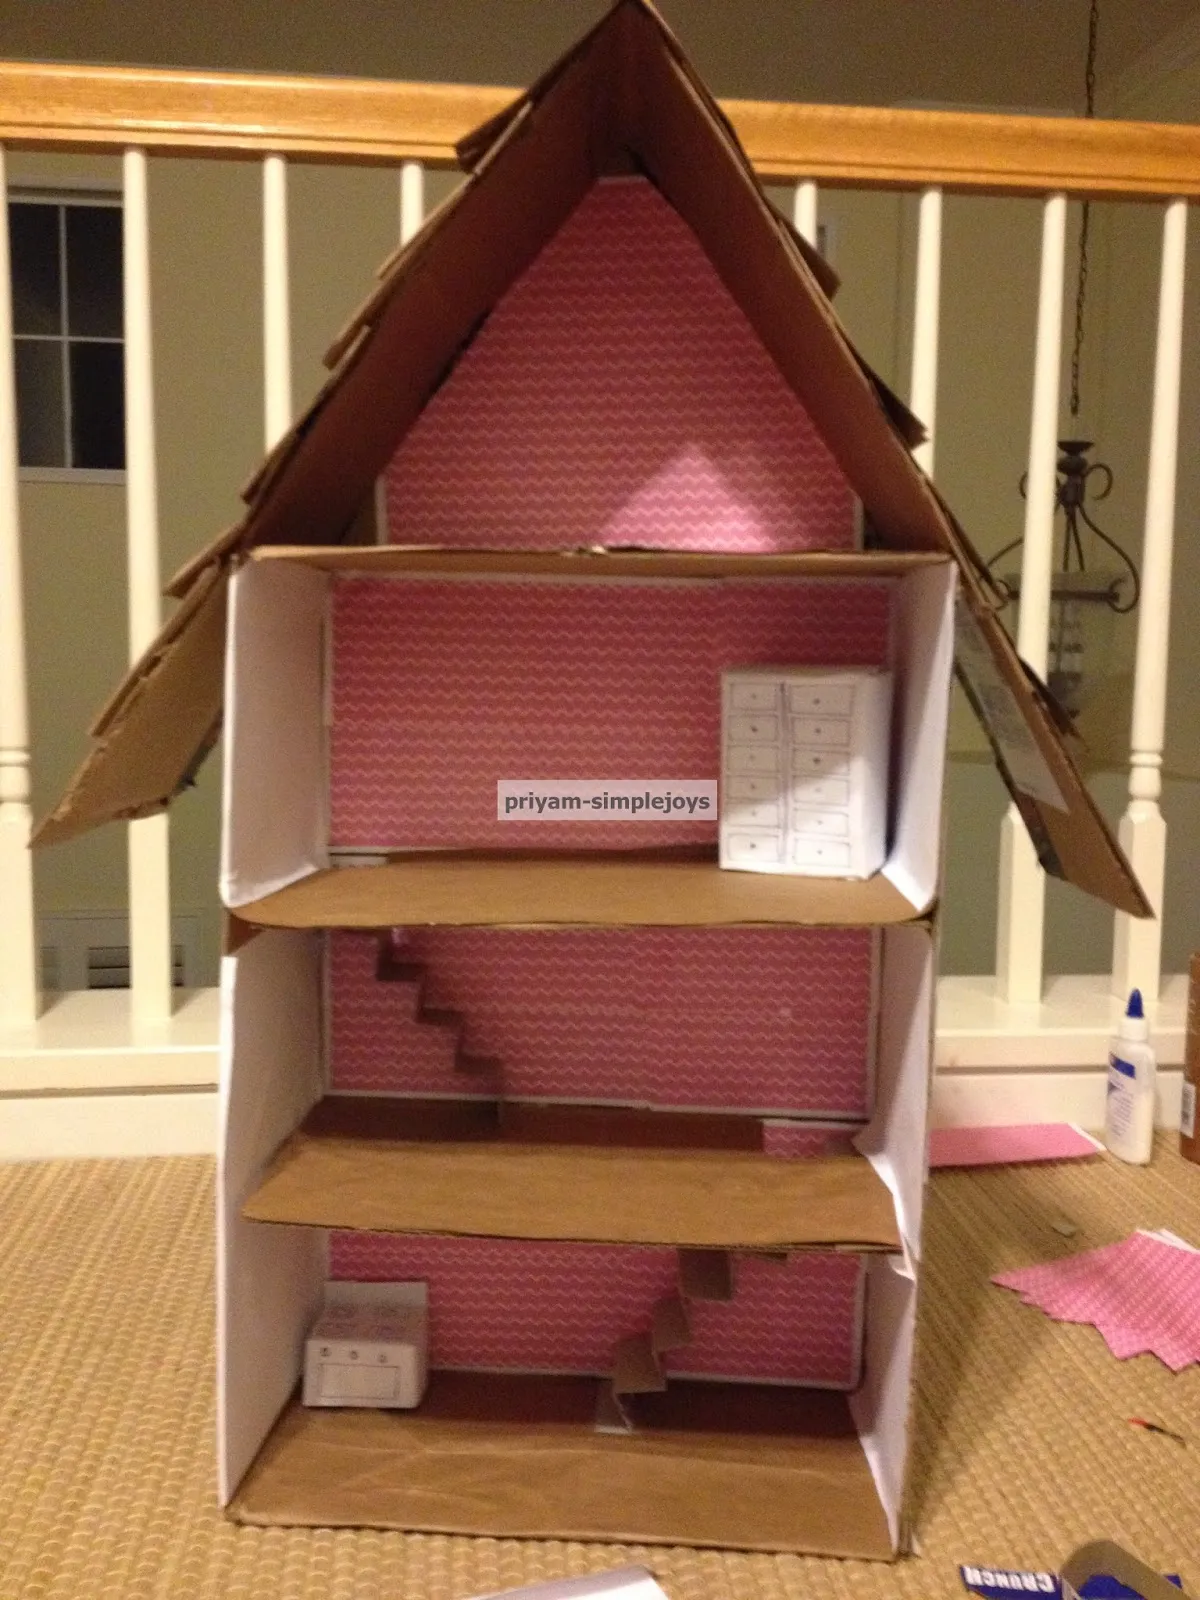
Step 3: Assembling the Walls and Floors
Now that you have your walls and floors cut out, it's time to bring your cardboard dollhouse to life! This step is all about assembling those pieces into a sturdy structure that will house your doll’s adventures.
Start by laying out your cut pieces on a flat surface. You should have:
- Two side walls
- One back wall
- One front wall (with a door cutout)
- Two floor pieces (for each level)
Here’s how to put them together:
- Attach the Floors: Take one of the floor pieces and attach it to the bottom of the side walls using strong tape or glue. Ensure that it’s securely affixed so that it can support the weight of the dollhouse.
- Attach the Walls: Begin by attaching the back wall to the floor piece. Then, attach the side walls to the back wall. You can use tape or glue to keep everything in place. It’s helpful to hold the walls in place for a minute or so until the adhesive sets.
- Add the Front Wall: Finally, attach the front wall, ensuring the door cutout is facing outward. Make sure all walls are standing straight; if not, adjust them before the glue dries.
Tip: To add extra stability, consider using small pieces of cardboard as corner braces. Just cut them into triangles and glue them into the corners where the walls meet.
Also Read This: How to Disconnect from Someone on LinkedIn
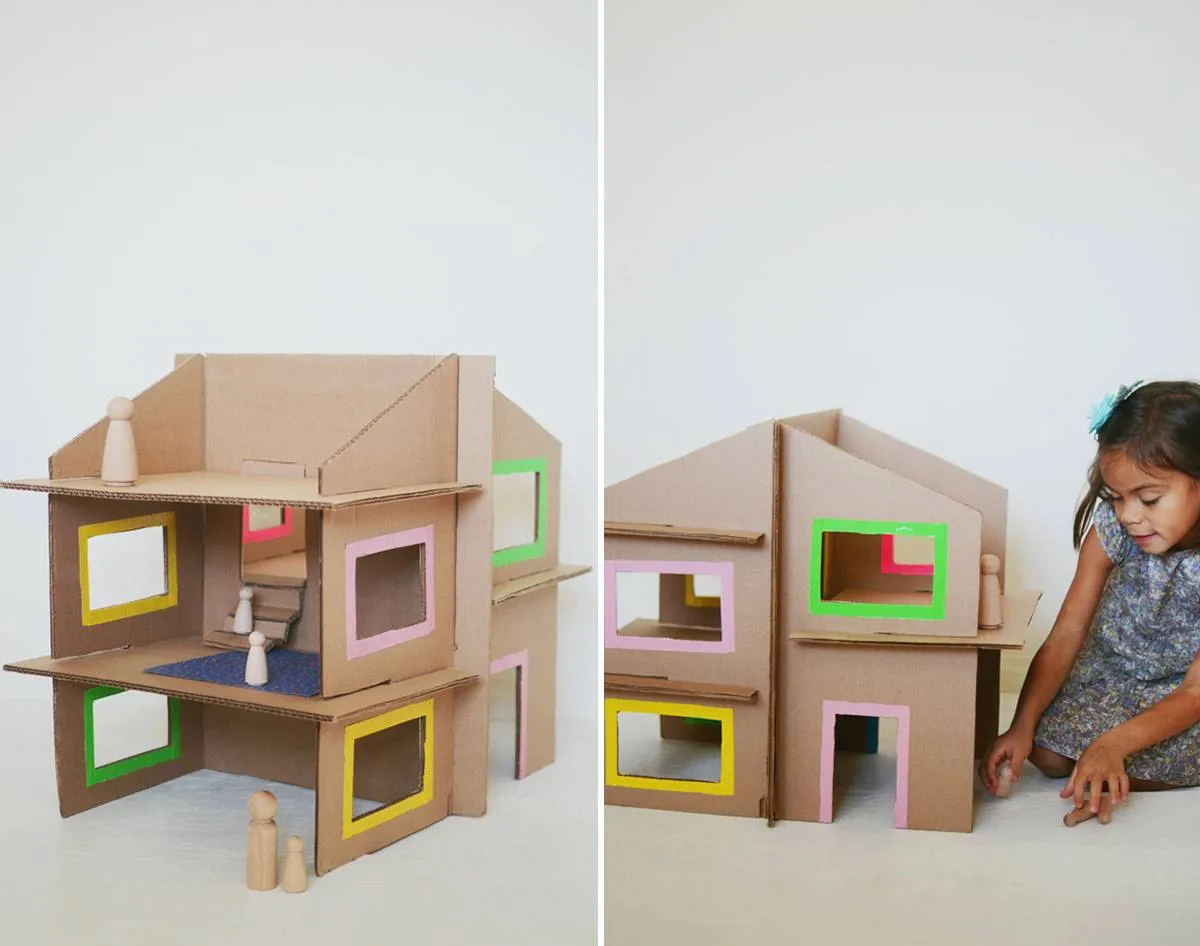
Step 4: Adding Roof and Windows
With the walls and floors securely assembled, it’s time to top off your dollhouse and let in some light! This step focuses on creating the roof and adding delightful windows that will make your dollhouse feel like a home.
Here’s what you’ll need for the roof:
- Two roof panels (cut into triangles or rectangles, depending on your design)
- Scissors or a craft knife
- Glue or tape
Now, let’s get started:
- Cut the Roof Panels: Depending on the design you want, cut two triangular or rectangular pieces of cardboard for the roof. Make sure they are slightly larger than the width of the house to provide an overhang.
- Attach the Roof Panels: Place the roof panels on top of the walls and secure them using glue or tape. A triangular roof can be attached at the peak, while a flat roof can simply rest on top.
- Add Windows: For the windows, cut out rectangles or squares from your leftover cardboard. You can also use clear plastic to represent glass. Attach these to the walls using glue. Don’t forget to cut out spaces in the walls for the windows before you attach them!
Consider using decorative paper or paint to embellish the windows and roof. This will give your dollhouse a unique touch that reflects your personality!
Also Read This: Websites Offering Features Similar to Dailymotion
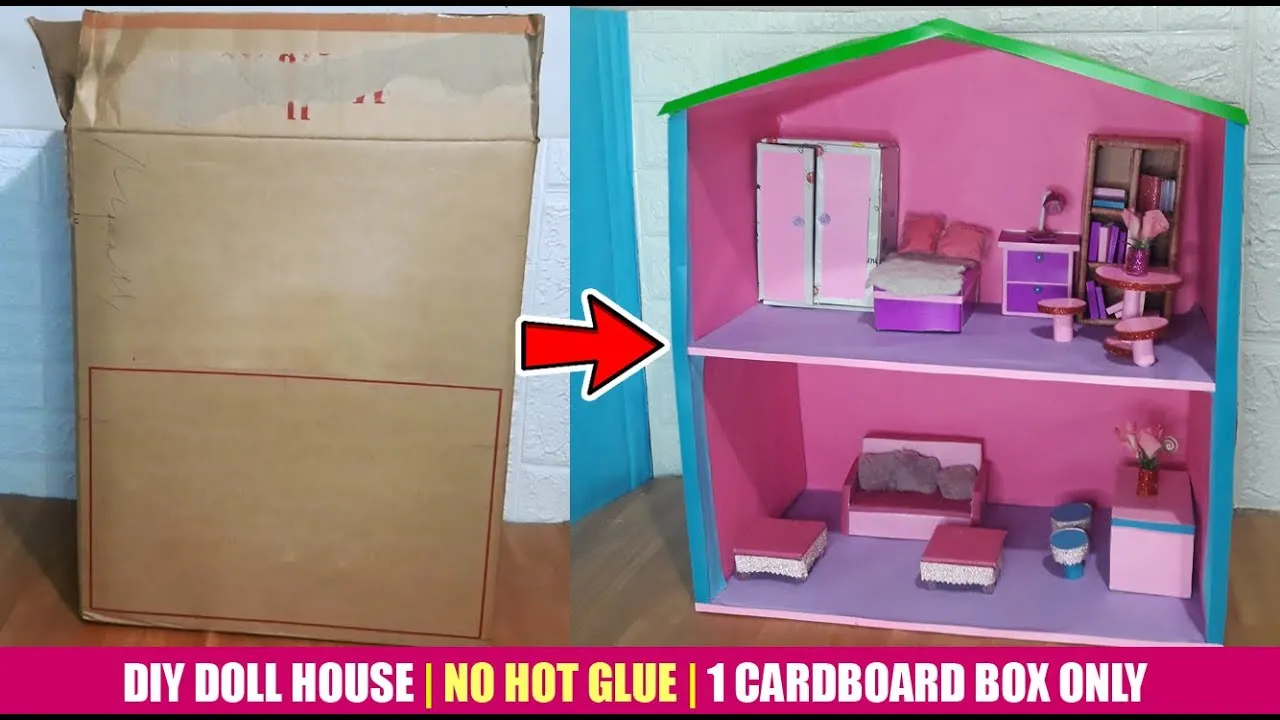
Step 5: Painting and Decorating
Now that your cardboard dollhouse is taking shape, it's time to unleash your creativity in the painting and decorating phase! This step is where your dollhouse truly comes to life, and the best part is, you can make it reflect your personal style.
First, gather your materials. You’ll need:
- Acrylic paints in various colors
- Paintbrushes (various sizes)
- Masking tape
- Decorative paper or wallpaper
- Glue or double-sided tape
Start by choosing a color scheme for your dollhouse. Do you want it to be bright and cheerful or soft and pastel? Once you’ve decided, use masking tape to create clean lines for windows and doors. This will help you avoid messy edges.
Next, begin painting. You can paint each room a different color or use a single color throughout. Remember, it’s your dollhouse, so have fun with it! While the paint dries, you can cut out wallpaper or decorative paper to enhance the look of each room. Simply apply glue or double-sided tape to the back of the paper and press it onto the walls.
Finally, think about adding some fun details. You can paint designs like flowers, stripes, or even polka dots on the exterior. Use stencils if you want a more polished look. It’s all about making your dollhouse a unique masterpiece!
Also Read This: What Is Commentary YouTube and Why Is It Popular?
Step 6: Furnishing Your Dollhouse
With your dollhouse beautifully painted and decorated, it's time to move on to one of the most exciting parts—furnishing it! This is where you get to fill your creation with character and charm.
Before you dive in, consider what kind of furniture you want. Here’s a quick list of essentials you might need for each room:
- Living Room: Couch, coffee table, TV.
- Kitchen: Dining table, chairs, stove, and sink.
- Bedroom: Bed, nightstands, dresser.
- Bathroom: Bathtub, toilet, sink.
You can either make furniture from cardboard or repurpose small items from around your home. For example, bottle caps can serve as tables, and small boxes can be turned into beds. If you're feeling crafty, you can also use fabric scraps to create soft furnishings like cushions and curtains.
Once you have your furniture pieces, arrange them in each room. Play around with the layout until you find what feels right. The beauty of a dollhouse is that there are no rules—just your imagination!
Don't forget to add personal touches like artwork, plants, or family photos. These little details will make your dollhouse feel like a cozy home. Happy furnishing!
How to Create a Cardboard Dollhouse: A Simple Step-by-Step Tutorial
Creating a cardboard dollhouse is a fun and creative project that can be enjoyed by both children and adults. This simple step-by-step tutorial will guide you through the process of building your very own dollhouse using materials that are easily available at home.
Materials Needed:
- Cardboard boxes (cereal boxes, shoe boxes, etc.)
- Scissors or a craft knife
- Glue or tape
- Ruler
- Pencil
- Paint or colored paper for decoration
- Optional: Craft supplies for furniture (buttons, fabric scraps, etc.)
Step-by-Step Instructions:
- Design Your Dollhouse: Sketch a simple layout of your dollhouse. Decide how many rooms you want and their sizes.
- Cut the Cardboard: Using your ruler and pencil, measure and mark the cardboard for walls, floors, and roofs. Carefully cut them out with scissors or a craft knife.
- Assemble the Structure: Start gluing or taping the walls to the base. Make sure they are secure before moving to the next step.
- Add Floors and Roof: Attach additional pieces for floors if you have multiple levels. Then, create a roof using two triangular pieces of cardboard.
- Decorate: Paint the walls or cover them with colored paper. Use craft supplies to create furniture and decorations for your rooms.
Tips for Customization:
Feel free to add windows, doors, and even a garden using more cardboard and craft materials. Personalize your dollhouse with colors and themes that reflect your style.
By following these simple steps, you can create a beautiful and personalized cardboard dollhouse that provides hours of imaginative play. Enjoy the process of building and decorating your unique creation!
Conclusion: Building a cardboard dollhouse is a rewarding project that allows for creativity and personalization, making it an excellent activity for families and craft enthusiasts alike.