Are you struggling to connect your iPhone 4 to WiFi? You’re not alone! Many users find this process a bit tricky, especially with an older model like the iPhone 4. But fear not! In this guide, we’ll walk you through the steps to establish a solid WiFi connection, ensuring you can browse, stream, and stay connected without a hitch. Let’s dive in and get your device online!
Checking Your iPhone 4 Settings
Before diving into the actual connection process, it’s crucial to check your iPhone 4 settings. This step can often save you time and frustration. Here’s how to make sure everything is set up correctly:
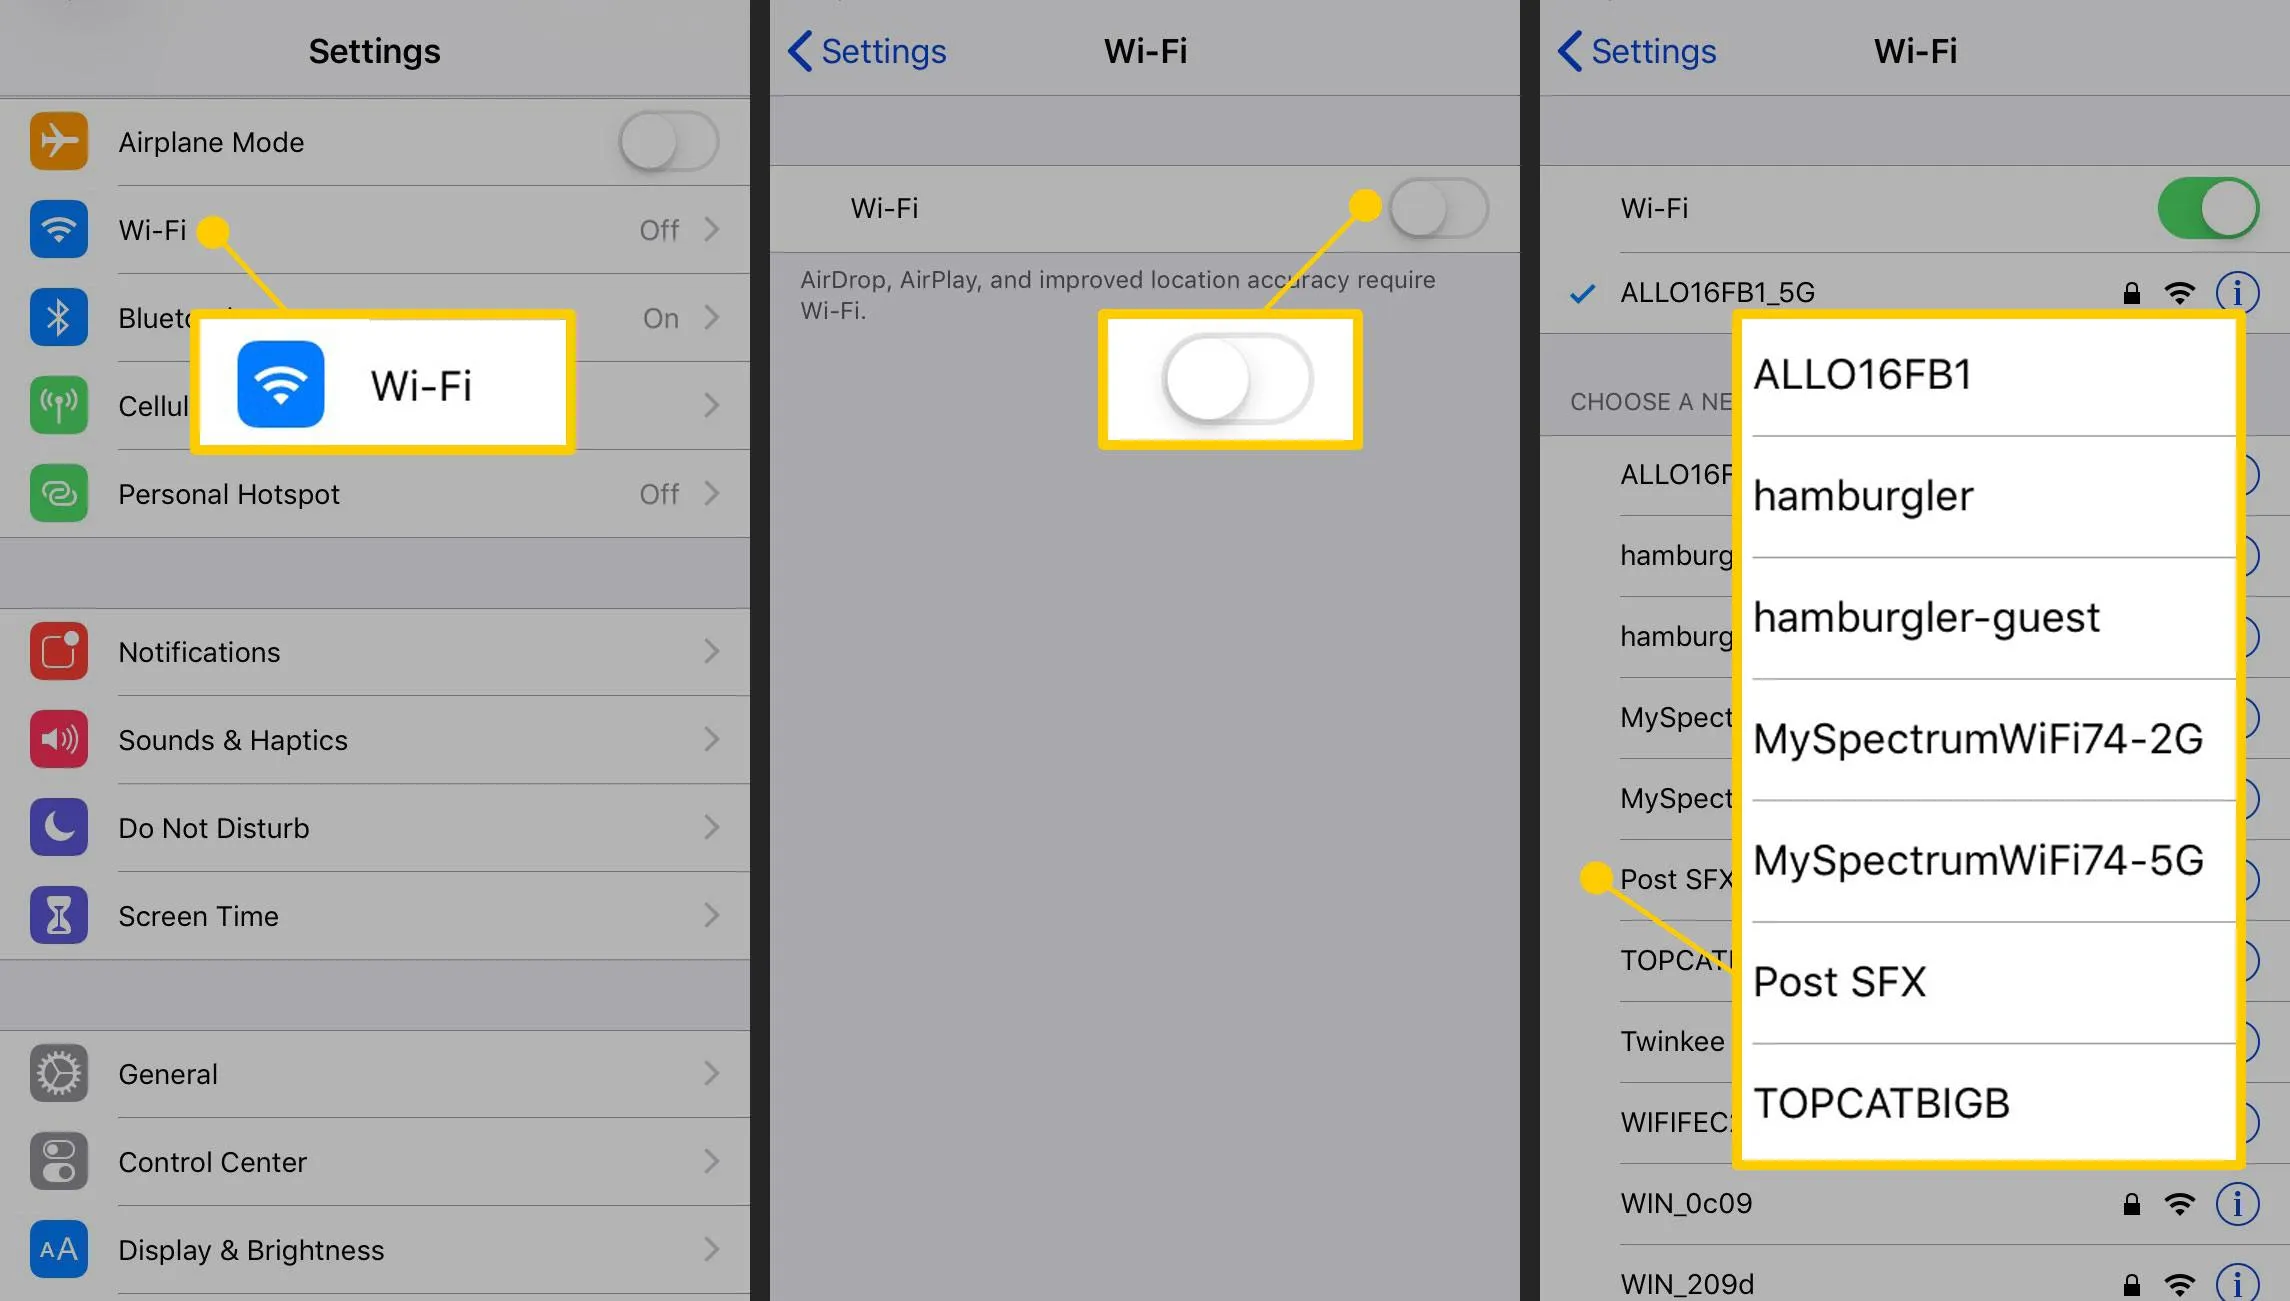
- Open Settings: Start by tapping on the “Settings” app on your home screen. It looks like a gear icon.
- Wi-Fi Option: In the Settings menu, find and select “Wi-Fi.” This will take you to the Wi-Fi settings.
- Wi-Fi Toggle: Ensure that the Wi-Fi toggle is turned ON. If it’s not, just tap the switch to enable it.
Once Wi-Fi is ON, your device will begin searching for available networks. If you don’t see any networks listed, try the following:
- Airplane Mode: Make sure Airplane Mode is turned off. You can find this option in the “Settings” menu.
- Restart Your iPhone: Sometimes, a simple restart can refresh your connection settings. Just hold the power button and slide to power off.
- Software Update: Ensure your iPhone has the latest software. Check for updates under “Settings” > “General” > “Software Update.”
By following these steps, you’ll ensure your iPhone 4 is primed for a smooth WiFi connection. Let’s get you connected!
Also Read This: Discovering Harvard Lawyer Lee on YouTube
Finding Available WiFi Networks
Before you can connect your iPhone 4 to a WiFi network, you need to find out what networks are available. This is quite straightforward! Here’s how to do it:
- Start by unlocking your iPhone 4 and navigating to the Settings app. It’s that gear icon you see on your home screen.
- Once in Settings, look for Wi-Fi. Tap on it, and you’ll be taken to the Wi-Fi menu.
- Make sure the Wi-Fi toggle switch is turned on (it should be green). If it’s off, just tap it to turn it on.
- After enabling Wi-Fi, wait a moment while your iPhone searches for available networks. This might take a few seconds.
Now, when the scan is complete, you’ll see a list of networks that are within range. It’s usually displayed at the top of the Wi-Fi settings page. Networks that are open will not require a password, while those that are secured will have a lock symbol next to them.
If you don’t see any networks, try moving to a different area or ensuring your router is powered on and functioning. Sometimes, a little change in location can make all the difference!
Also Read This: A Beginnerâs Guide to Using Alamy for Buying and Selling Stock Photos
Connecting to a WiFi Network
Now that you’ve found a WiFi network you want to connect to, let’s go through the steps to get you online:
- Under the list of available networks in your Wi-Fi settings, locate the one you wish to connect to. Just tap on its name.
- If the network is secure, you’ll be prompted to enter a password. Make sure you enter it correctly. Remember, passwords are case-sensitive!
- After entering the password, tap Join. Your iPhone will attempt to connect.
Once connected, you’ll see a checkmark next to the network name, and the Wi-Fi icon will appear in the upper left corner of your screen, indicating you’re online!
If you encounter issues connecting, double-check the password, ensure you’re within range of the router, and try restarting your device. Sometimes, a quick restart can solve connectivity issues!
Also Read This: Getting more appreciations on Behance
5. Verifying Your Connection
After you've connected your iPhone 4 to a WiFi network, it’s crucial to ensure that the connection is stable and working correctly. Verifying your connection can save you from potential frustrations later on, especially if you rely on a strong internet connection for browsing, streaming, or gaming.
Here’s how you can verify that your connection is good:
- Check the WiFi Icon: Look at the top of your iPhone’s screen. If you see the WiFi symbol and it’s filled in, you’re connected! If it’s empty or has an “X,” you may not be connected.
- Open Safari: Launch the Safari app and try to load a website. A successful load indicates a working connection. Try a few different sites to confirm.
- Go to Settings: Navigate to Settings > WiFi. Here, you should see a checkmark next to the network you’re connected to, confirming it’s active.
- Try Streaming: If you enjoy watching videos, open a streaming app like YouTube. If videos play without buffering, your connection is solid.
If all checks pass, congratulations! You’re all set for smooth connectivity on your iPhone 4. If not, don’t worry—there might be a few tweaks you can make.
Also Read This: WWE Royal Rumble 2023 Winner Revealed
6. Troubleshooting Common Issues
Even with a successful connection process, you might still face issues. Here’s a quick guide to troubleshooting common WiFi problems on your iPhone 4:
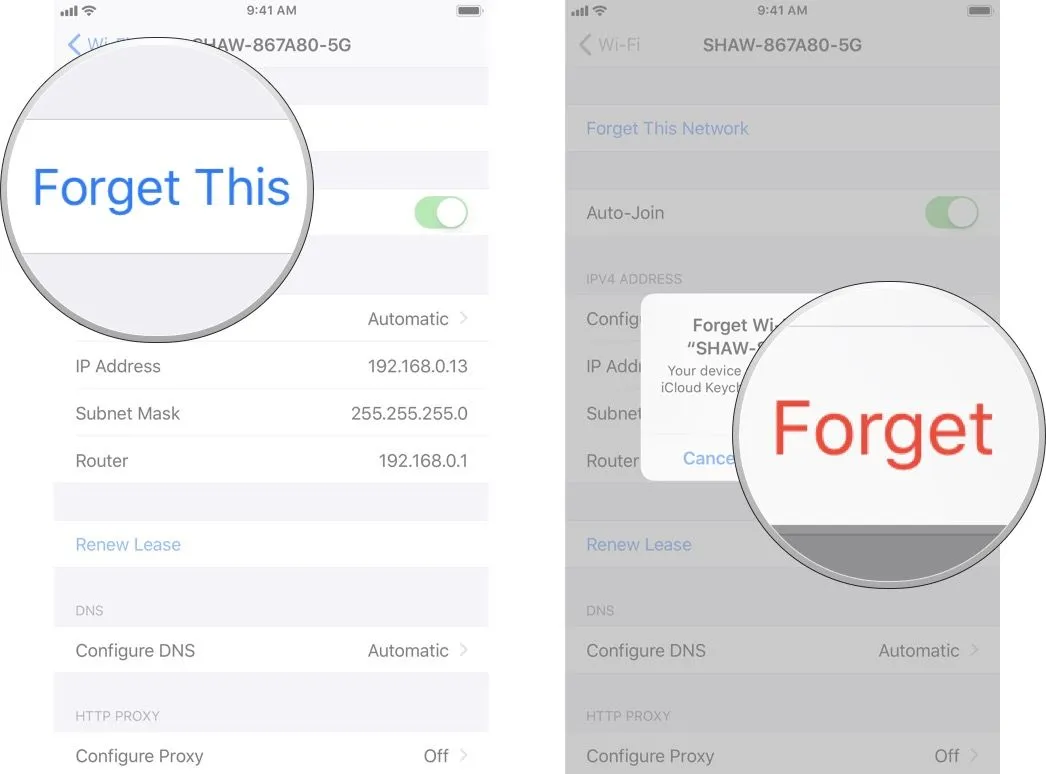
- Forget and Reconnect: If your connection seems unstable, try forgetting the network. Go to Settings > WiFi, tap on the network, and select Forget this Network. Then reconnect.
- Restart Your iPhone: Sometimes, a simple restart can fix many issues. Hold the power button, slide to power off, and then turn it back on.
- Check Router Settings: Make sure your router is functioning correctly. Restart it by unplugging it for a few seconds and then plugging it back in.
- Update iOS: Ensure your iPhone’s software is up to date. Go to Settings > General > Software Update and install any available updates.
If you’ve gone through these steps and still face issues, it might be worth checking with your internet service provider. They can help diagnose any connectivity problems on their end.
How to Connect WiFi on iPhone 4 for Smooth Connectivity
Connecting your iPhone 4 to a WiFi network is essential for smooth internet connectivity. Follow these simple steps to set up your WiFi connection and enjoy seamless browsing, streaming, and downloading.
Steps to Connect WiFi on iPhone 4
- Unlock your iPhone: Start by unlocking your iPhone 4. Access the home screen to begin.
- Open Settings: Locate and tap on the Settings app, which is represented by a gear icon.
- Select Wi-Fi: Scroll down and tap on Wi-Fi. This will take you to the WiFi settings menu.
- Turn on Wi-Fi: Ensure that the Wi-Fi toggle switch is turned ON. Your iPhone will start scanning for available networks.
- Choose a Network: From the list of available networks, tap on the name of the network you wish to connect to.
- Enter Password: If the network is secured, you will be prompted to enter the WiFi password. Type it carefully and tap Join.
- Verify Connection: Once connected, a checkmark will appear next to the network name, and you will see the WiFi icon in the status bar.
Troubleshooting Tips
If you experience issues connecting to WiFi, consider the following:
- Ensure you are within range of the WiFi router.
- Restart your iPhone and try reconnecting.
- Double-check the WiFi password.
- Reset network settings by going to Settings > General > Reset > Reset Network Settings.
By following these steps, you can easily connect your iPhone 4 to a WiFi network, ensuring smooth and uninterrupted connectivity for all your online activities.
Conclusion
Connecting your iPhone 4 to WiFi is a straightforward process that enhances your device's functionality and allows you to enjoy a better online experience.