Behance is a vibrant online platform designed for creatives to showcase their work, connect with other artists, and gain inspiration. Whether you’re a graphic designer, photographer, illustrator, or any other type of creative, Behance offers a space to present your projects in a visually appealing manner. What sets
Creating a Behance Account

Getting started on Behance is a straightforward process, and before you know it, you’ll be ready to share your creative projects. Here’s how you can create your own Behance account:
- Visit the Behance Website: Open your browser and go to Behance.net.
- Sign Up: Click on the “Sign Up” button located at the top right corner of the homepage. You can choose to sign up using:
- Email: Enter your email address and create a password.
- Social Media: Sign up using your Adobe, Facebook, or Google account for a quicker registration process.
And there you have it! Creating a Behance account is just the beginning of your journey in showcasing your creativity. With your new account, you’re now ready to start uploading and organizing your projects!
Also Read This: How to Download YouTube Videos in HD
Preparing Your Projects for Upload

Before you hit that upload button on Behance, it's crucial to prepare your projects properly. Think of it as getting your best outfit ready for a big event! Here’s how to ensure your projects shine:
- Gather Your Assets: First things first, collect all the files you want to showcase. This could include images, videos, or even PDF documents. Organizing them into a single folder can save you time during the upload process.
- Edit and Optimize: Make sure your images are high-quality but not too large. You want them to look great without slowing down the loading time. Using tools like Photoshop or online compressors can help you optimize your files.
- Create a Cohesive Narrative: Think about how each piece of work fits into a larger story. A clear narrative helps viewers understand your creative process and the intent behind your designs.
- Write Descriptions: Craft engaging descriptions for each piece. Explain the concept, your inspiration, and any challenges you faced. This adds depth to your project and can resonate with your audience.
- Tagging: Consider relevant tags and categories that align with your project. This not only helps in organizing your work but also enhances discoverability on the platform.
By taking the time to prepare your projects, you’re setting yourself up for success on Behance. It’s all about making a lasting impression!
Also Read This: How to Earn Money on Rumble
Steps to Upload Your Projects
Now that your projects are all prepped and ready, let’s walk through the steps to upload them on Behance. It’s easier than you might think! Just follow these simple steps:
- Log In to Your Behance Account: Start by logging into your Behance account. If you don’t have one yet, you’ll need to create it first.
- Click on the ‘Create a Project’ Button: Once you’re in, look for the ‘Create a Project’ button, usually found on your profile page or dashboard.
- Upload Your Files: Drag and drop your prepared files into the upload area or click to browse your computer. You can upload multiple files at once!
- Arrange Your Content: After uploading, you can rearrange the order of your images or videos. Make sure to present them in a way that tells your story effectively.
- Add Project Details: Fill out the title, description, and tags for your project. This is where your narrative comes into play!
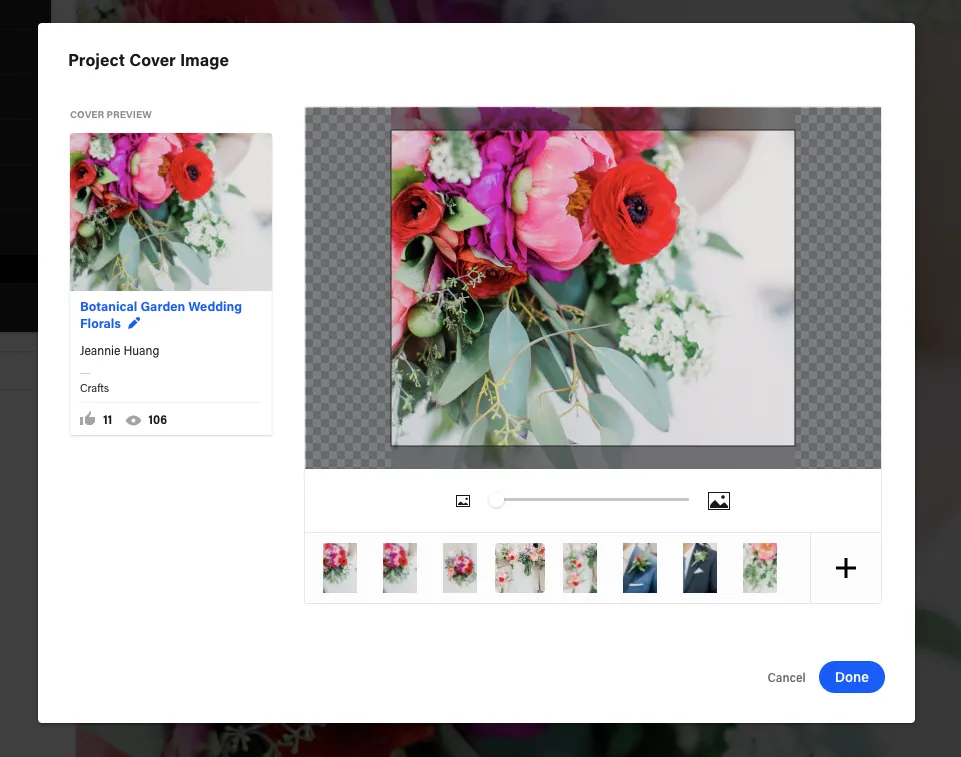
- Choose a Cover Image: Select an eye-catching cover image that represents your project. This will be the first thing people see, so make it count!
- Publish: Once you’re happy with how everything looks, hit the ‘Publish’ button. Your project is now live for the world to see!
And there you have it! With these steps, you’re all set to showcase your creative work on Behance. Happy uploading!
Also Read This: Should You Message Hiring Managers on LinkedIn
5. Organizing Your Projects Effectively
Organizing your projects on Behance is essential for making your profile visually appealing and easy to navigate. A well-organized portfolio not only attracts potential clients but also highlights your skills and creativity. Here are some effective strategies to help you organize your projects:
- Group Similar Projects: Start by categorizing your work. If you have several graphic design projects, create a dedicated section for them. The same goes for photography, illustration, or any other specialties you may have.
- Use Project Covers: Choose eye-catching covers for your projects. They serve as the first impression for viewers, so make sure they’re visually consistent and represent the essence of your project.
- Sort by Date or Theme: Depending on your preference, you can arrange your projects chronologically or by theme. This makes it easier for viewers to follow your creative journey or explore a specific type of work.
- Incorporate Descriptions: Each project should have a clear, engaging description. Explain the project’s purpose, your role, and the tools you used. This adds context and depth to your work.
- Regularly Update Your Portfolio: As you complete new projects, don’t forget to revisit your portfolio. Remove outdated work and add fresh projects to keep your profile current and reflective of your latest skills.
By following these strategies, you'll create a well-organized and visually appealing portfolio that effectively showcases your artistic journey.
Also Read This: How to Unsubscribe from LinkedIn Emails
6. Tips for Showcasing Your Work
When it comes to showcasing your work on Behance, there are several key tips that can help you stand out from the crowd. Remember, your portfolio isn’t just a collection of projects; it’s a representation of you as a creative professional. Here are some tips to elevate your showcase:
- High-Quality Images: Always use high-resolution images. Blurry or pixelated visuals can detract from the quality of your work. Ensure that your images are well-lit and showcase your projects in their best light.
- Engaging Project Descriptions: Write engaging and informative descriptions for each project. Share the story behind the project, your thought process, and any challenges you faced. This not only engages viewers but also demonstrates your problem-solving skills.
- Use Tags Wisely: Tags help users find your work. Be sure to use relevant tags that accurately describe your project. This can include the type of work, the tools used, or the industry it belongs to.
- Highlight Your Best Work: Don’t feel pressured to upload everything you’ve ever created. Focus on quality over quantity. Choose projects that showcase your skills and style effectively.
- Engage with the Community: Behance is a community of creatives. Engage with other users by commenting on their work and responding to comments on yours. This interaction can lead to valuable connections and feedback.
By following these tips, you’ll be able to create a compelling showcase that not only highlights your skills but also invites engagement and interest from potential clients and collaborators.
How to Add Projects on Behance: Organizing and Uploading Your Work
Behance is a popular platform for creative professionals to showcase their work, connect with others, and discover new opportunities. Adding projects on Behance involves organizing your work effectively and uploading it in a way that highlights your skills and creativity. Here’s a step-by-step guide to help you through the process.
Step 1: Organize Your Work
Before uploading, it's essential to organize your projects. Consider the following:
- Select Your Best Work: Choose projects that showcase your skills and creativity.
- Group Similar Works: Organize similar pieces together to create a cohesive presentation.
- Gather High-Quality Images: Use high-resolution images to ensure your work looks professional.
- Prepare Project Descriptions: Write clear, engaging descriptions that explain your work and thought process.
Step 2: Create a New Project on Behance
To upload your work, follow these steps:
- Log in to your Behance account.
- Click on the “Create a Project” button.
- Upload your images or videos by dragging and dropping them or using the upload button.
- Add project titles, descriptions, and tags to enhance visibility.
- Arrange your media in the desired order.
- Preview your project to ensure everything looks good.
- Click “Publish” to make your project live.
Tips for a Successful Behance Project
Here are some additional tips to enhance your project’s appeal:
- Engaging Thumbnails: Choose eye-catching thumbnails for your projects.
- Consistent Branding: Use a consistent color scheme and style across your projects.
- Networking: Share your projects on social media and engage with other creatives.
By following these steps, you can effectively organize and upload your work on Behance, allowing you to showcase your creativity and connect with a broader audience.
Conclusion and Next Steps
In conclusion, adding projects to Behance is a straightforward process that can significantly enhance your online presence as a creative professional. After uploading your work, consider promoting your projects on social media and engaging with the Behance community to expand your reach and make valuable connections.