As a creative individual whether an artist or a designer sharing your creations is akin to revealing a glimpse of your inner self. It's more than just showcasing visuals; it's about narrating your story highlighting your path and establishing connections with like minded souls who share your enthusiasm. I vividly recall the moment I uploaded my design for the time. The thrill blended with anxiety was tangible. Would others resonate with my aesthetic? Would anyone even take note of my artwork?
In the current era showcasing your work on platforms like Behance is crucial. It helps you connect with a wider audience receive feedback and potentially attract clients or collaborators. Here are some key reasons why sharing your creations is important.
- Building Your Brand: Your portfolio is a reflection of who you are as a creative professional.
- Networking Opportunities: Sharing your work opens doors to connect with other creatives.
- Gaining Constructive Feedback: Feedback from peers can help you grow and improve.
- Attracting Clients: A well-presented portfolio can catch the eye of potential clients.
In the end, sharing your creations is all about expressing your love for what you do and welcoming others into your imaginative universe. So, go ahead and embrace the limelight. Your creations are worth being noticed!
Creating Your Behance Account
Creating a Behance account is super easy and it marks the beginning of your journey to showcase your creative work. I vividly recall the thrill I felt when I first registered. It was like stepping into a lively community filled with artists and designers. So, lets go through the setup process step by step.
- Visit the Behance website: Go to behance.net.
- Click on 'Sign Up': You’ll see this option prominently displayed.
- Fill in your details: You can sign up using your email or even your Adobe ID if you have one. Ensure you choose a username that reflects your brand.
- Customize Your Profile: Once signed up, take a moment to fill in your profile details. Add a profile picture, a short bio, and links to your social media accounts. This is your chance to make a great first impression!
Think of your Behance profile as a digital introduction. The more work you invest in it the more it will connect with people. So make sure to craft a profile that genuinely reflects who you are and what you do.
Also Read This: Is A&E Available on YouTube TV? Exploring Channel Options
Navigating to the Project Creation Page
Now that you’ve got your Behance account ready, let’s dive into creating your very first project. I get that this part might seem a bit overwhelming at first, but believe me it’s not as difficult as it appears! When I first landed on the project creation page I felt a rush of excitement. Here’s a guide on how to get started.
- Log into Your Behance Account: Use your credentials to access your profile.
- Locate the 'Create a Project' Button: This button is usually located at the top of your profile page. Click on it, and let’s get started!
- Choose Your Project Type: You can upload images, videos, or even a mix of formats. Think about what best represents your work.
When you head over to start a new project take a moment to reflect on the narrative you wish to convey. Every project presents a chance to showcase your individuality and establish a connection with your audience. Avoid hurrying through this process; instead pause to organize your ideas and shape your creation in a manner that resonates with your true self.
Also Read This: Is Watching TV Shows on Dailymotion Legal
Uploading Your Project Files
Once you reach the page for creating a project its time to get to the exciting part—uploading your project files! This is where your imagination really comes to life and let me tell you it feels like a little celebration every time I add something fresh. I can still recall the moment I first pressed the upload button; my heart raced with anticipation and a touch of nervousness. Will they appreciate it? Will it connect with others? Lets take a look at how to streamline and enhance this process.
Here’s a guide on how to upload your project files.
- Select Your Files: Click on the upload button, and you can choose images, videos, or even PDFs. Try to select files that best represent your work.
- Organize Your Files: Consider arranging your files in a sequence that tells a story. For example, if it's a design project, start with the initial concept and end with the final product.
- Use High-Quality Images: Quality matters! Ensure your images are clear and vibrant. I learned this the hard way—nothing kills the vibe like a blurry picture.
- Drag and Drop Feature: Behance allows you to drag and drop files, making it super convenient. Just drag your files into the designated area, and they’ll be uploaded in a flash!
After uploading your files, take a moment to go through them. Ensure that everything is set and you’ll be closer to showcasing your creative vision to the world!
Also Read This: Are ParrotX2 YouTube Videos Scripted? Unveiling the Truth Behind the Popular Channel
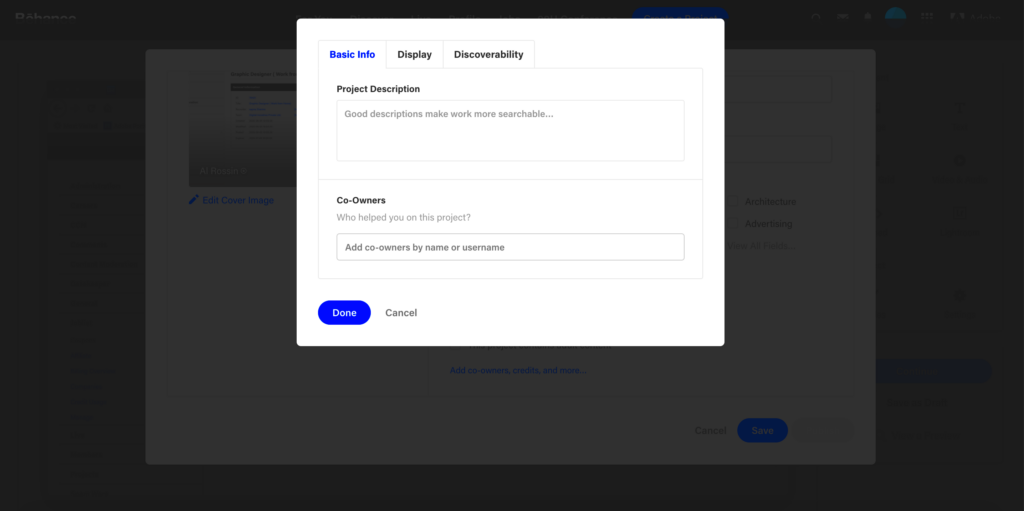
Adding Project Details and Descriptions
Now that you have your files uploaded its time to enrich your project with details and descriptions. This is the moment to spin your narrative and provide context for your work. I vividly remember the instance when I carefully penned a description for my project. It felt like infusing a touch that breathed life into the entire creation. Your choice of words has the power to captivate your audience and establish a connection with them on your journey.
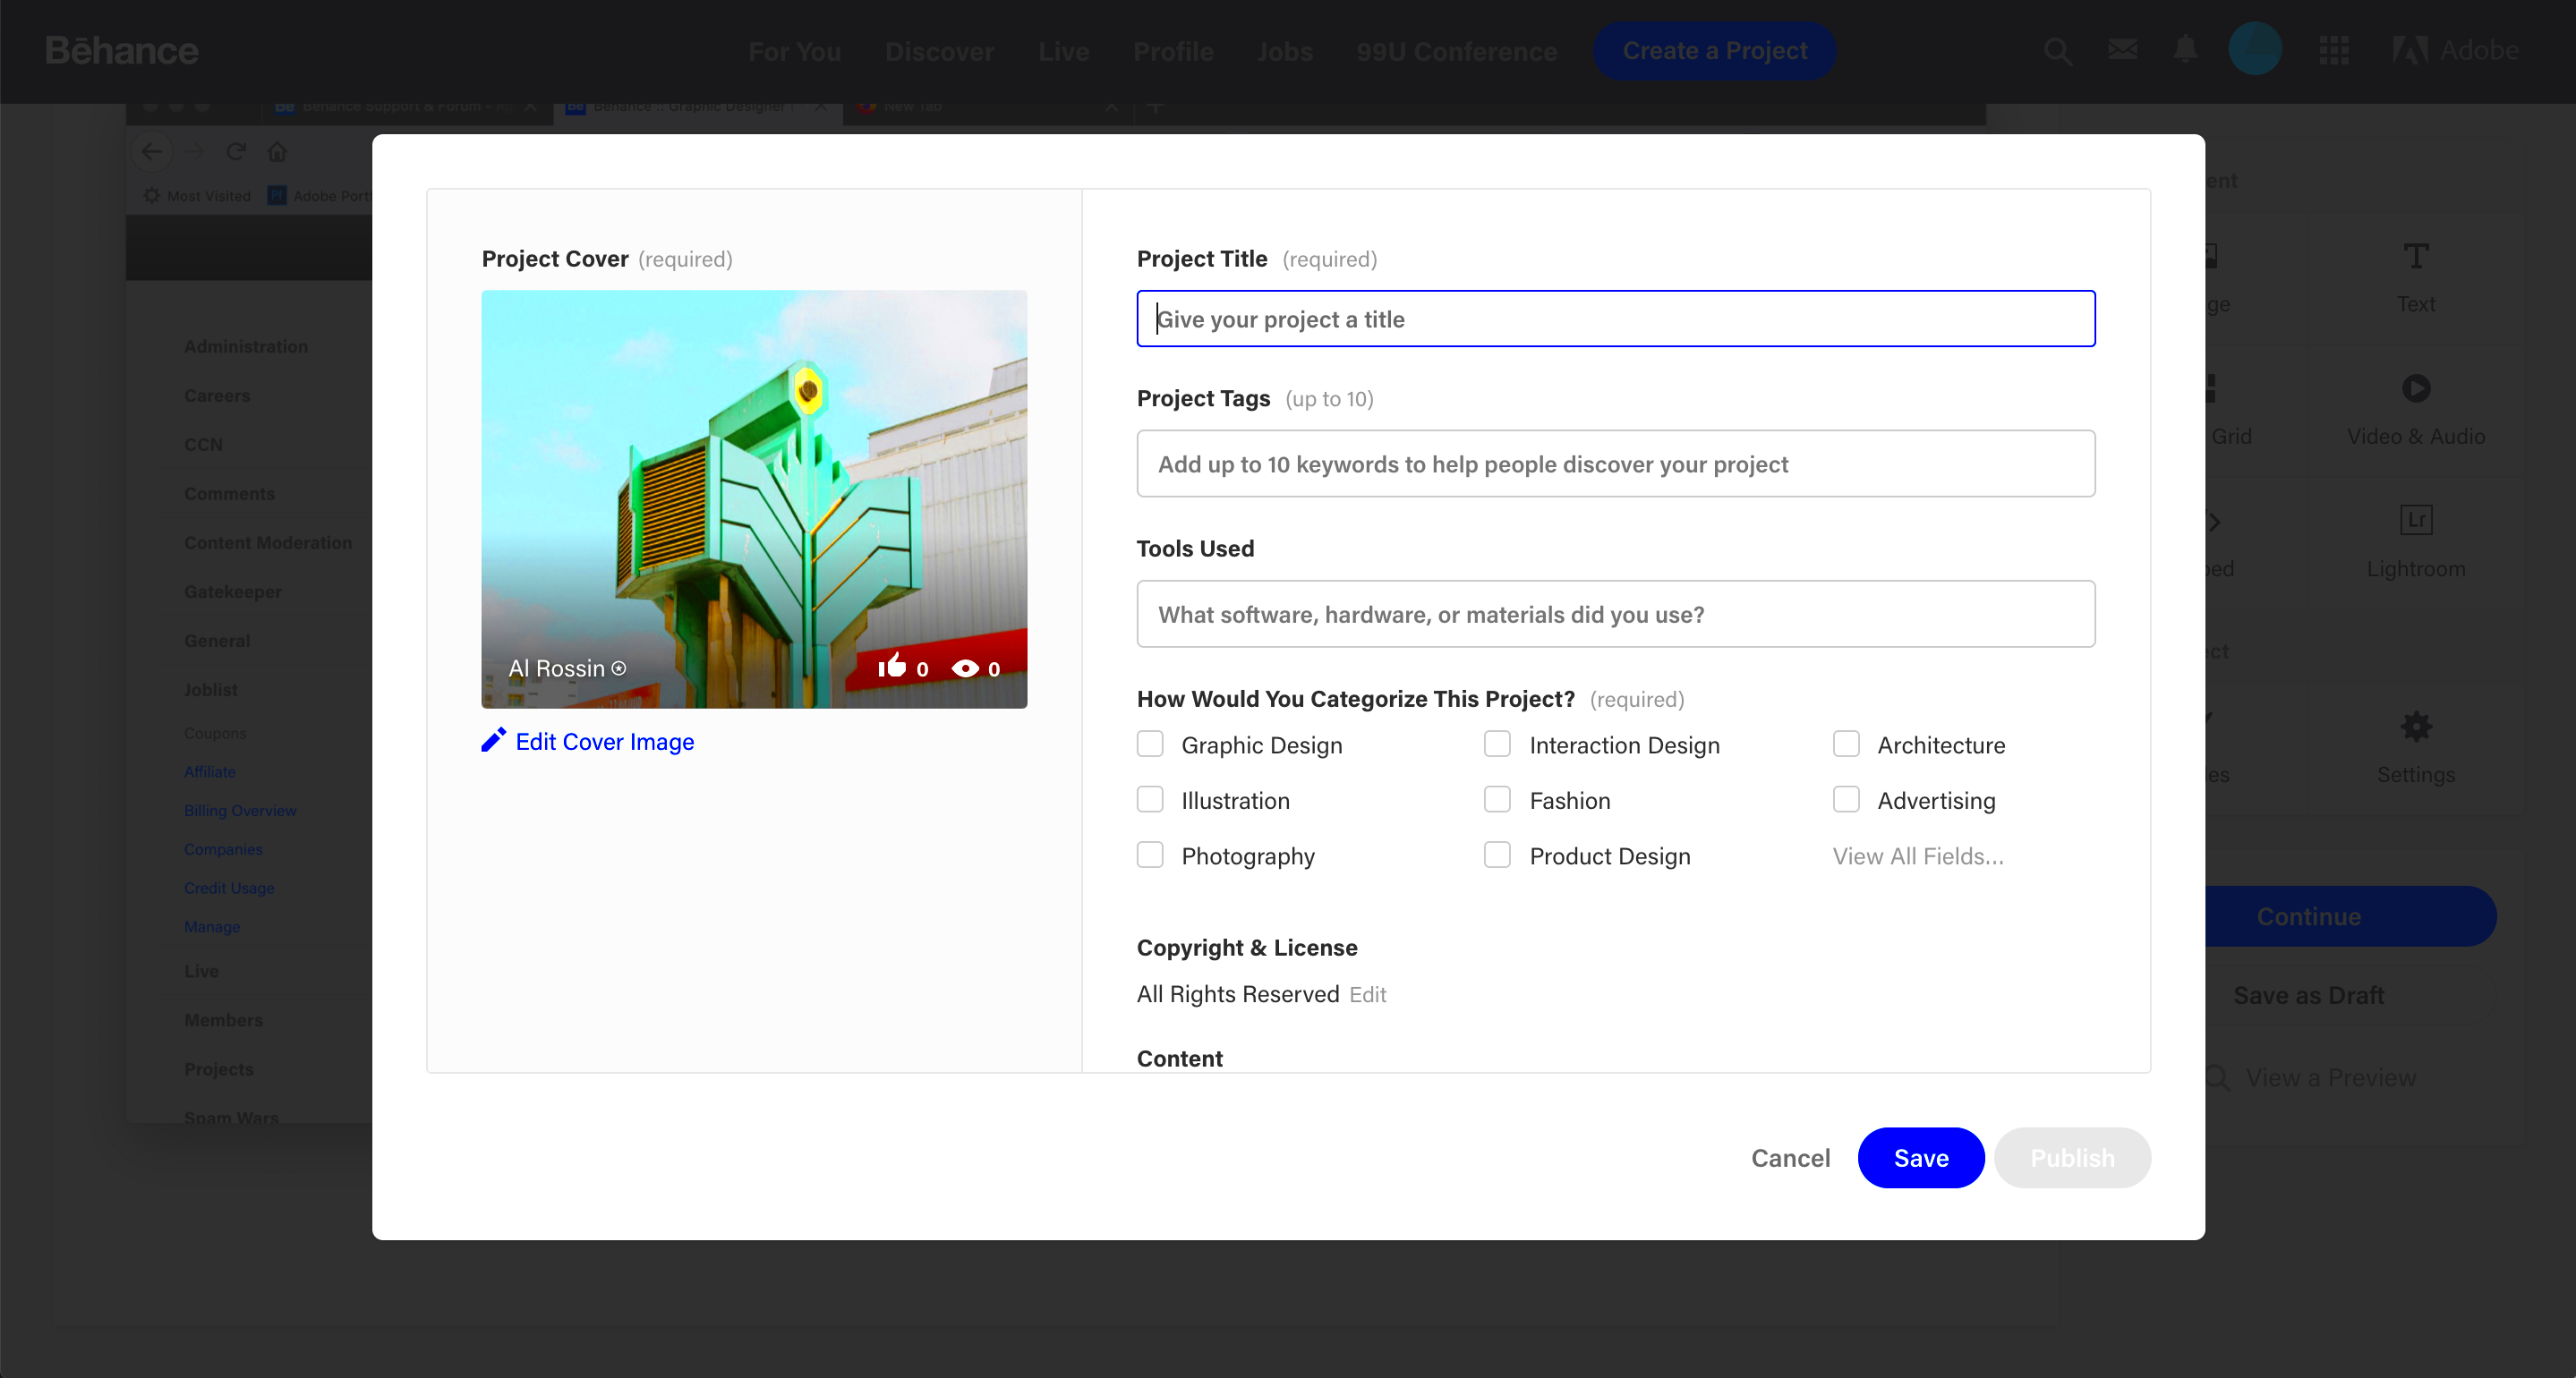
Here’s a guide to enhance your project with added details.
- Title: Start with a catchy title. Think of something that encapsulates the essence of your project.
- Description: Write a brief yet engaging description of your project. Share your thought process, challenges faced, and the inspiration behind your work. You might say, “This project was born from a deep love for nature and the desire to bring its beauty to life through design.”
- Tags: Use relevant tags that describe your work. This helps others discover your project easily.
- Project Tools: If you used specific tools or software, mention them. This can help fellow creatives understand your workflow better.
Finally make sure to add your unique flair. Share stories or experiences that motivated you throughout the project. Keep in mind that this is an opportunity for you to stand out and engage with your audience more meaningfully.
Also Read This: Shutterstock vs Adobe Stock: Choosing the Best for Your Needs
Setting Up Project Visibility Options
As you near the completion of setting up your project it's important to think about how visible you want your work to be. Deciding who gets to see your project can be a bit daunting but it's also a chance to showcase your creativity to the audience. I recall feeling a blend of thrill and nervousness when I released my first piece. Here’s a helpful guide to assist you in navigating this aspect.
Here’s how to adjust the visibility settings for your project.
- Public vs. Private: Decide whether you want your project to be publicly accessible or private. If it’s public, it will be visible to everyone on Behance and beyond. If it’s private, only people you invite will see it.
- Collection Options: You can choose to add your project to specific collections on Behance. This can increase your visibility among targeted audiences.
- Social Media Sharing: Behance allows you to share your project on social media platforms. Make sure to enable this option to reach a broader audience.
- Collaborator Settings: If you worked with others, you can add them as collaborators on the project. This not only gives credit where it’s due but also expands your network.
Before you click the publish button, take a second to go over your visibility settings. Think about what aligns with you and your creations. Keep in mind that this is an opportunity to showcase your imagination to the world, so make your choices carefully!
Also Read This: Get Your LinkedIn QR Code for Quick Profile Sharing
Publishing Your Project
The time has come to share your work with the world! I can vividly recall the excitement I felt when I published my first project on Behance. It was like putting a part of myself out there. However before you press that button lets take a moment to make sure everything is perfect.
Before hitting that publish button here’s a handy checklist you might want to go through.
- Final Review: Take a moment to go through all your uploaded files, descriptions, and tags. Check for any typos or missing details. Sometimes, stepping away for a few minutes helps you see things more clearly.
- Preview Your Project: Use the preview feature to see how your project will appear to viewers. Make sure the layout looks good, and everything is in place.
- Seek Feedback: If you have a trusted friend or colleague, consider asking for their opinion. A fresh set of eyes can catch things you might have overlooked.
- Publish Settings: Confirm your visibility settings—make sure your project is set to public if you want everyone to see it.
Once you’re happy with your work hit that publish button. You’ll experience a blend of excitement and a touch of nervousness, which is totally natural! Promote your project on social media or among your artistic communities to get the word out. Keep in mind that this is your chance to stand out and the world is ready to witness your imagination!
Also Read This: Mastering Editing Techniques for Perfect Pictures in Photoshop CS6
Frequently Asked Questions
As you dive into your Behance adventure you might find yourself with a few questions and that’s completely understandable. I recall being inundated with details when I began my own journey. So lets address some inquiries to make your experience more seamless.
- How do I delete a project? You can delete a project by going to your project settings. Look for the 'Delete Project' option, but make sure you want to remove it as this action is irreversible.
- Can I edit my project after publishing? Absolutely! You can go back and edit any details, add new files, or change the description even after your project is live.
- What if I want to change the visibility settings? No problem! You can adjust your project’s visibility settings at any time by editing the project details.
- How can I get noticed on Behance? Engage with other artists, comment on their projects, and share your work on social media. Building connections can lead to more visibility.
Don’t forget that every creator has a beginning and it’s completely natural to have doubts. The important thing is to continue expanding your knowledge and evolving with each project you share!
Wrapping Up Your Behance Journey
As you conclude your time on Behance take a moment to reflect on the progress you've made. Looking back at my initial projects I can see the growth, the challenges and the experiences that have shaped my creative journey. Each project represents not a mere assortment of visuals but a significant milestone in your artistic narrative.
Here are some suggestions to make your journey more meaningful.
- Stay Consistent: Regularly update your portfolio with new projects. Consistency helps you stay relevant and showcases your evolving skills.
- Engage with the Community: Behance is a vibrant platform. Interact with other artists, provide constructive feedback, and learn from their experiences.
- Reflect and Learn: After completing a project, take time to evaluate what worked and what didn’t. Every experience is an opportunity to grow.
- Celebrate Your Achievements: Don’t forget to celebrate your milestones, no matter how small. Every project you publish is a testament to your hard work.
Ultimately your experience on Behance is one of a kind. Embrace the highs and lows the bursts of creativity and the obstacles. Continue to showcase your enthusiasm to the world and you never know you might just motivate someone during your journey!