Behance is a vibrant online community where creative professionals showcase their work. Whether you are a graphic designer, photographer, or illustrator, Behance provides a space to display your projects and connect with other creatives. It's part of the Adobe family, which means it integrates well with other Adobe products. Here, users can follow each other, appreciate projects, and offer constructive feedback. This makes it an excellent platform not only for sharing your work but also for networking with other artists and potential clients.
Why You Might Want to Edit Your Portfolio
Editing your Behance portfolio is essential for keeping your work fresh and relevant. Here are some reasons why you might consider making changes:
- Showcase New Skills: As you learn and grow in your craft, it's important to update your portfolio to reflect your latest skills and techniques.
- Remove Outdated Work: Projects that no longer represent your current style or skills can dilute your portfolio. Removing them can help you present a more cohesive body of work.
- Improve Visibility: Regular updates can increase your portfolio's visibility on the platform, attracting more viewers and potential clients.
- Feedback Incorporation: If you received feedback from peers or clients, incorporating that into your projects can improve your work and show your adaptability.
Also Read This: Demystifying the Myth: Are Shutterstock Images Truly Free for Commercial Use?
Steps to Access Your Behance Portfolio
Accessing your Behance portfolio is simple and straightforward. Just follow these steps:
- Log in to Your Account: Visit the Behance website and log in using your Adobe ID. If you don’t have an account, you’ll need to create one first.
- Navigate to Your Profile: Once logged in, click on your profile picture in the top right corner. This will take you to your profile page.
- View Your Projects: Scroll through your portfolio to see all the projects you have uploaded. This is where you can decide which projects to edit or update.
- Select a Project to Edit: Click on the project you want to change. This will open the project page where you can view its details.
Now you're ready to start making edits and enhancements to your portfolio!
Also Read This: How to Load Every Video in a YouTube Playlist Effectively
Editing Your Project Details
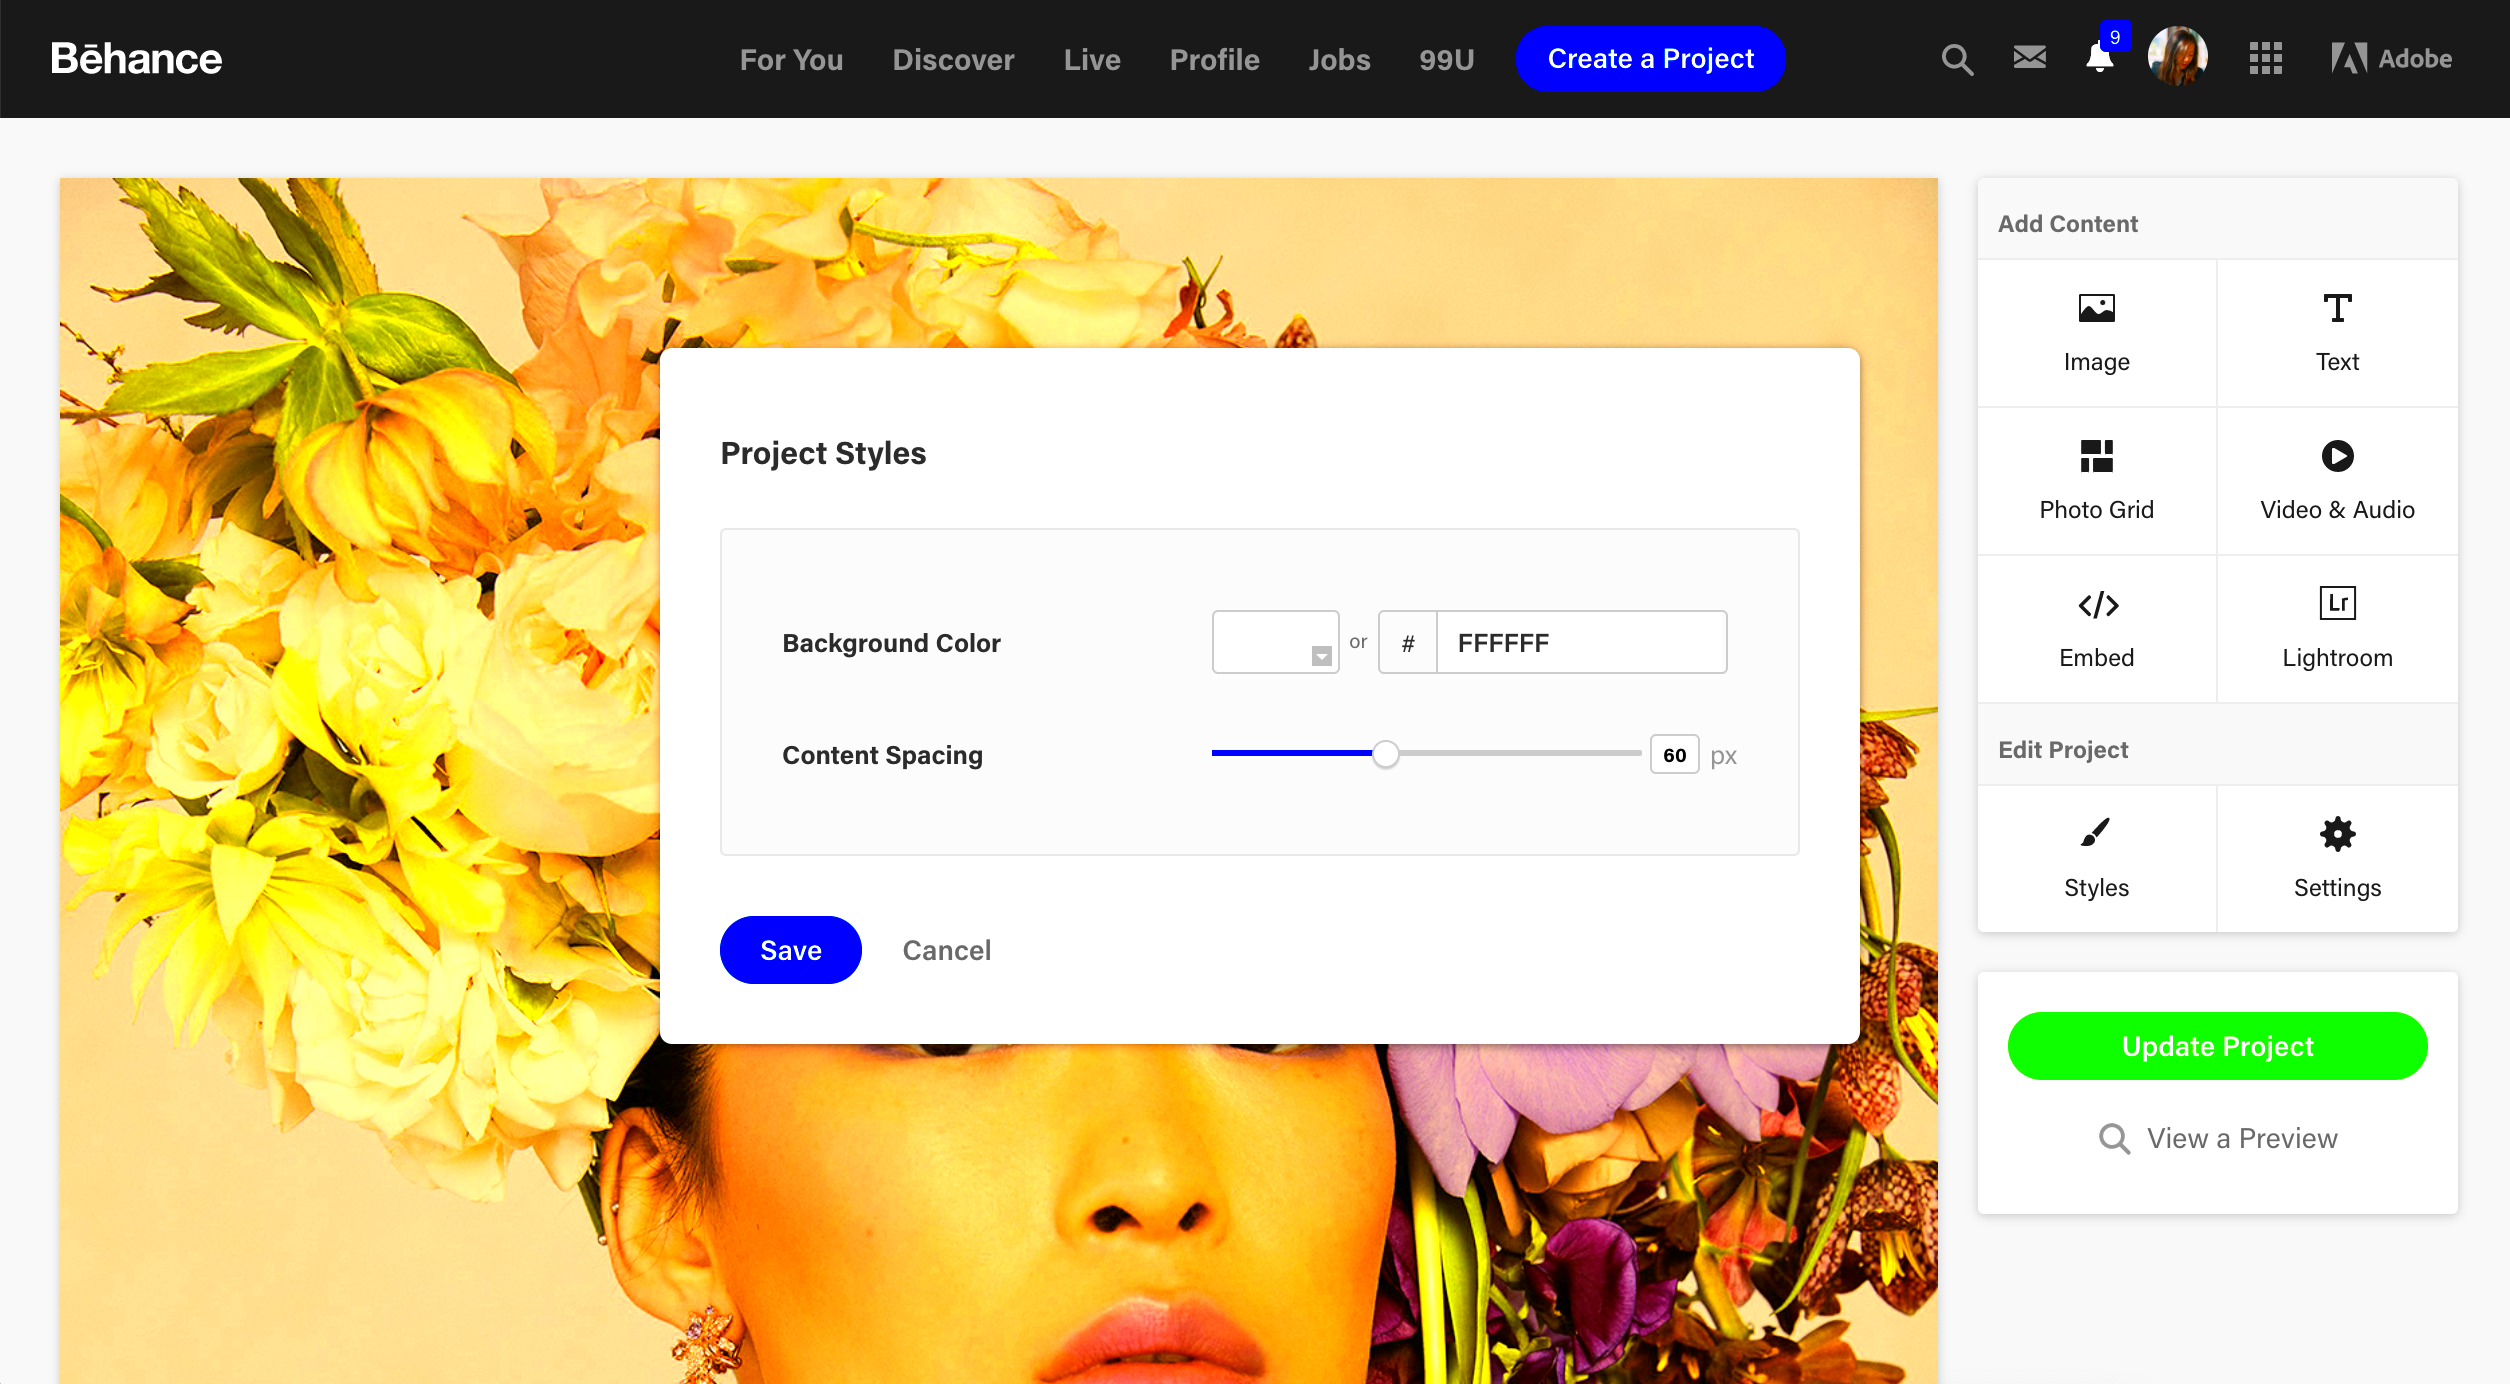
Editing your project details on Behance allows you to fine-tune how your work is presented to the world. The details include important information like the project title, tools used, and tags that help people find your work. Keeping these details accurate and updated is essential for attracting the right audience and showcasing your skills effectively.
Here’s how you can edit your project details:
- Access the Project: Go to your portfolio and click on the project you want to edit.
- Edit Title and Tags: Once on the project page, look for the title section. Click on it to edit. Tags are crucial for searchability; make sure they reflect your project accurately.
- Update Tools Used: This section shows potential clients the software or methods you utilized. It adds credibility to your work. Just click to edit and add or remove tools as needed.
- Save Changes: After making your edits, don't forget to save. There’s usually a button at the bottom of the page to ensure your updates are recorded.
Regularly updating your project details can significantly impact how your work is perceived, so make it a habit to revisit and refine!
Also Read This: The Best Ways to Save Pictures from ShootProof
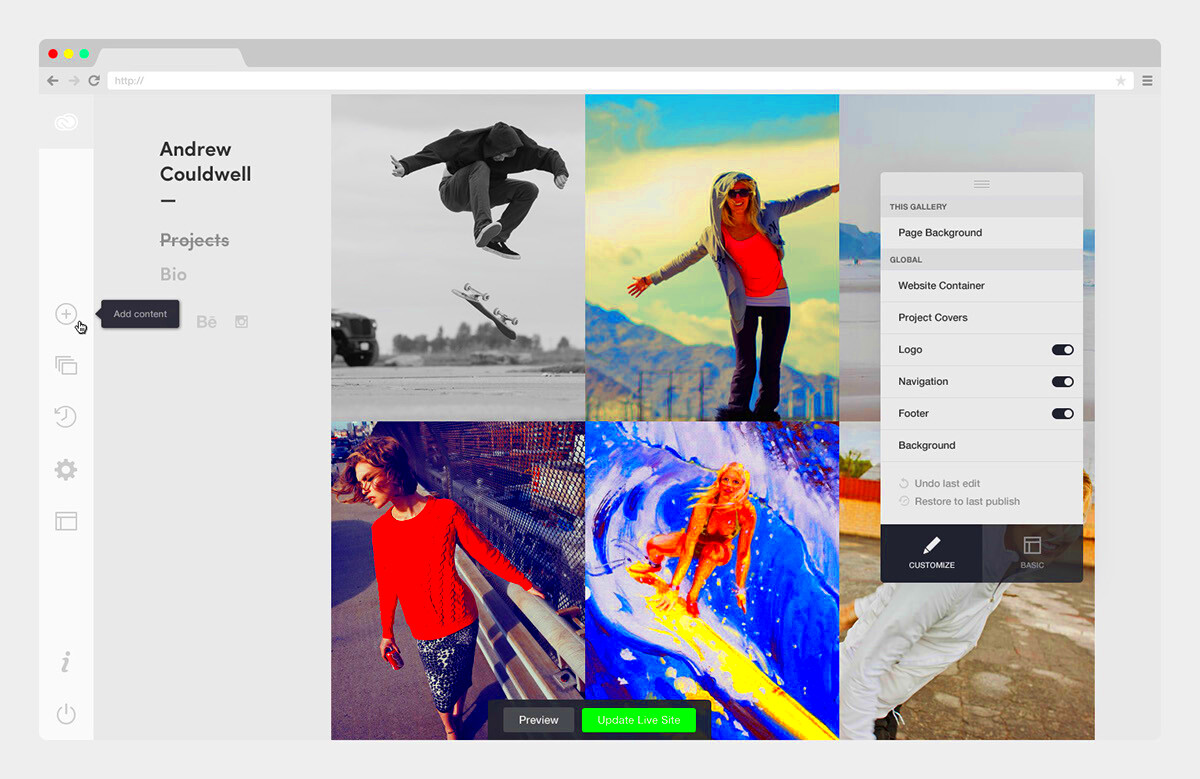
Updating Project Images and Files
Images are the heart of your Behance projects. High-quality visuals grab attention and help tell your story. Updating project images and files is straightforward and can make your work stand out even more.
Follow these steps to refresh your images:
- Go to the Project Page: Navigate to the project you want to update.
- Click on the Edit Option: Look for an "Edit" button, usually located near the project title.
- Upload New Images: In the editing interface, find the section for images. You can drag and drop your new images or click to upload. Make sure your images are high resolution for the best quality.
- Remove Old Images: If you want to replace old images, simply click on them and look for an option to delete or replace.
- Arrange the Order: You can drag images to rearrange their order, ensuring that the most impactful visuals are front and center.
- Save Changes: Don't forget to save your work once you’re done!
Updating your images regularly keeps your portfolio looking fresh and engaging for visitors.
Also Read This: Crafting Your Brand: Exploring Adobe Stock Logo Options
Making Changes to Project Descriptions
The project description is your opportunity to tell the story behind your work. It’s where you can explain your thought process, the challenges you faced, and the solutions you came up with. A compelling description can enhance the viewer's understanding and appreciation of your project.
Here’s how to make changes to your project descriptions:
- Access the Project: Click on the project you want to edit.
- Edit Description: Find the description box, usually located beneath your project images. Click on it to start editing.
- Craft a Compelling Narrative: Use clear and concise language. Consider including:
- The Project Goals: What were you trying to achieve?
- Your Approach: What methods or processes did you use?
- The Outcome: What was the final result? Include any metrics if applicable.
- Proofread Your Text: A well-written description shows professionalism. Check for spelling or grammatical errors.
- Save Your Changes: Make sure to save your edited description to keep your updates.
Regularly revising your project descriptions can help keep your portfolio relevant and engaging. Don’t hesitate to add new insights or experiences that enrich your narrative!
Also Read This: How to Bookmark Videos on YouTube to Organize and Save Content
Saving and Previewing Your Edits
After putting in the effort to edit your project details, images, and descriptions, it’s time to save and preview your work. This step is crucial to ensure everything looks just right before it goes live. Behance makes it easy to do both, so let’s walk through the process.
Here’s how to save and preview your edits:
- Check Your Edits: Before saving, take a moment to go through each section of your project. Make sure your images are in order, your descriptions are clear, and all details are accurate.
- Click on the Preview Button: Look for a preview option, usually located near the save button. This allows you to see how your project will appear to viewers.
- Review the Preview: In preview mode, check everything from formatting to layout. Ensure your project flows nicely and all elements are visually appealing.
- Make Any Final Adjustments: If something doesn’t look right, go back and make the necessary edits before saving.
- Save Your Changes: Once you’re satisfied with how everything looks, hit the save button. This action updates your portfolio with all the changes you’ve made.
Regularly saving and previewing your edits can help you maintain a polished and professional portfolio that attracts the right audience.
Also Read This: Creating Beautiful Hands and Feet with Easy At Home Tips
FAQs about Editing Behance Portfolio
Editing your Behance portfolio can raise several questions. Here are some frequently asked questions to help you navigate the editing process smoothly:
| Question | Answer |
|---|---|
| Can I edit my portfolio anytime? | Yes, you can edit your portfolio at any time. Just log in and make your changes. |
| Will my changes be saved automatically? | No, you need to manually save your changes after editing. |
| Can I see how my project looks before publishing? | Yes, you can use the preview feature to see your changes before saving them. |
| What if I want to revert to an earlier version? | Behance doesn’t have a version history feature, so it's a good idea to save backups of your work. |
| Can I edit my portfolio on mobile? | While it's easier on a computer, you can access and make edits on mobile too. |
These FAQs should help clear up any confusion you might have about editing your portfolio on Behance.
Conclusion and Final Thoughts
Editing your Behance portfolio is a vital step in showcasing your creative journey and skills. By keeping your projects updated with accurate details, fresh images, and engaging descriptions, you not only improve your visibility but also enhance your professional appeal. Remember, your portfolio is often the first impression potential clients and collaborators will have of you, so make it count!
In summary, always take the time to:
- Review your project details regularly.
- Update your images to reflect your current skills.
- Craft engaging narratives in your descriptions.
- Preview your edits before saving them.
By following these tips, you can create a standout portfolio that accurately reflects your talents and aspirations. Happy editing!