When I first discovered ShootProof I was looking for a tool to help me organize and showcase my photography. This platform quickly became my choice not only for uploading photos but also for crafting stunning galleries and selling prints. ShootProof provides an experience for photographers with features that are tailored to enhance creativity.
Here are a few advantages of utilizing ShootProof:
- Easy Uploads: You can upload your images in bulk, which saves a lot of time compared to other platforms.
- Stunning Galleries: The templates allow you to create personalized galleries that reflect your style.
- Print Sales: With integrated e-commerce options, selling prints directly to clients becomes a breeze.
- Client Proofing: Clients can view and select their favorite shots, streamlining the feedback process.
- Cloud Storage: Your photos are securely stored in the cloud, ensuring they’re safe and accessible anywhere.
ShootProof provides resources that can streamline your process and improve how you interact with clients, whether you're an aspiring photographer or an experienced one.
Getting Started with Your ShootProof Account
Getting your ShootProof account up and running is a breeze. On my first day with it the interface was so user friendly that I found myself questioning why I hadnt made the switch earlier. Here’s a simple guide to help you kick things off.
- Sign Up: Visit the ShootProof website and create your account by providing basic details.
- Choose a Plan: ShootProof offers different pricing tiers. Pick one that suits your needs.
- Set Up Your Profile: Add a profile picture and a bio. Make it personal, just like you would in a face-to-face meeting.
- Link Your Payment Method: If you plan to sell prints, linking a payment method is essential.
After finishing these steps, you're ready to jump into ShootProof. I discovered that spending some time personalizing my profile really improved the way I showcased my work.
Also Read This: How to Create Beautiful Tissue Paper Flowers – A Fun DIY Guide
Preparing Your Pictures for Upload
Before you share your valuable photos on ShootProof it’s crucial to get them ready. I discovered this through experience when I uploaded images that didn’t do justice to my work. Here’s a list of things to keep in mind to make your photos stand out.
- Resolution: Make sure your images are at least 300 DPI for print quality.
- File Format: ShootProof supports JPEG and PNG formats. Choose wisely based on your needs.
- Editing: Basic edits like cropping and color correction can make a world of difference. Take time to enhance your photos.
- Organize by Folders: Creating folders for different projects or clients helps keep everything neat and manageable.
- Image Naming: Use descriptive names for your files. It helps in easily locating them later.
Taking a methodical approach to getting your photos ready not only helps you save time but also improves the way they look in general. I frequently find myself reminiscing about my well structured folders and feeling a sense of satisfaction as I see my work beautifully organized.
Also Read This: Start Earning Money from Your Dailymotion Channel
Step by Step Guide to Uploading Pictures
Once you've got your photos ready to go, it's time to take the leap and upload them to ShootProof. I still remember the thrill I felt when I did it for the first time—knowing that my creations were about to be unveiled to everyone. To make the process smooth for you, here's a handy guide on how to upload your images seamlessly.
- Log In: Start by logging into your ShootProof account. It's always a good idea to double-check your internet connection to avoid interruptions.
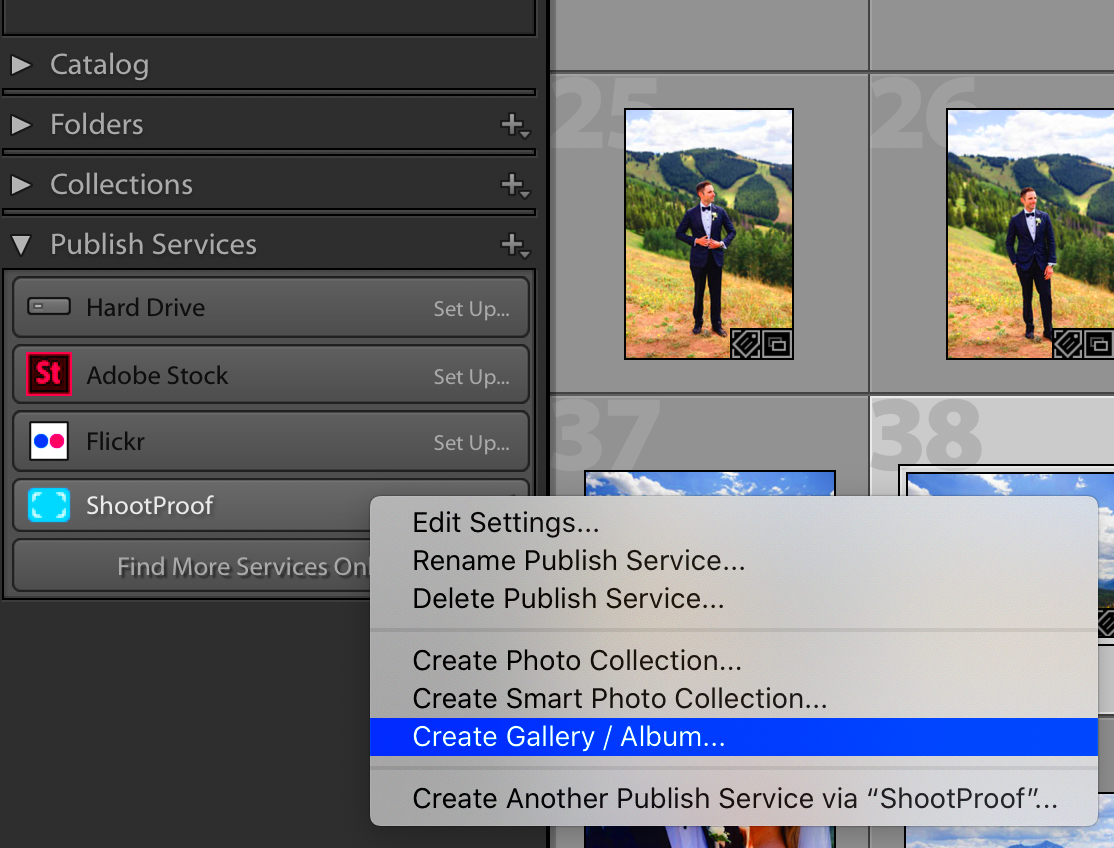
- Navigate to the Upload Section: Click on the "Upload" button located prominently on your dashboard. This will direct you to the upload page.
- Select Your Photos: You can either drag and drop your images into the upload area or click to browse your computer. I often find that drag-and-drop is faster and feels a bit more fun!
- Choose the Right Gallery: If you have multiple galleries, select where you want your pictures to go. This is crucial for keeping everything organized.
- Wait for Upload Confirmation: Once your files are selected, the upload process will begin. You’ll see a progress bar that indicates how much has been uploaded. Be patient; large files can take a little time!
- Review Your Upload: After the upload completes, take a moment to review your images. Ensure everything looks good before you share them with clients or the public.
By following these guidelines, you can ensure a seamless and pleasant uploading experience. Every time I share my work it feels like a little celebration, as my creativity takes shape and comes to life!
Also Read This: How to Block a YouTube Channel and Manage Unwanted Content
Common Issues You Might Encounter
Every platform comes with its own set of idiosyncrasies and ShootProof is not an exception. When I first started using the service I encountered a few bumps in the road that left me puzzled. Below are some challenges and suggestions on how to overcome them.
- Slow Upload Speeds: Sometimes, the internet can be a bit sluggish. If uploads take too long, try resizing your images or check your connection. I’ve found that uploading during off-peak hours can help.
- File Format Errors: If you receive an error message, it might be because your files are not in the supported format (JPEG or PNG). Double-check before uploading.
- Image Size Limitations: ShootProof has size limits for uploads. If your images are too large, consider compressing them without losing quality.
- Missing Images: After uploading, if some images are missing, don’t panic! Sometimes, they just need a moment to appear in your gallery. Refreshing the page usually does the trick.
- Gallery Arrangement Issues: If your images are not displaying in the order you’d like, you can rearrange them in the gallery settings. I often spend time arranging mine to tell a visual story.
Being mindful of these challenges can help you avoid wasting time and feeling frustrated. Every obstacle is simply a part of the learning journey and overcoming them is an essential aspect of the process!
Also Read This: Backlinks on Behance
How to Organize Your Photos in ShootProof
After you upload your pictures the real excitement kicks in—getting them all sorted! I recall being a bit lost with a messy collection when I began my journey, so I swiftly grasped the significance of having a methodical system in place. Here’s a guide on how to efficiently arrange your snapshots in ShootProof;
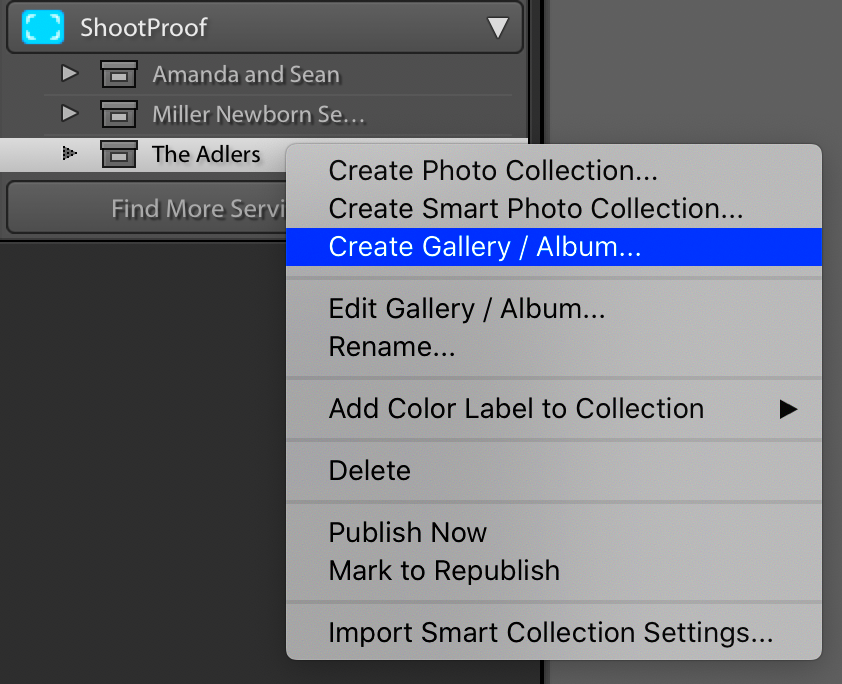
- Create Galleries: Use galleries to group similar projects or events. For instance, separate wedding shoots from portrait sessions. This makes it easy for clients to find what they’re looking for.
- Use Collections: Collections allow you to curate specific sets of photos across multiple galleries. It’s a fantastic way to showcase your best work in one place.
- Tagging Photos: Utilize tags to categorize your images further. Tags like “landscape,” “portrait,” or “events” can help you and your clients locate specific types of images quickly.
- Renaming Files: After uploading, consider renaming your files to something descriptive. For example, instead of "IMG_1234," use "Wedding_Ceremony_2024." It not only helps you remember but also adds a professional touch.
- Regular Maintenance: Just like cleaning your room, take time to review and clean up your galleries. Delete any images that no longer represent your current style or standards.
Arranging your pictures in a way can enrich how people perceive them and streamline the process of handling your collection. I take pleasure in going through my well sorted albums and reminiscing about the memories associated with each shot.
Also Read This: Create Impactful Presentations with Canva Google Slides Templates
Sharing and Selling Your Photos
One of the most fulfilling parts of being a photographer is sharing and selling your images. When I embarked on this journey I experienced a mix of thrill and apprehension about showcasing my creations. Thanks to ShootProof sharing your artistic vision becomes a smooth process, enabling you to engage with clients and fellow photography lovers. Here's a guide on how to successfully share and market your photographs.
- Share Direct Links: Once your photos are uploaded, you can generate direct links to galleries. This means you can easily share your work on social media or with specific clients, giving them immediate access to your portfolio.
- Use Email Notifications: ShootProof allows you to send email notifications to clients whenever you upload new galleries. This feature keeps your clients in the loop and reminds them of your availability for new projects.
- Set Pricing for Prints: If you’re looking to sell prints, you can set your pricing right within the platform. Having a clear pricing structure makes it easier for clients to make a decision.
- Offer Discounts: Consider running promotions or offering discounts during certain times of the year, like festivals or holidays. I’ve seen a significant boost in my sales during festive seasons.
- Engage with Your Audience: Don’t just post your photos; engage with your audience by sharing behind-the-scenes stories or tips on photography. This creates a deeper connection and encourages more interactions.
Using these resources you can make sharing and selling your creations an enjoyable experience that not only helps you develop as a photographer but also allows you to profit from what you love doing.
Also Read This: Can You Stream YouTube on Android Auto with AA Wireless While Driving
FAQs
Like with any platform people tend to have questions especially when theyre just starting out with ShootProof. I get it I’ve been there too and I know how important it is to have things explained. So here are some common questions that can help you navigate your experience:
- Is ShootProof free? ShootProof offers a variety of pricing plans, including a free trial. However, to access all features, you’ll need to choose a paid plan that suits your needs.
- What file formats does ShootProof support? ShootProof supports JPEG and PNG formats, ensuring you can upload your images without a hitch.
- Can I customize my galleries? Yes, you can customize your galleries with different layouts and themes, making your presentation unique to your style.
- How do I protect my images? ShootProof offers features like password protection for galleries, allowing you to control who can access your work.
- Can I sell digital downloads? Absolutely! ShootProof allows you to sell digital downloads, providing clients with the flexibility to purchase images online.
Feel free to contact their support team if you have any additional inquiries. They are very friendly and quick to respond and I have consistently received support whenever I required it.
Conclusion
Looking back on my time with ShootProof I can see how crucial this platform has played in shaping me as a photographer. From the moment I uploaded my image to showcasing and selling my creations the journey has been fulfilling and empowering. Keep in mind that photography goes beyond freezing moments in time; it’s about expressing your distinct viewpoint to the world.
If you want to create a collection of work connect with customers or turn your hobby into a venture ShootProof has the resources to bring your ideas to life. Enjoy the journey, grow with each submission and feel free to express your artistic side. People are excited to see what you can do!
Are you prepared to set out on this photography quest? I promise you it will be a journey that is truly worthwhile.