When I began using ShootProof I didn’t realize how much organizing albums would matter. As a photographer I had countless photos all over the place and it was quite a mess. But when I started sorting my images into albums it transformed everything. It wasn’t simply about staying tidy; it had a huge impact on how I showcased my portfolio to clients.
Organizing albums can:
- Enhance Client Experience: A well-organized album allows clients to navigate through your work effortlessly, showcasing your professionalism.
- Streamline Workflow: When everything is categorized, you can quickly find and edit photos without wasting precious time.
- Highlight Your Best Work: Grouping your best images together tells a cohesive story and makes it easier for clients to see your unique style.
Organizing your photo albums in a neat and orderly manner not only helps you save time but also enhances the experience for your clients. They will value the thoughtfulness you show in streamlining their selection process. In the competitive realm of photography little gestures like these can make a significant impact.
Getting Started with Your ShootProof Account
Setting up a ShootProof account marks the beginning of streamlining your photography business operations. The process is simple and the platform is built to be easy to navigate. I recall the thrill of establishing my account and how it opened doors to endless opportunities.
Here’s how you can get started:
- Visit the ShootProof Website: Go to ShootProof and click on the “Sign Up” button.
- Fill in Your Details: Enter your name, email, and create a password. Make sure to use a professional email for a better impression.
- Choose Your Plan: Review the available plans and select one that fits your needs. Don’t worry; you can always upgrade later.
- Verify Your Account: Check your email for a verification link. Click on it to activate your account.
- Set Up Your Profile: Add your business details, including your logo, website, and a brief bio. This makes your account more personalized.
After you create your account take some time to check out the features. The dashboard is user friendly and you’ll find it simple to move around the various sections. Keep in mind that having an account sets the stage for a smooth work process down the line.
Also Read This: Creative Cake Decorating Tips for Making a Car Cake
Navigating to the Orders Section
With your account all set up its time to explore the Orders section. This is where the real excitement begins! I remember when I first discovered this feature it was like opening a treasure trove of possibilities. Streamlining order management can take your customer service to new heights.
To access the Orders section, just follow these easy steps:
- Log In to Your Account: Use your credentials to access your ShootProof dashboard.
- Locate the Dashboard Menu: On the left side of the screen, you’ll see a menu. Look for the “Orders” option.
- Click on Orders: Once you click on this, you will be taken to a new page displaying all your current and past orders.
- Review Order Details: Here, you can see the status of each order, including pending and completed ones. It’s essential to keep track of this for effective communication with clients.
Make it a habit to review this area frequently to avoid missing any orders. It’s essential to keep that personal connection with your customers. They’ll value your thoughtfulness and it could result in repeat sales and recommendations. The Orders part of your process is vital so take some time to familiarize yourself with it!
Also Read This: How to Loop a Video on Behance to Keep Viewers Engaged with Seamless Video Playback
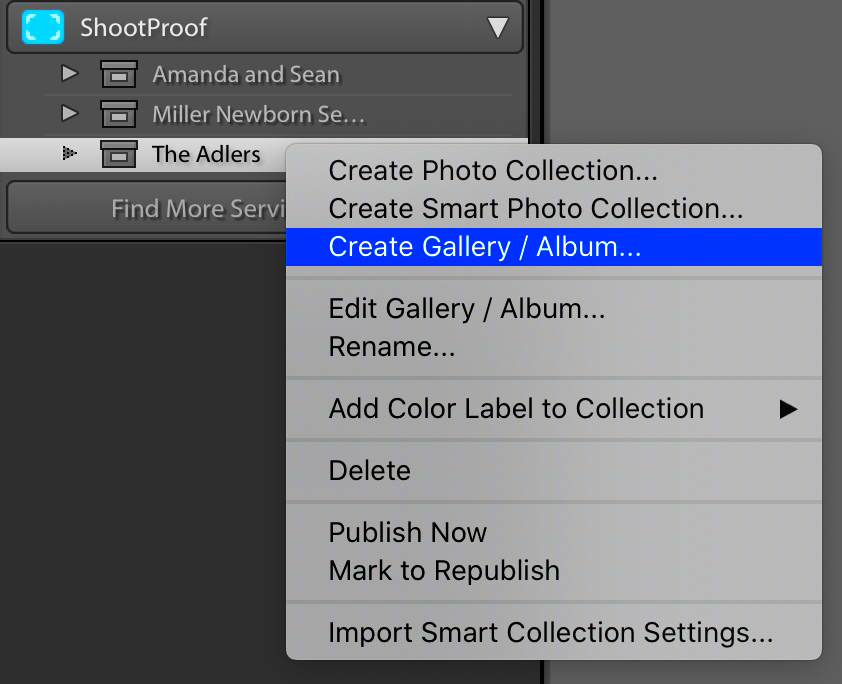
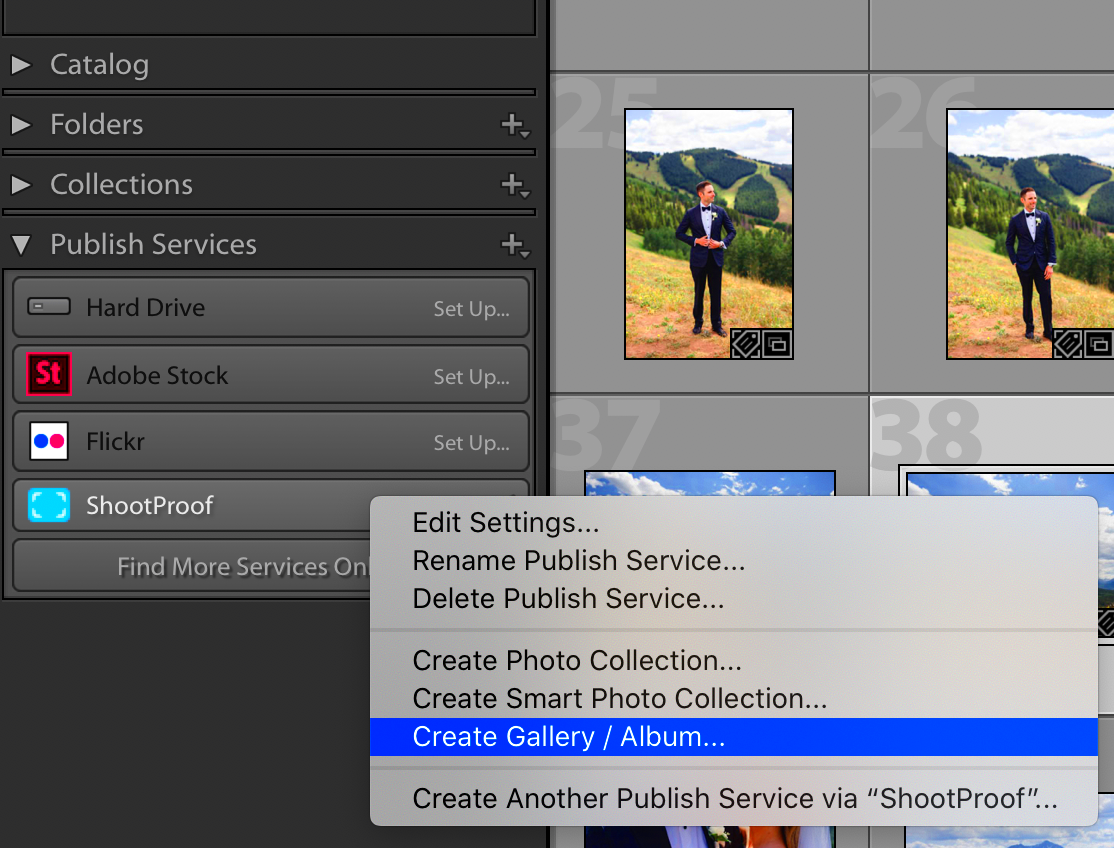
Steps to Create a New Album
Starting a fresh album in ShootProof feels like getting a blank slate. I still recall the excitement I felt when I put together my very first album filled with cherished wedding moments. It was a great opportunity to present my photography in a more structured manner. The process may be straightforward but it really encourages you to unleash your imagination.
Creating a new album is a breeze. Just follow these simple steps.
- Access the Albums Section: From your dashboard, navigate to the “Albums” tab on the left-hand menu. This is your hub for all album-related activities.
- Click on Create New Album: You’ll see a button that says “Create New Album.” Click on it, and let your creativity flow.
- Name Your Album: Give your album a memorable name. Consider including the event or occasion, like “Diwali Celebrations 2024” or “Family Reunion - Kerala 2023.”
- Add a Description: Write a brief description that gives viewers insight into what they can expect. For instance, “A beautiful collection of moments captured during our family trip to the hills.”
- Select Privacy Settings: Choose whether you want the album to be public or private. This is crucial if you’re sharing client work.
- Save Your Album: After filling out the necessary details, click on “Save.” Your album is now created and ready for images!
Making albums goes beyond being a simple job; it allows you to take a moment to look back at your creations and convey significant narratives to your viewers. Every album serves as a part of your storytelling adventure highlighting your distinct flair and perspective.
Also Read This: Crafting the Perfect LinkedIn Headline to Attract Ideal Opportunities
Adding Images to Your Album
Once you’ve got your album ready it’s time to dive into the enjoyable part—incorporating visuals! This is the moment when your imagination really stands out. As I browse through my pictures I often find myself lost in nostalgia with every photo triggering a memory that enriches my collection.
Here’s how to add images to your album:
- Open Your Album: From the Albums section, find and click on the album you just created.
- Click on Add Images: You’ll see an option to “Add Images.” Click it to begin the process.
- Select Images: A window will pop up allowing you to choose images from your computer. You can also drag and drop images directly into the window. Select the ones that best represent the story you want to tell.
- Upload Your Selection: After selecting your images, click on the “Upload” button. Watch as your images begin to fill your album!
- Arrange Images: Once uploaded, you can rearrange the order of your images by dragging them. This is crucial for storytelling—arranging images in a way that flows naturally can enhance the overall experience.
Incorporating pictures is the moment when your unique style as a photographer shines. Its not merely about assembling images; its about weaving a story that strikes a chord with your viewers enabling them to engage with your art more profoundly.
Also Read This: Understanding LinkedIn Pulse for Effective Thought Leadership
Reviewing and Customizing Your Album Details
Now that you have your photos set, take a moment to go over and personalize the specifics of your album. Many people tend to skip this stage but it can greatly impact how your album is viewed. From my experience I’ve found that putting effort into the finer points can transform an album from being to truly outstanding.
Here’s a guide on how to go through and personalize your album.
- Go to Album Settings: Click on the settings icon or the “Edit” button in your album.
- Review the Album Name and Description: Ensure your album name and description accurately reflect the content and purpose of the album. A catchy title can attract more viewers.
- Customize Cover Image: Choose a striking cover image that represents the album well. This is the first impression, so make it count!
- Add Tags: Adding relevant tags helps improve the discoverability of your album. Think about what keywords people might use to find your work.
- Check Privacy Settings: Confirm that your privacy settings align with your intentions for the album. Decide if you want to allow downloading or sharing of images.
- Preview Your Album: Before finalizing, take a moment to preview the album. Make sure everything looks the way you envisioned it.
- Save Your Changes: Once you’re satisfied with the details, click “Save” to ensure all your customizations are applied.
Investing effort into personalizing your album can enhance the enjoyment of your audience. It showcases your commitment and skill, making a lasting impression that may open doors for future opportunities.
Also Read This: Exploring the Significant Impact of Imago Images on Digital Media Storytelling
Finalizing Your Order with the Album
Once you’ve put your soul into crafting that ideal album it’s time to wrap up your order. This moment always brings me a thrill of anticipation. I still recall the first time I finished an order for a customer; it felt like I was sharing a part of my creativity with the universe. The last touches are essential to make sure everything is set for your client to receive their treasured moments.
Here’s how to finalize your order:
- Review Your Album: Take one last look at your album to ensure everything is as you want it. Check for any missing images, typos in the descriptions, or anything that doesn’t feel right.
- Set Pricing: Determine the price for your album. Consider the effort you put into it, the quality of the images, and the market rates. Remember, your work is valuable!
- Add Additional Items: If you offer prints or other products, this is the time to include them. Clients often appreciate bundled options.
- Confirm Client Details: Double-check the client’s contact information and shipping address. I learned this the hard way when a cherished album was sent to the wrong address!
- Choose Payment Method: Select a payment method that works best for your client. Offering flexibility can improve their experience.
- Send Order Confirmation: Once everything looks good, click on “Finalize Order.” A confirmation email should be sent to your client, which reassures them that their memories are on the way.
Completing your order is crucial in the process as it signifies the conclusion of a journey and the start of a new one for your client. When they get their album it will serve as a reminder of the cherished moments captured within through your dedication.
Also Read This: Effortless Downloads: Simplifying Image Access with Shutterstock Downloader
FAQs
Just like any other platform, it's common to have questions, especially when you're looking to get the best out of ShootProof. I can relate to my own experience, which was marked by curiosity and a bit of confusion. To assist you in navigating this process I've compiled a list of frequently asked questions that might be helpful.
- How do I change my album’s privacy settings? You can change your album’s privacy settings in the album settings section. Just select the desired option and save your changes.
- Can I add more images to my album after finalizing? Yes, you can add more images later, but it’s best to finalize everything before sending it to your client for the first time.
- What payment options are available? ShootProof supports various payment methods, including credit cards and PayPal, providing flexibility for you and your clients.
- How do I track my order status? You can check your order status from the “Orders” section on your dashboard. It keeps everything transparent and organized.
- What should I do if my client doesn’t receive their order? If there are any delivery issues, reach out to the shipping provider first, then inform your client to keep them in the loop.
Addressing these queries can ease worries and allow you to concentrate on what really counts creating cherished moments for your clients.
Conclusion
Putting together an album in ShootProof goes beyond simply completing a job; it involves crafting narratives and safeguarding cherished memories. Reflecting on my experiences I see how each aspect ranging from sorting photos to determining the sequence showcases my evolution as a photographer. Every album I produce serves as a tribute to my development, artistic flair and the confidence that clients bestow upon me.
By adhering to the instructions in this manual you can improve your efficiency and provide outstanding service to your customers. Stay committed to the journey keep your clients preferences at the forefront of your mind and continuously pursue greatness. Witnessing the joy on your clients faces as they receive their albums makes all the hard work worthwhile. So get creative and showcase your talent!