Welcome to our easy side braid hairstyling tutorial! If you’re looking for a chic yet simple hairstyle that can elevate any outfit, you’ve come to the right place. Side braids are not only stylish but also versatile, making them perfect for casual outings, work, or even a night out. In just a few easy steps, you'll learn how to create a stunning side braid that complements your personal style. Let’s get started!
Gathering Your Supplies
Before diving into the braiding process, it’s essential to gather all the supplies you’ll need. Having everything on hand will make the styling experience smooth and enjoyable. Here’s a list of what you’ll require:
- Brush or Comb: To detangle your hair and ensure a smooth base for braiding.
- Hair Ties: Choose small, clear, or colored hair ties to secure the braid at the end.
- Hair Spray: Optional, but useful for keeping flyaways in check and ensuring your braid holds its shape.
- Hair Clips: If you have layers or shorter pieces, hair clips can help keep them out of the way while you braid.
- Moisturizing Cream or Serum: This can help tame frizz and add a bit of shine to your braid.
Once you’ve gathered these items, you’re all set to create your beautiful side braid! Remember, the key to a great braid starts with well-prepared hair, so take a moment to ensure your hair is clean and tangle-free. Happy braiding!
Also Read This: Explore and Enjoy Dailymotion Playlists
Preparing Your Hair
Before diving into the side braid styling, it's essential to ensure your hair is in the best condition for braiding. Proper preparation can make a significant difference in how the braid looks and holds up throughout the day.
Start by washing your hair with a gentle shampoo and a nourishing conditioner. This step helps to remove any buildup and adds moisture, making your hair more manageable. If you have time, let your hair air dry; this can enhance texture, especially if you have wavy or curly hair. If you’re in a hurry, a quick blow-dry works too, just remember to use a heat protectant spray.
Once your hair is clean and dry, consider using a styling product. A light mousse or texturizing spray can add grip, making it easier to work with. If your hair tends to be slippery, a bit of dry shampoo can work wonders to add some texture without weighing it down.
Finally, ensure your hair is free of tangles. Use a wide-tooth comb or a detangling brush, starting from the ends and working your way up to avoid breakage. Once your hair is tangle-free, you’re ready for the next step!
Also Read This: Understanding Sponsored Messages on LinkedIn
Step-by-Step Guide to Creating a Side Braid
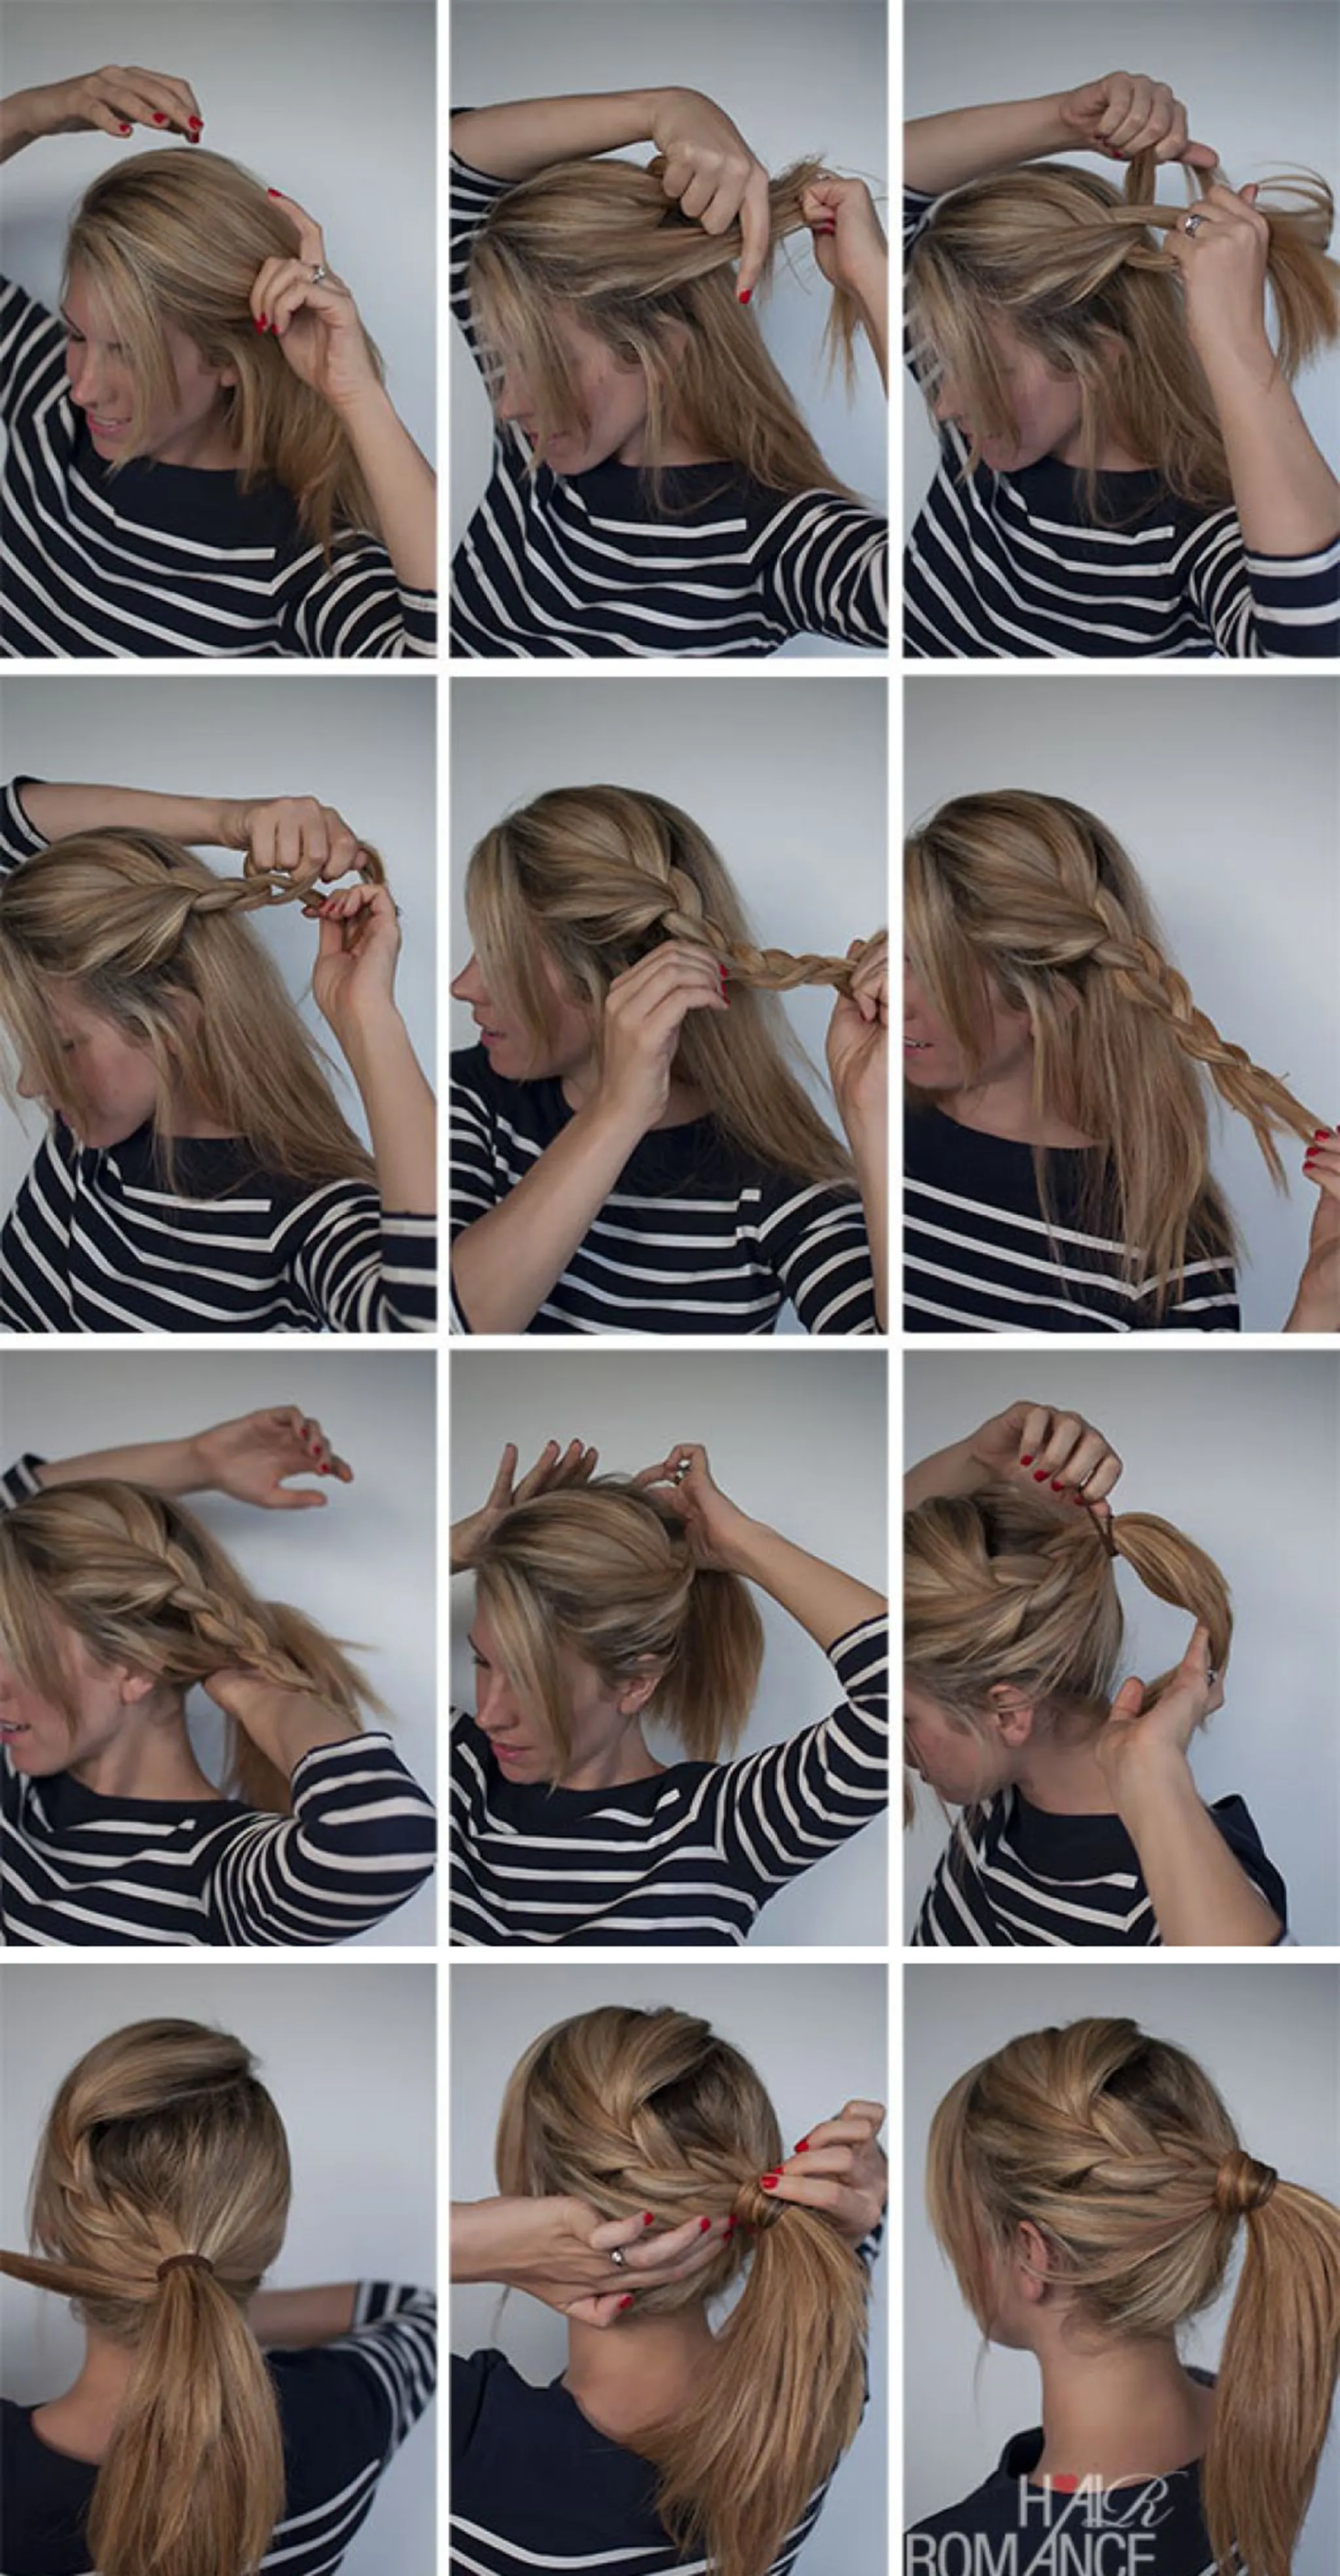
Now that your hair is prepped and ready, let’s jump into the fun part: creating your side braid! Follow these simple steps to achieve a beautiful side braid.
- Gather Your Hair: Start by flipping your hair to one side, making sure it falls comfortably over your shoulder. Gather all your hair on that side.
- Divide into Sections: Split your hair into three equal sections. This will form the basis of your braid.
- Start Braiding: Cross the right section over the middle section, then cross the left section over the new middle section. Repeat this process, crossing sections over each other.
- Add Hair as You Go: When you reach the bottom of your hair, start incorporating more hair from the sides into each section before crossing. This will give your braid a fuller look.
- Secure the Braid: Once you reach the end, secure your braid with a hair tie. You can choose to leave the ends loose for a more casual look or pull gently on the braid to loosen it for added volume.
- Finishing Touch: To complete your look, you can spritz a little hairspray to hold everything in place, and maybe add a decorative hairpin for extra flair!
And there you have it! With just a few steps, you’ve created a gorgeous side braid that’s perfect for any occasion. Enjoy your new hairstyle!
Also Read This: How to Permanently Delete My Facebook Account
Styling Tips and Tricks
Creating the perfect side braid can be a fun and rewarding experience! Here are some tips and tricks to elevate your braid game:
- Prep Your Hair: Start with slightly textured hair. If yours is too smooth, consider using a texturizing spray or dry shampoo to add grip. This helps the braid hold better.
- Use Elastic Bands: Invest in clear or hair-colored elastic bands. They’re less visible and won’t distract from your beautiful braid.
- Embrace Loose Strands: Don’t stress about every hair being in place. A few wispy strands can add a relaxed, bohemian vibe to your look.
- Practice Different Braiding Techniques: Consider experimenting with variations like the fishtail braid or Dutch braid. Each style has its own charm and can suit different occasions.
- Secure with Pins: If your braid feels loose, use bobby pins to secure it in place. Just tuck the pins into the braid for a seamless finish.
- Finish with Hairspray: To ensure your braid stays intact throughout the day, a light spritz of hairspray can do wonders. Just be careful not to overdo it!
Also Read This: How Much Can I Make on Adobe Stock? Understanding Potential Earnings as a Contributor
Common Mistakes to Avoid
While braiding is a fun activity, there are some common pitfalls you’ll want to steer clear of:
- Skipping Hair Prep: Going straight into braiding without preparing your hair can lead to a messy outcome. Always start with clean, slightly textured hair.
- Tight Braids: Pulling your hair too tightly can cause discomfort and headaches. Aim for a secure yet comfortable braid.
- Inconsistent Sections: Make sure the sections of hair you’re braiding are of even size. Uneven sections can result in a lumpy, uneven braid.
- Ignoring Your Face Shape: Consider how the braid frames your face. Different styles can enhance your features—experiment to find what works best for you!
- Neglecting to Secure the End: Always secure the end of your braid properly with an elastic band. A loose end can unravel, ruining your hard work.
Easy Side Braid Hairstyling Tutorial
Braiding hair can seem daunting, but with a few simple steps, you can create a beautiful side braid that is perfect for any occasion. Whether you are dressing up for a special event or simply want a chic, everyday look, this easy side braid tutorial will guide you through the process.
Before you begin, gather the following tools:
- Hairbrush or comb
- Hair ties
- Hair spray (optional)
- Hair clips (optional)
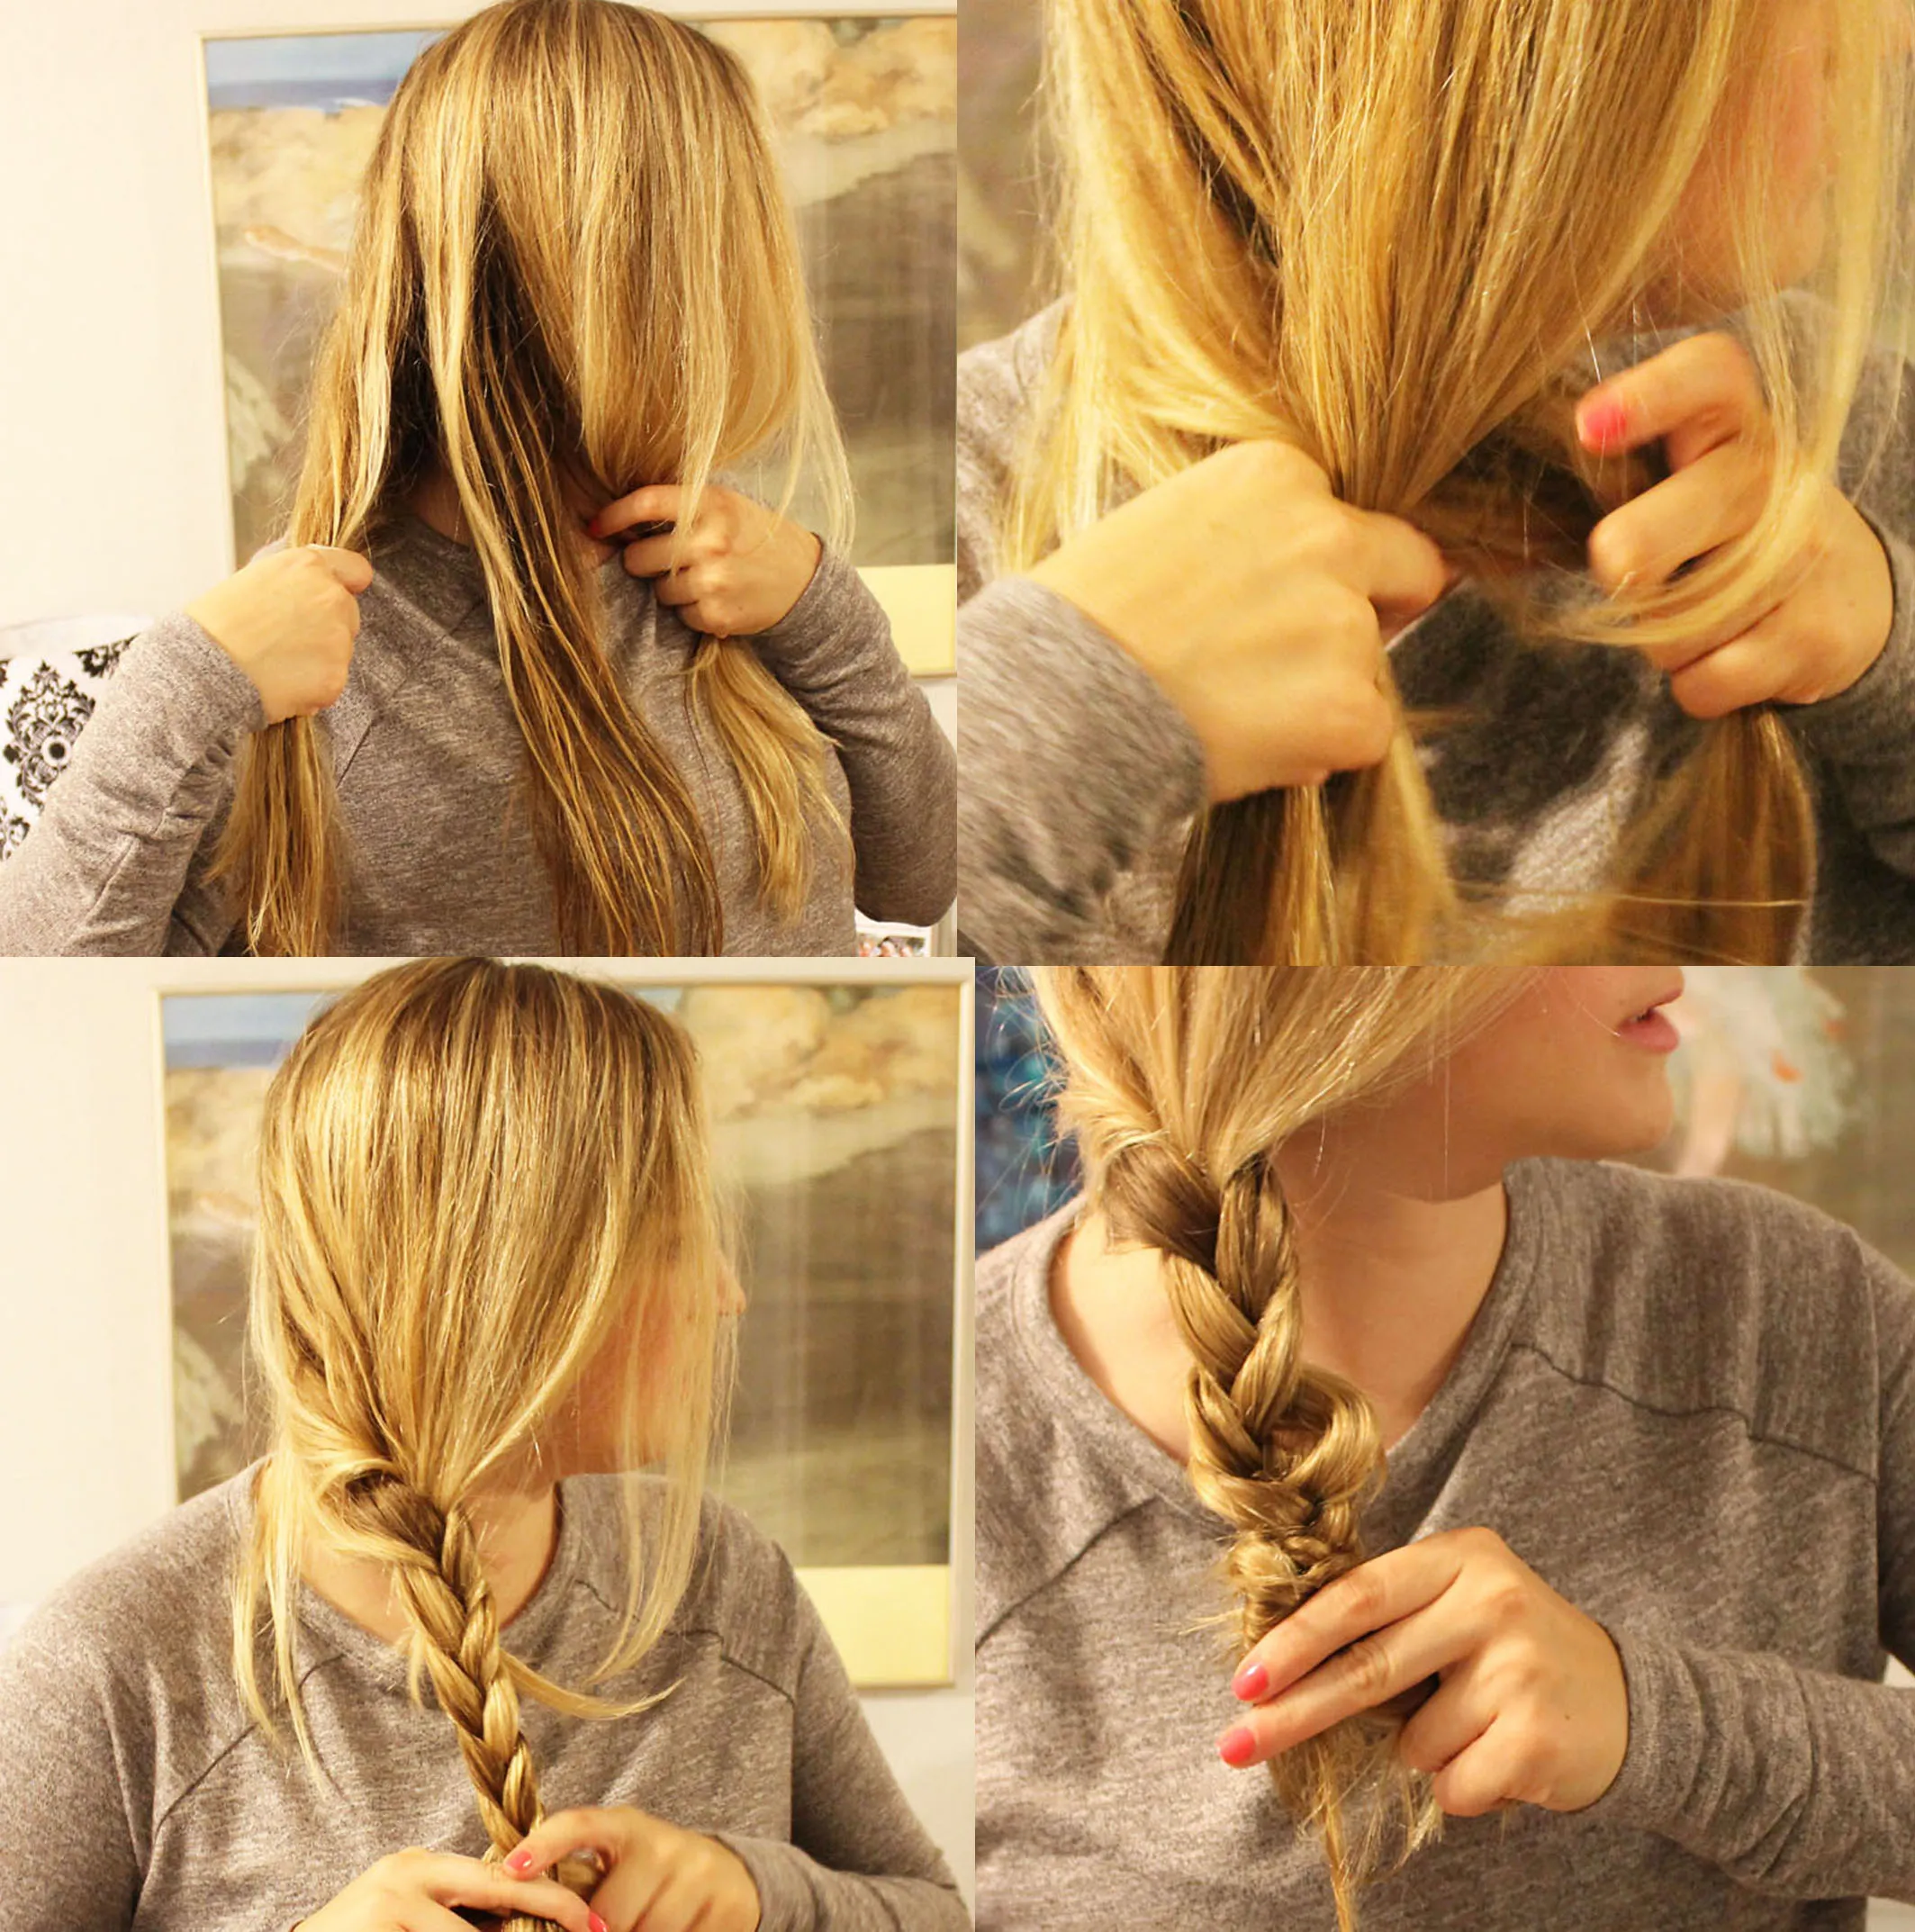
Follow these steps for a stunning side braid:
- Prep Your Hair: Start with clean, dry hair. Brush through to remove any knots or tangles.
- Gather Your Hair: Tilt your head to one side and gather all your hair on that side. Use a hair tie to secure it loosely if necessary.
- Divide Into Sections: Split your gathered hair into three equal sections. This will be the foundation of your braid.
- Begin Braiding: Cross the right section over the middle section, then the left section over the new middle. Repeat this process until you reach the ends of your hair.
- Secure the Braid: Use a hair tie to secure the end of the braid. For a more polished look, you can use hair spray to set the braid.
- Loosen the Braid: For a more relaxed look, gently pull on the sides of the braid to loosen it up.
And there you have it! A gorgeous side braid that is easy to create and looks fantastic. Whether you're going for a casual day out or a more formal occasion, this hairstyle is versatile and stylish.
Conclusion: Mastering the side braid is a simple yet effective way to enhance your hairstyle repertoire, allowing for creativity and elegance in just a few easy steps.