Are you ready to indulge in a dessert that combines the rich, creamy goodness of Oreos with a moist, delectable cake? If you’ve been searching for a treat that’s both easy to make and impossible to resist, you’ve landed in the right place! This Oreo cake recipe is perfect for birthdays, celebrations, or just a cozy night in. With its layers of chocolate cake and delightful Oreo frosting, it’s sure to become a favorite in your household. Let’s dive into the ingredients you’ll need to whip up this mouthwatering creation!
Ingredients Needed
To create this scrumptious Oreo cake, you’ll need the following ingredients. Gather them up, and let’s get baking!
- For the Chocolate Cake:
- 1 ¾ cups all-purpose flour
- 1 ¾ cups granulated sugar
- ¾ cup unsweetened cocoa powder
- 1 ½ teaspoons baking powder
- 1 ½ teaspoons baking soda
- 1 teaspoon salt
- 2 large eggs
- 1 cup whole milk
- ½ cup vegetable oil
- 2 teaspoons vanilla extract
- 1 cup boiling water
- For the Oreo Frosting:
- 1 cup unsalted butter, softened
- 4 cups powdered sugar
- ½ cup heavy cream
- 1 teaspoon vanilla extract
- 10-12 Oreo cookies, crushed
These ingredients come together to create a cake that’s not just a feast for the stomach, but also a delight for the eyes! So, are you ready to bring this delicious Oreo cake to life? Let’s get started!
Also Read This: Mastering Rumble in Blox Fruits and Overcoming Game Challenges
3. Preparation Steps
Getting ready to whip up a delicious Oreo cake is half the fun! Let’s break down the preparation steps to ensure you have everything you need before diving into baking.
First things first, gather your ingredients. Here’s a quick list:
- 1 and 3/4 cups all-purpose flour
- 1 cup granulated sugar
- 1/2 cup unsweetened cocoa powder
- 1 teaspoon baking powder
- 1 teaspoon baking soda
- 1/2 teaspoon salt
- 2 large eggs
- 1 cup milk
- 1/2 cup vegetable oil
- 2 teaspoons vanilla extract
- 1 cup boiling water
- 1 cup crushed Oreos (for the cake batter)
- Extra Oreos for decoration
Next, make sure to preheat your oven to 350°F (175°C). This is crucial, as a properly preheated oven will help your cake rise beautifully.
Now, let’s tackle the mixing! Grab a large mixing bowl and combine the dry ingredients:
- Flour
- Sugar
- Cocoa powder
- Baking powder
- Baking soda
- Salt
Whisk these together until they’re well combined. In another bowl, mix your wet ingredients:
- Eggs
- Milk
- Vegetable oil
- Vanilla extract
Beat these until smooth, then gradually add the wet mixture to the dry ingredients. Stir until just combined, and then carefully add the boiling water and crushed Oreos. The batter will be thin, but that’s what makes it so scrumptious!
Also Read This: Diversifying Icons: Alternatives to Flaticon
4. Baking the Cake
Now that we have our cake batter all set and prepped, it’s time to bake! This is where the magic really happens, and your kitchen will start to smell absolutely divine.
Start by greasing and flouring two 9-inch round cake pans. You want to make sure the cakes come out easily, so don’t skip this step! Once that’s done, evenly pour the batter into the prepared pans.
Place the pans in your preheated oven, and let them bake for about 30-35 minutes. You’ll know they’re done when a toothpick inserted into the center comes out clean or with just a few moist crumbs clinging to it.
Here’s a quick tip:
- If the tops of your cakes rise too much, gently press them down with a spatula once they come out of the oven to ensure flat tops for easier stacking.
After baking, allow the cakes to cool in the pans for about 10 minutes. Then, carefully transfer them to a wire rack to cool completely. Patience is key here—resist the urge to frost while they’re still warm!
Once cooled, you’ll have two beautiful layers ready for frosting and decorating. Get ready for the final touches, because this cake is going to be a showstopper!
Also Read This: Accessing Getty Images A Comprehensive Guide to Navigating Gettyâs Image Licensing Platform
Making the Frosting
When it comes to cake, frosting is the star of the show. For our Oreo cake, we want a frosting that's rich, creamy, and perfectly complements those delightful cookies. Let's dive into making a frosting that's just as irresistible as the cake itself!
To whip up this dreamy frosting, you’ll need the following ingredients:
- 1 cup unsalted butter, softened
- 4 cups powdered sugar
- 1/2 cup cocoa powder
- 1/4 cup milk (adjust for desired consistency)
- 1 teaspoon vanilla extract
- 1 cup crushed Oreo cookies
Here’s how to make it:
- In a large mixing bowl, beat the softened butter using an electric mixer until it’s smooth and creamy.
- Gradually add in the powdered sugar and cocoa powder, mixing on low speed until it’s well combined.
- Pour in the milk and vanilla extract. Beat on medium-high speed until the frosting becomes fluffy and light. You can add more milk if it’s too thick, or more powdered sugar if it’s too runny.
- Finally, fold in the crushed Oreo cookies. This adds a delightful crunch and that unmistakable Oreo flavor.
And there you have it! A luscious Oreo frosting that’s perfect for spreading, piping, or just sneaking a spoonful (or two!). Now, let’s move on to assembling our cake!
Also Read This: List of Top Startups on LinkedIn from the UK in 2023
Assembling the Cake
Assembling your Oreo cake is where the real magic happens. It’s the moment you bring everything together, and let me tell you, it’s going to look and taste amazing! Here’s how to do it step by step:
Before you get started, make sure your cake layers are completely cool. This is crucial to avoid any melting frosting disasters!
Here’s what you’ll need for assembly:
- 2 layers of chocolate cake (baked and cooled)
- Oreo frosting (from the previous section)
- Additional crushed Oreo cookies for garnish
Now, let’s get to it!
- Place one layer of the cooled chocolate cake on a serving plate or cake stand.
- Spread a generous amount of the Oreo frosting over the top of the first layer. Don’t be shy; this is where the flavor really shines!
- Gently place the second layer of cake on top of the frosted layer.
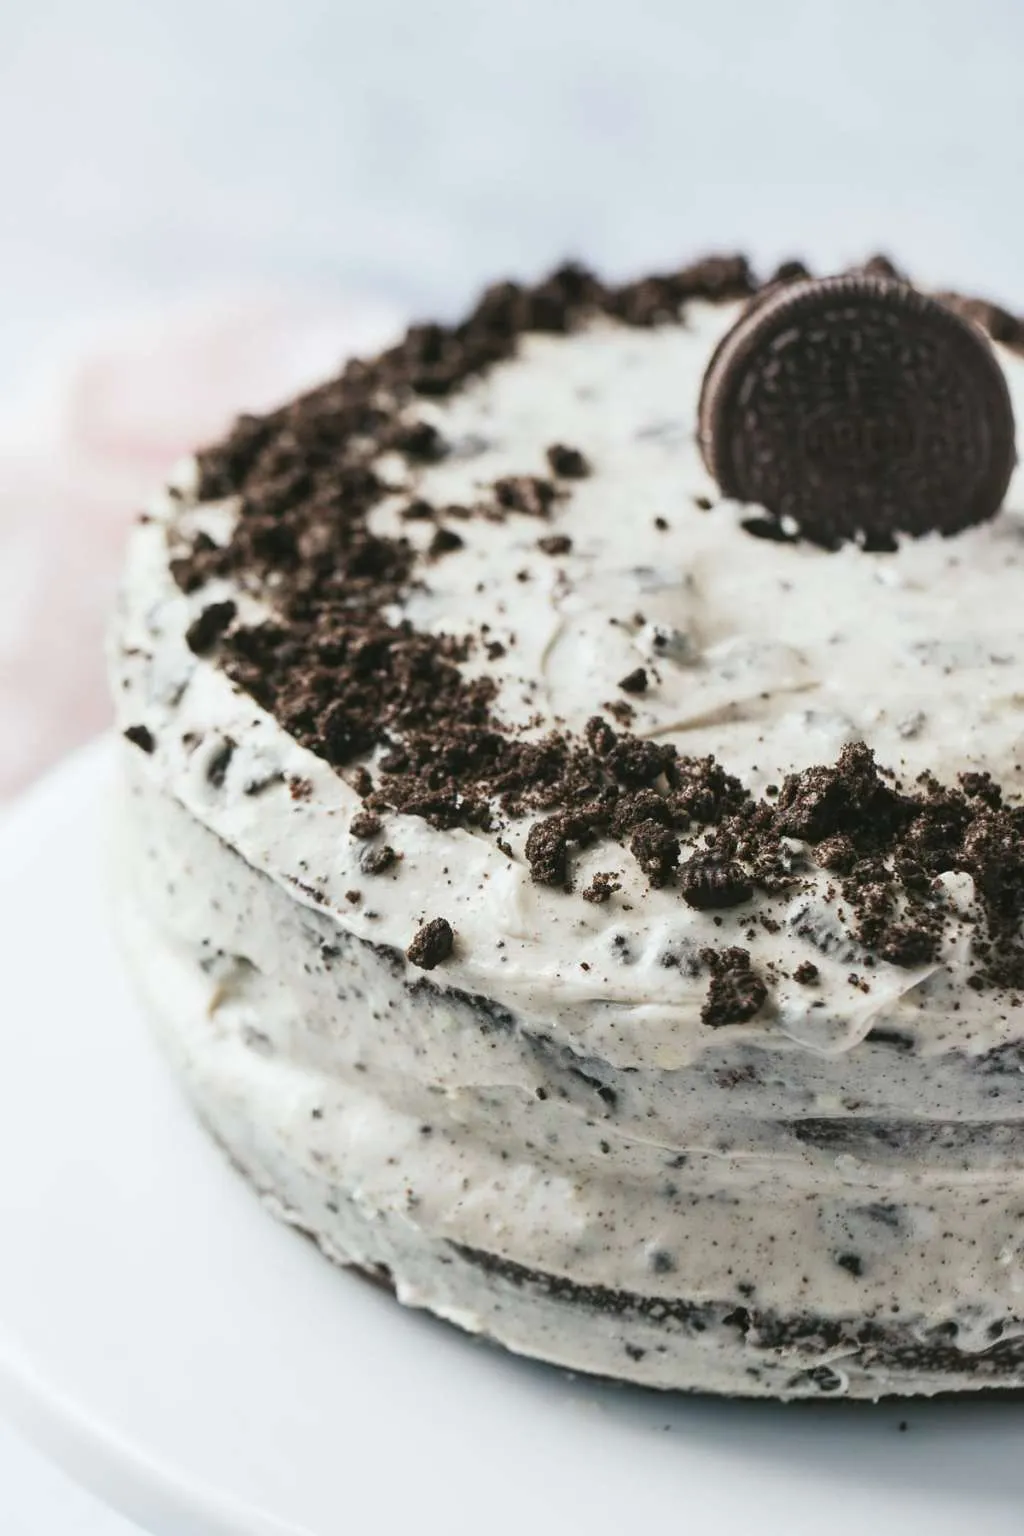
- Now, it’s time to frost the top and sides of the entire cake with the remaining Oreo frosting. Use a spatula for a smooth finish or create swirls for a fun texture.
- Finally, sprinkle some crushed Oreo cookies on top for that extra crunch and a beautiful presentation.
And voilà! Your delicious Oreo cake is now assembled and ready to impress. Just remember, it’s not just a treat for the eyes; it’s a delightful indulgence that you and your guests won’t be able to resist!
Also Read This: Streaming YouTube Content on Twitch
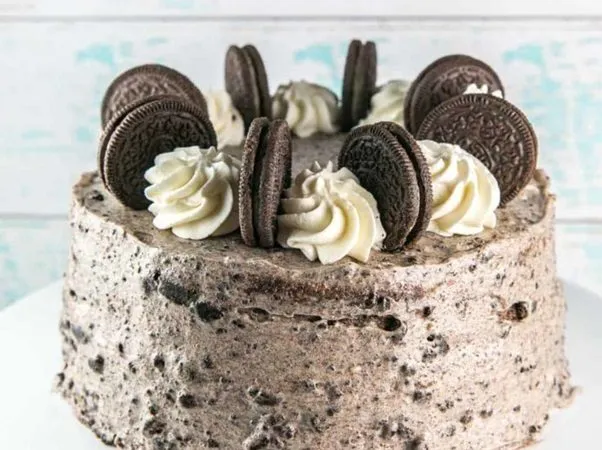
Decoration Tips
When it comes to decorating your Oreo cake, the possibilities are practically endless! Here are some fun and creative ideas that will make your cake not only delicious but also visually stunning.
- Crushed Oreos: One of the simplest and most effective decoration tips is to sprinkle crushed Oreo cookies on top of your frosting. This adds texture and enhances the Oreo flavor!
- Whipped Cream: Use a piping bag to create beautiful swirls of whipped cream around the edges of the cake. This adds a lightness to the rich flavors of the cake.
- Chocolate Drizzle: Melt some chocolate and drizzle it over the top of the cake for a decadent touch. You can use dark, milk, or even white chocolate depending on your preference!
- Oreo Pieces: Top the cake with whole or halved Oreo cookies for a striking presentation. You can even stack them in a fun way for added height.
- Sprinkles: Add a pop of color with colorful sprinkles or chocolate sprinkles. This is especially great for birthdays or celebrations.
Don't forget to get creative! You can combine several of these ideas, or even incorporate themed decorations if you're celebrating a special occasion. The goal is to make your cake as delightful to the eyes as it is to the taste buds!
Serving Suggestions
Now that you’ve crafted a beautiful and delicious Oreo cake, it’s time to think about how to serve it! Here are some suggestions that will elevate your dessert experience.
- Slice It Up: Use a sharp knife to cut the cake into even slices. A good rule of thumb is to cut the cake into 12 slices, which is perfect for sharing!
- Serve with Ice Cream: Pair each slice with a scoop of vanilla or cookies and cream ice cream. The creaminess of the ice cream complements the rich Oreo flavors beautifully.
- Garnish Plates: Drizzle some chocolate sauce or caramel on the plates before placing the cake slice down. This creates a lovely presentation that will wow your guests.
- Coffee or Milk: Serve the cake with a side of hot coffee or a cold glass of milk. The combination of flavors is simply unbeatable!
- Leftover Treats: If you have any leftovers, store them in an airtight container in the fridge. You can enjoy a slice the next day or share it with friends and family!
Remember, the way you serve your cake can enhance the overall experience. So, don’t hesitate to get a little fancy when it comes to serving! Enjoy your Oreo cake and the smiles it brings!