Behance is a vibrant online platform that empowers creative professionals to showcase their work, connect with others in the industry, and discover new talents. Whether you're a graphic designer, photographer, illustrator, or any other type of artist, Behance provides you with the tools to present your portfolio in a visually appealing manner. With a user-friendly interface and a global community of creatives, it’s the perfect place to gain exposure and share your passion with the world. In this blog post, we’ll explore how to create your
Benefits of Having a Behance Account
Creating a Behance account comes with a myriad of benefits that can significantly enhance your creative journey. Here are some key advantages:
- Showcase Your Work: Behance allows you to create a stunning online portfolio. You can upload images, videos, and even behind-the-scenes content that highlights your creative process.
- Networking Opportunities: The platform connects you with other creatives, potential clients, and industry professionals. You can follow, appreciate, and comment on others' work, which fosters community and collaboration.
- Feedback and Exposure: Sharing your work on Behance can attract feedback from peers and audiences alike, giving you valuable insights. Plus, your projects can be featured on the site, providing increased visibility.
- Job Opportunities: Many companies and recruiters scout for talent on Behance. A well-curated profile can lead to job offers and freelance opportunities directly from the platform.
- Integration with Adobe Creative Cloud: If you use Adobe products, you can integrate them with your Behance account for seamless uploads and updates.
With these benefits, having a Behance account isn't just about displaying your work—it's about building a professional presence that opens doors to new possibilities in your creative career.
Also Read This: How to Unblock Someone on Telegram
Step-by-Step Guide to Creating Your Behance Account

Creating a Behance account is a breeze, and it only takes a few minutes! Here’s how you can get started:
- Visit the Behance Website: Go to behance.net in your web browser.
- Click on “Sign Up”: Locate the “Sign Up” button in the top right corner. Click on it to start the registration process.
- Choose Your Sign-Up Method: You can either create an account using your email address or by linking your Adobe ID, Google, or Facebook accounts. Pick whichever is easiest for you!
- Fill in Your Details: If you choose email, fill in the required fields—your name, email address, and a password. Make sure to use a strong password!
- Agree to the Terms: Read through Behance’s terms of service and privacy policy. Check the box to agree.
- Verify Your Email: After signing up, Behance will send a verification email. Click the link in that email to confirm your account.
- Profile Setup: Once verified, you’ll be prompted to set up your profile. Don't skip this step!
And voilà! You now have a Behance account ready for you to showcase your creativity.
Also Read This: Exploring the Differences Between Rumble and Traditional Social Platforms
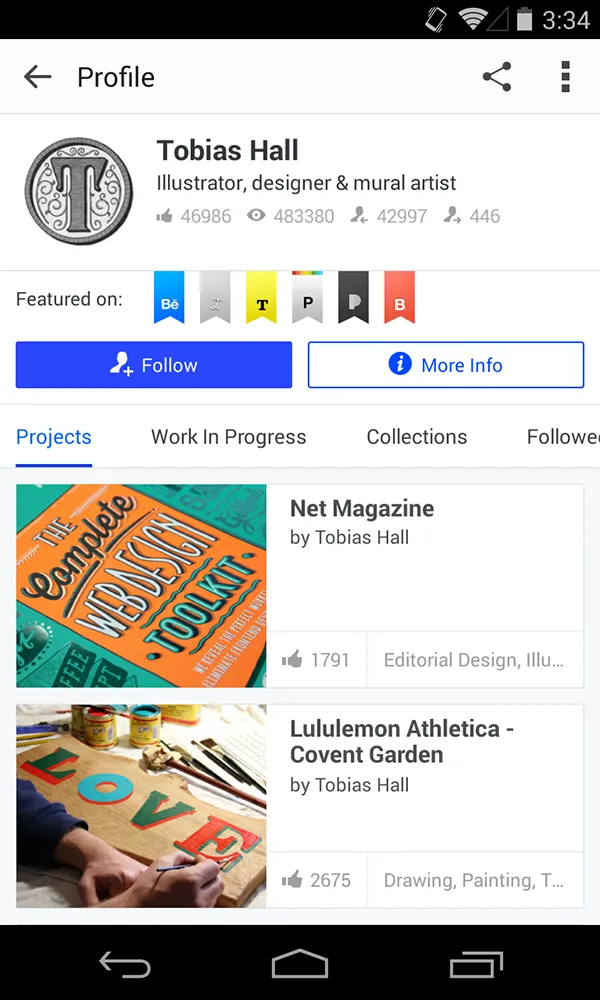
How to Set Up Your Profile Effectively
Your Behance profile is your digital portfolio, so making it visually appealing and informative is crucial. Here’s how to do it effectively:
- Choose a Professional Profile Picture: Use a clear, high-resolution image of yourself or a logo. This helps establish your brand identity.
- Craft a Compelling Bio: Keep it concise and engaging. Include your skills, interests, and what you’re passionate about in your creative field. For example:
- Add Your Work: Upload high-quality images or videos of your projects. Use project descriptions to explain your process and thought behind each piece.
- Link Your Social Media: Connect other social media platforms to your profile. This creates a network and helps people follow you across different channels.
- Update Regularly: Keep your portfolio fresh by adding new work and refining your profile as you grow as a creative.
| Do's | Don'ts |
|---|---|
| Highlight key achievements. | Make it too lengthy. |
| Use keywords relevant to your work. | Be overly vague. |
| Inject some personality. | Sound too stiff or formal. |
By thoughtfully setting up your profile, you can create a strong first impression and attract more viewers to your work on Behance!
Also Read This: How to Upload a YouTube Video to Canvas
Tips for Showcasing Your Work on Behance
Creating a stunning profile on Behance is essential to grab attention and showcase your creativity effectively. Here are some tips to make your work shine:
- High-Quality Images: Use high-resolution images for your projects. Blurry or pixelated visuals can detract from your work. Consider using professional photography or editing tools to enhance your images.
- Project Thumbnails: Design eye-catching thumbnails for your projects. These are the first impressions viewers will have, so make them compelling and representative of your style.
- Detailed Descriptions: Don’t just upload images; provide context! Write engaging descriptions about your projects, including your inspiration, goals, and techniques used. This adds depth and connects with your audience.
- Show Process: People love to see how a project evolves. Include sketches, drafts, or behind-the-scenes shots to illustrate your creative journey. This transparency can foster appreciation for your skills.
- Diverse Projects: Showcase a variety of projects to highlight your versatility. Different styles or mediums can attract a broader audience. Think about including graphic design, illustration, photography, and more.
- Update Regularly: Keep your profile fresh by regularly updating it with new projects. Consistency shows dedication and keeps your audience engaged.
Also Read This: How to Create a LinkedIn Newsletter with a Step-by-Step Guide
Engaging with the Behance Community
Behance isn't just a platform for showcasing your work; it's also a vibrant community of creatives. Engaging with others can significantly enhance your experience. Here are some ways to connect:
- Follow Other Creatives: Discover and follow artists whose work resonates with you. This not only supports them but also keeps you inspired.
- Give Feedback: Take time to leave thoughtful comments on other projects. Constructive feedback builds relationships and can lead to meaningful conversations about your craft.
- Join Groups: Participate in Behance groups that align with your interests. This is a great way to find like-minded individuals and collaborate on projects.
- Share Your Knowledge: Consider writing articles or creating tutorials. Sharing your expertise can establish you as a thought leader in your niche.
- Participate in Challenges: Engage in community challenges or contests. These are excellent opportunities to push your limits and gain visibility.
- Networking: Connect with other professionals through direct messages. Building relationships can lead to collaboration or job opportunities.
Also Read This: Mastering the Art of Smoke Rings with Our Easy Video Guide
Creating a Behance Account and Setting Up Your Profile to Showcase Your Work
Behance is a leading online platform that allows creative professionals to showcase their work and connect with other artists. Creating a Behance account is a straightforward process, and setting up your profile effectively can significantly enhance your visibility in the creative community. Here’s a step-by-step guide to help you get started.
Step 1: Sign Up for a Behance Account
To create a Behance account, follow these steps:
- Visit the Behance website.
- Click on the “Sign Up” button.
- You can sign up using your Adobe ID, Facebook, or Apple account, or you can register with your email address.
- Fill in the necessary details and agree to the terms and conditions.
- Verify your email address to activate your account.
Step 2: Setting Up Your Profile
Once you have created your account, it's time to set up your profile:
- Profile Picture: Upload a high-quality image that represents you or your brand.
- Cover Image: Choose an eye-catching cover image that showcases your work or style.
- Bio: Write a concise bio that highlights your skills, interests, and what you do as a creative.
- Skills: List your relevant skills to attract potential clients and collaborators.
- Links: Add links to your personal website or other social media accounts to direct traffic to your portfolio.
Step 3: Showcasing Your Work
Now that your profile is set up, it’s time to upload your projects:
- Click on the “Create a Project” button.
- Upload images, videos, or other media that represent your work.
- Add project titles, descriptions, and tags to help users find your work.
- Publish your project and share it within the Behance community.
By following these steps, you can create a compelling Behance account that effectively showcases your artistic talents. Remember, a well-curated profile not only attracts attention but also connects you with potential clients and collaborators.
Conclusion: Maximizing Your Presence on Behance
To maximize your presence on Behance, consistently engage with other creatives, update your portfolio regularly, and participate in community challenges to enhance your visibility and foster professional relationships.