Welcome to your ultimate guide on sewing a collar on a dress! Whether you're a seasoned seamstress or just starting your sewing journey, adding a collar can elevate your dress from ordinary to extraordinary. Collars come in various styles, from classic to modern, and they can completely transform the look of your outfit. In this guide, we'll walk you through everything you need to know, from gathering your materials to sewing the perfect collar. Let’s get started on this fun and creative sewing adventure!
Materials Needed
Before diving into sewing, it's essential to gather all the necessary materials. Having the right tools will make your project smoother and more enjoyable. Here's a comprehensive list of what you'll need:
- Fabric: Choose a fabric that complements your dress. Popular options include cotton, linen, or even a lightweight wool. Make sure to pre-wash your fabric to prevent shrinking later.
- Interfacing: This is crucial for providing structure to your collar. Opt for a fusible interfacing that matches the weight of your fabric.
- Thread: Select a thread that matches your fabric. Quality thread is essential for a durable finish. Cotton or polyester threads are great choices.
- Scissors: A good pair of fabric scissors will help you cut cleanly. Consider using pinking shears for a zigzag finish to prevent fraying.
- Sewing Machine: While you could sew by hand, a sewing machine will save you time and provide more precise stitching.
- Pins or Clips: Use these to hold your fabric in place while you sew. They help prevent shifting and ensure a neat finish.
- Measuring Tape: Accurate measurements are key. A measuring tape helps you get the collar size just right.
- Pattern Paper: If you're drafting your own collar design, pattern paper will help you create and adjust your template.
Gathering these materials will set you up for success. Ready to start sewing? Let’s move on to the next steps!
Also Read This: Is Subscribing on YouTube Free
Preparing the Dress
Before you dive into sewing a collar onto your dress, it’s essential to prepare your garment properly. This step ensures that everything aligns perfectly and makes the sewing process smoother.
First, gather all your materials:
- Dress fabric
- Collar fabric (matching or contrasting)
- Thread (preferably matching the collar fabric)
- Scissors
- Pins
- Sewing machine
- Iron
Next, follow these steps:
- Wash and Iron: Always wash and iron your fabrics before you start. This preps them for sewing and helps avoid shrinkage later.
- Mark the Collar Placement: Use fabric chalk or a disappearing marker to outline where the collar will be attached. This gives you a clear guide as you sew.
- Pin the Collar: Position the collar right sides together with the neckline of the dress. Use pins to secure it in place, ensuring the edges align perfectly.
- Check Fit: If possible, try the dress on to ensure the collar placement feels comfortable. Adjust if necessary.
By taking the time to prepare your dress properly, you’ll set the stage for a successful collar application. Remember, a little preparation goes a long way in achieving professional-looking results!
Also Read This: How to Get Featured on Behance Served
Choosing the Right Collar Style
When it comes to adding a collar to your dress, the style you choose can dramatically change the look and feel of the garment. Here’s a quick rundown of popular collar styles to consider:
| Collar Style | Description | Best For |
|---|---|---|
| Peter Pan Collar | A rounded collar that sits flat against the garment. | Casual dresses and vintage-inspired looks. |
| Mandarin Collar | A stand-up collar that doesn’t have flaps, giving a sleek look. | Modern designs and structured dresses. |
| Ruffle Collar | A frilly collar that adds a touch of femininity. | Romantic or bohemian styles. |
| Notched Collar | Characterized by a “V” shape at the front. | Blazers and fitted dresses. |
When choosing your collar, consider factors like the occasion, the dress silhouette, and your personal style. For instance, a Peter Pan collar is great for a playful summer dress, while a mandarin collar adds sophistication for evening wear.
Ultimately, the right collar can elevate your dress from ordinary to extraordinary. Don't be afraid to experiment with different styles to find what suits you best!
Also Read This: How to Download Videos from Dailymotion Without Software
5. Cutting the Collar Fabric
Cutting the collar fabric is a pivotal step in creating a beautifully finished dress. To ensure that your collar fits perfectly and looks professional, follow these tips and techniques:
- Choose the Right Fabric: Select a fabric that complements your dress. Cotton and linen work wonderfully for casual dresses, while satin and silk are ideal for more formal looks.
- Use a Pattern: Start with a collar pattern that matches the neckline of your dress. You can purchase a pattern or create your own by tracing an existing collar.
Once you have your pattern, it's time to cut the fabric:
- Prepare the Fabric: Iron your fabric to remove any creases. This will help in getting accurate cuts.
- Lay Out the Pattern: Place your collar pattern on the fabric, aligning it with the grain. Pin it down securely to prevent slipping.
- Cut the Fabric: Using sharp fabric scissors, carefully cut around the pattern. Remember to leave a seam allowance (usually about 1/4 inch) for sewing.
Finally, don't forget to cut interfacing pieces if your collar requires extra support. This will add structure and stability to your collar, making it stand out beautifully against the dress.
Also Read This: How to Embed Sketchfab Model in Behance
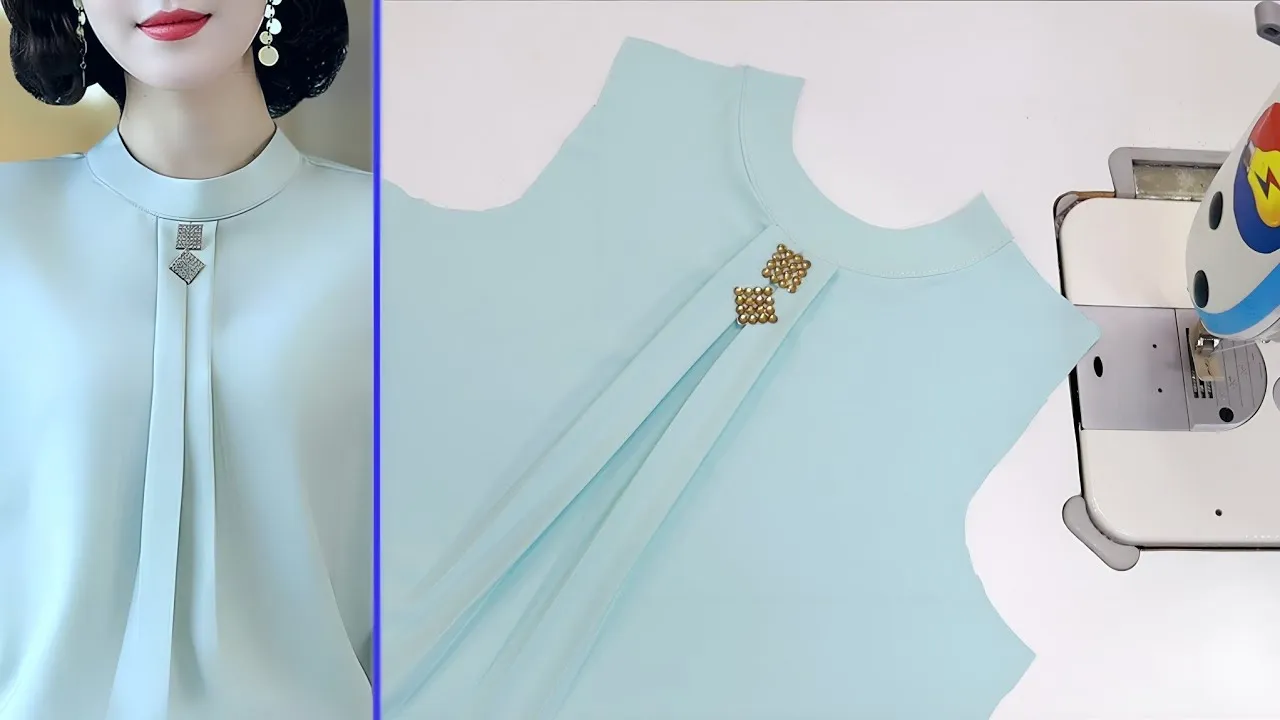
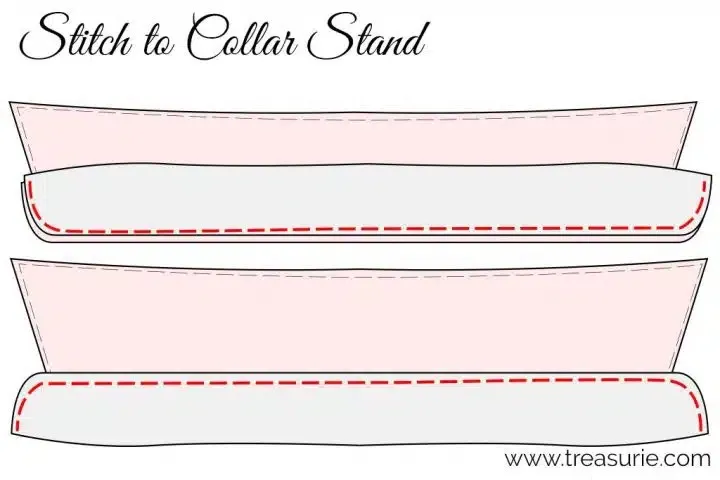
6. Sewing the Collar to the Dress
Sewing the collar onto the dress is where your hard work truly comes together. With a bit of patience and attention to detail, you can achieve a polished look. Here’s how to do it:
- Pinning the Collar: Start by aligning the edges of the collar with the neckline of the dress. Pin them together, ensuring that the collar is evenly distributed and lays flat.
- Check for Alignment: Before sewing, double-check that the collar is aligned properly. This step is crucial to avoid any awkward folds or puckering.
Now, let's move to the sewing process:
- Sew the Collar: Using a sewing machine, sew along the pinned edge with a straight stitch. Make sure to backstitch at the beginning and end for reinforcement.
- Trim Excess Fabric: After sewing, trim any excess seam allowance to reduce bulk, especially at the collar points.
- Press the Seam: Gently press the collar seam allowance towards the collar. This will help it lay flat and give it a crisp finish.
Finally, finish by top-stitching along the collar edge for a professional touch. This not only enhances the look but also secures the collar in place, ensuring it stays neat and tidy.
Also Read This: Ultimate Guide to Crafting a Paper Jet Plane
7. Finishing Touches
After you’ve sewn the collar onto your dress, it’s time to add those final touches that elevate your garment from good to great. These finishing touches can really make a difference in the overall appearance and durability of your dress.
Here are some key steps to consider:
- Pressing the Collar: Use a steam iron to gently press the collar. This helps to set the seams and gives it a crisp, professional look. Always press from the underside to avoid damaging the fabric.
- Topstitching: Consider adding a line of topstitching along the collar edge. This not only looks decorative but also helps to hold the collar down, preventing it from flipping up.
- Finishing Raw Edges: If you haven’t done so already, finish the raw edges of the collar with a serger or zigzag stitch. This prevents fraying and enhances longevity.
- Adding Closure: Depending on your dress design, you might need to add buttons, snaps, or a hook-and-eye closure to secure the collar. Ensure they are aligned properly for a polished finish.
- Final Inspection: Before wearing your dress, do a final inspection. Check for any loose threads or uneven seams. Snip away any threads and make any necessary adjustments.
With these finishing touches, your collar will not only look fabulous but also be functional and sturdy, ensuring your dress is ready to shine!
Also Read This: Canva Image in Circle
8. Common Mistakes to Avoid
Even experienced sewists make blunders when adding collars to dresses. To help you steer clear of these pitfalls, here’s a list of common mistakes and how to avoid them:
| Mistake | How to Avoid It |
|---|---|
| Incorrect Collar Size: Sometimes, collars can end up too tight or too loose. | Always double-check your pattern measurements against your dress neckline before cutting. |
| Misaligned Seams: Collars can end up crooked if not aligned properly. | Pin the collar in place and baste it if necessary before sewing the final stitch. |
| Ignoring Fabric Grain: Sewing against the fabric grain can cause distortion. | Ensure that your collar pieces are cut along the grainline as indicated on the pattern. |
| Skipping Interfacing: Not using interfacing can lead to a floppy collar. | Always use interfacing to give your collar the structure it needs. |
| Neglecting to Press: Skipping pressing can make your collar look unkempt. | Press each step as you go to achieve a neat finish. |
By being aware of these common mistakes, you'll be better equipped to create a beautifully finished collar on your dress. Remember, practice makes perfect!
Complete Guide to Sewing a Collar on a Dress
Sewing a collar on a dress can elevate its style and give it a polished look. Whether you’re a beginner or an experienced sewer, adding a collar can be a fun project. This guide will take you through the steps necessary to create a beautiful collar for your dress.
Before you begin, gather the following materials:
- Fabric for the collar (matching or contrasting the dress)
- Interfacing (for added structure)
- Sewing machine
- Scissors
- Pins
- Measuring tape
- Chalk or fabric marker
Follow these steps to sew a collar:
- Choose Your Collar Style: Decide on a collar style, such as a Peter Pan collar or a classic pointed collar.
- Cut the Fabric: Use your pattern to cut the collar pieces from your fabric and interfacing. Typically, you will need two fabric pieces and two interfacing pieces.
- Attach Interfacing: Iron the interfacing to the wrong side of the fabric pieces for stability.
- Sew the Collar: Place the fabric pieces right sides together. Sew along the edges, leaving a small opening to turn the collar right side out.
- Turn and Press: Turn the collar right side out and gently press it with an iron for a crisp finish.
- Attach to the Dress: Pin and sew the collar to the neckline of the dress, ensuring it is evenly distributed.
With practice, sewing a collar can be a straightforward addition to your dressmaking repertoire. Experiment with different styles and fabrics to create unique looks!
Conclusion: Sewing a collar onto a dress is a rewarding process that enhances its aesthetic appeal. By following these steps and tips, you can create a stunning collar that will elevate your sewing projects.