As a designer, I frequently contemplate how image resolution affects my work. Be it an eye catching social media post or a polished presentation the quality of the visuals I incorporate is vital in conveying my message. To put it simply image resolution denotes the level of detail captured in an image usually quantified in pixels. A resolution signifies greater intricacy whereas a lower resolution may result in fuzzy or pixelated visuals.
When working with Canva it’s crucial to understand the importance of image resolution for crafting visually appealing designs. Canva offers the flexibility to create images in different resolutions and knowing how to navigate this feature can greatly impact the final result. I speak from experience when I say that I initially overlooked this aspect and was left disappointed with the outcomes. By the time you finish reading this section you’ll gain a better insight into image resolution and its role, in your design process.
Why Image Resolution Matters
The quality of an image can either enhance your project or detract from it. Here’s why it’s important:
- Quality of Presentation: A high-resolution image gives a professional touch, while a low-resolution image can make your work appear unpolished.
- Impact on Audience: Clear, high-quality visuals grab attention. In my experience, when I used sharp images, engagement increased significantly.
- Adaptability: Higher resolution images can be resized for various formats without losing clarity, making them versatile for different platforms.
Picture this scenario: you're showcasing your project at a conference and the visuals on your slides are all out of focus. This not only impacts your self assurance but also shapes how your audience views your dedication. Taking the time to grasp image quality is not just helpful; it's crucial.
Also Read This: Step-by-Step Guide to Creating a Side French Braid
How to Increase Image Resolution in Canva
Boosting the resolution of an image in Canva is a task. I still recall the moment I accomplished it; it was like reaching a milestone in my design abilities. Allow me to share a quick tutorial to assist you in improving the clarity of your pictures.
- Select Your Image: Start by choosing the image you want to enhance in your Canva design.
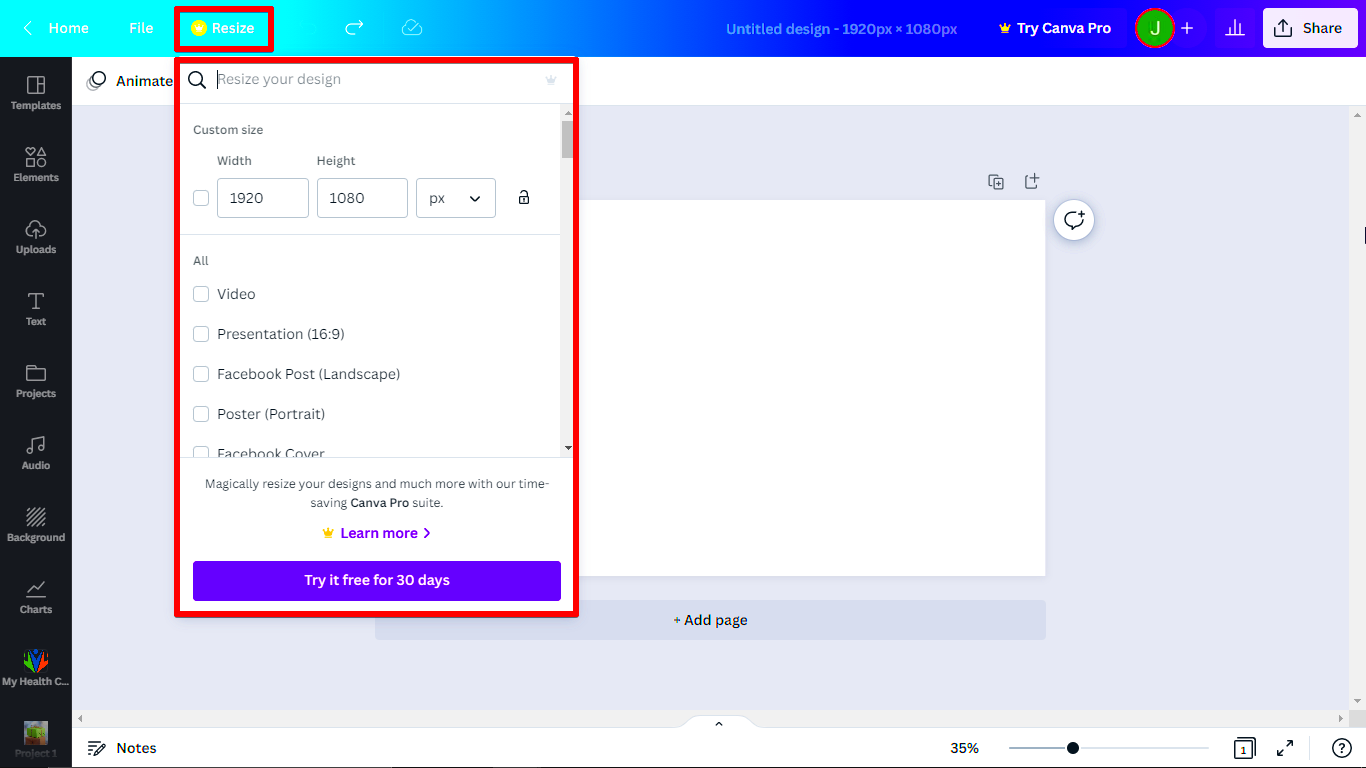
- Resize Your Canvas: Click on the resize option in the top right corner. Increasing the dimensions will help boost the resolution.
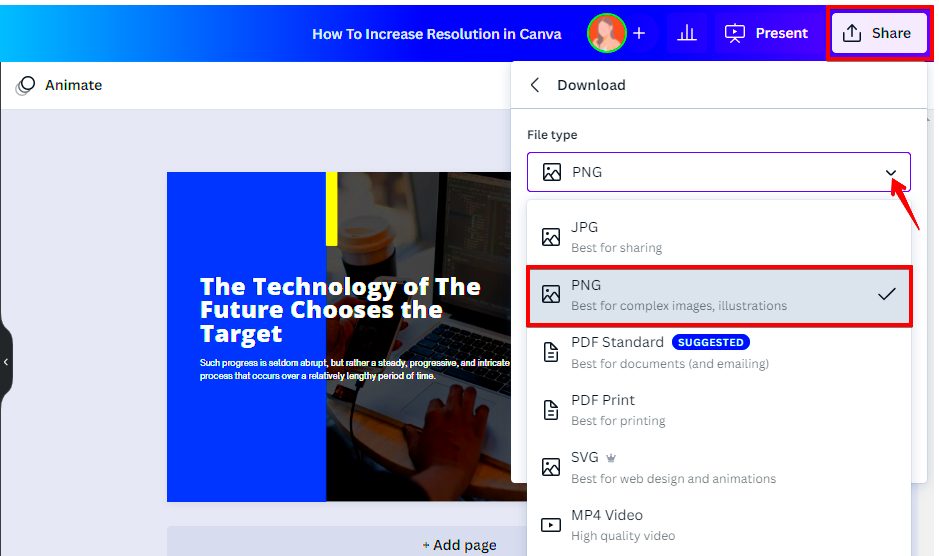
- Download Settings: When you are ready to download, click on the 'Download' button. Choose 'PNG' or 'PDF Print' for better resolution options.
- Image Quality: Adjust the quality settings by selecting 'High Quality' to ensure you get the best output.
Here’s a helpful suggestion. If you notice that your images still don’t look clear enough consider finding higher quality versions before bringing them into Canva. This small action can significantly enhance the quality of your end result.
In the end enhancing image resolution comes down to knowing how to use the resources available to you. By honing your skills and being mindful of the finer points you can produce breathtaking visuals that strike a chord with your viewers.
Also Read This: How to Cancel Your YouTube TV Subscription
Using the Canva Image Downloader
Canvas image downloader is a standout feature making it a breeze to save your stunning creations. I can still recall the thrill of finishing my first design and eagerly wanting to share it. The anticipation of hitting that download button was something else. With Canva this whole process is not easy to navigate but also provides a range of options to suit your preferences.
To maximize your experience with the Canva Image Downloader, adhere to the following guidelines.
- Choose Your Design: After finalizing your design, look for the ‘Download’ button in the top right corner.
- Select File Type: You can choose from various formats like PNG, JPG, PDF, and more. Personally, I prefer PNG for social media posts, as it provides better quality.
- Adjust Settings: For images that require high quality, select the 'Transparent background' option if applicable. This feature works wonders, especially for logos and graphics.
- Click Download: Once you’ve adjusted all settings, click the 'Download' button. Your design will be saved to your device in seconds.
By following these steps you can easily save images from Canva. It may seem like a task but trust me the satisfaction of witnessing your design come to life is truly fulfilling!
Also Read This: How to Make Shawarma in Urdu Video: Complete Cooking Guide on Dailymotion
Best Practices for Image Resolution
After dedicating a amount of time to testing different image resolutions I've discovered some key best practices to keep in mind. These guidelines not help you achieve images but also spare you from potential hassles in the future. Here's what I suggest:
- Start with High-Quality Images: Whenever possible, begin with high-resolution images. Websites like Unsplash and Pexels offer stunning images that can serve as excellent backgrounds or focal points.
- Check Dimensions: Before finalizing your design, always check the dimensions. Keeping an eye on pixel dimensions helps avoid any unwanted surprises when downloading.
- Avoid Excessive Resizing: Resizing images too much can lead to pixelation. Stick to minor adjustments, as drastic changes can compromise quality.
- Use Grids and Guides: Canva provides grids and guides to help you maintain alignment and proportion, which can enhance the overall look of your design.
From what I’ve seen sticking to these methods has greatly impacted my design work. It’s really about cultivating positive routines that enhance not just your efficiency but also the quality of your end results!
Also Read This: When Is the Next Royal Rumble Scheduled
Common Issues When Increasing Resolution
While boosting image resolution might seem like a task it does bring its own challenges. I've had my moments with difficulties and I'm here to shed light on some common missteps and ways to steer clear of them. Being aware of these can help you save both time and hassle.
- Pixelation: The most frequent issue arises when low-resolution images are enlarged. This often leads to a pixelated effect. Always start with a high-resolution image.
- Loss of Quality: When adjusting resolution settings, it’s easy to overlook quality settings. Ensure you select 'High Quality' during the download process.
- Incorrect Dimensions: Sometimes, increasing resolution without checking the final dimensions can lead to unexpected results. Keep an eye on the pixel count to avoid unwanted changes.
- Color Shift: Occasionally, images may look different once downloaded. This color shift can occur due to various settings in the design. Always preview your images before finalizing.
By recognizing these pitfalls you can tackle the obstacles that come with enhancing image resolution in a smarter way. Keep in mind that its all about growth. Every design presents a chance to hone and polish your abilities!
Also Read This: How to Change Your Name in LinkedIn
Tips for Maintaining Quality
When using Canva to create images it's important to pay attention to detail in order to maintain quality. There have been times when I had to redo my designs because the final result didn't meet my expectations. Over the years I've picked up some helpful tips that have assisted me in keeping my designs looking polished and professional.
To preserve the quality of your images I suggest the following tips
- Choose the Right File Format: The choice of file format can significantly impact image quality. For detailed graphics, use PNG, while JPEG is suitable for photographs. In my experience, sticking to PNG for most designs has paid off well.
- Utilize High-Resolution Images: Always start with high-resolution images. It’s like cooking with fresh ingredients; quality matters. Websites like Pixabay and Unsplash offer fantastic free resources.
- Avoid Over-Editing: While it’s tempting to apply multiple filters and effects, too much editing can degrade image quality. Find a balance and stick to subtle enhancements.
- Preview Before Downloading: Always preview your designs to catch any quality issues. It’s a simple step, but it can save you from unpleasant surprises.
If you follow these suggestions you can make sure that your designs stay true to their original quality. It’s important to be thoughtful and purposeful in your decision making. Each design has a story to tell and it’s crucial to keep that story clear and engaging!
Also Read This: Understanding the Rumbling Noise Outside
Frequently Asked Questions
While exploring Canva I came across a lot of questions that new users tend to have. Here are some of the queries along with my thoughts on them.
- What is image resolution? Image resolution refers to the amount of detail in an image, typically measured in pixels. Higher resolution means more detail and clarity.
- How do I know if my image is high resolution? A high-resolution image usually has a pixel dimension of at least 300 DPI (dots per inch). You can check the dimensions in Canva before downloading.
- Can I increase the resolution of a low-quality image? While you can adjust settings in Canva, it’s best to start with a high-quality image. Increasing resolution on a low-quality image often leads to pixelation.
- What file format should I use for printing? For printing purposes, it's advisable to use PDF or PNG formats. These maintain quality better than JPEG.
These frequently asked questions address issues that a lot of people have. Feel free to ask for more information whenever you need it. The process of creating something involves valuable lessons and each inquiry gets you closer to perfecting your skills!
Conclusion
As I conclude this talk about image resolution and quality in Canva I find myself reminiscing about my evolution as a designer. It has been quite a journey starting with crafting posts to now meticulously focusing on every aspect. Grasping the nuances of resolution has not enhanced my designs but also bolstered my self assurance.
Canva provides an excellent platform for designers of all skill levels. By prioritizing quality using the appropriate tools and adhering to guidelines you can craft visuals that deeply resonate with your audience. Keep in mind that each image you produce presents an opportunity to showcase your individuality and forge connections with others.
Feel free to jump in try things out and dont hold back when it comes to making errors. Every situation brings you closer to personal development. Cheers to crafting stunning creations that narrate your one of a kind tale!