
You know what I love about using Canva for design? It makes things really easy even for someone like me who wasn't always a design whiz. But there's this one feature that I particularly enjoy when I'm working on something creative – overlapping images. It's all about stacking one image on top of another blending them together to achieve a look. You don't need to be a pro to do this. In fact with Canvass user friendly interface it feels like playing with pieces of paper to craft a collage. It's my go to technique, for adding a personal touch to my designs whether it's a birthday card for a friend or a quick post on social media.
How to Overlap Images in Canva: Step-by-Step Guide
If you share my enthusiasm for jumping into things without getting bogged down in details this comprehensive guide is tailored to your preferences. Take my word for it, I discovered the ropes through trial and error and it was an enjoyable experience!
- Start a New Design: Open Canva and choose the template or dimensions for your design. I usually go for the Instagram post size – it’s perfect for almost everything!
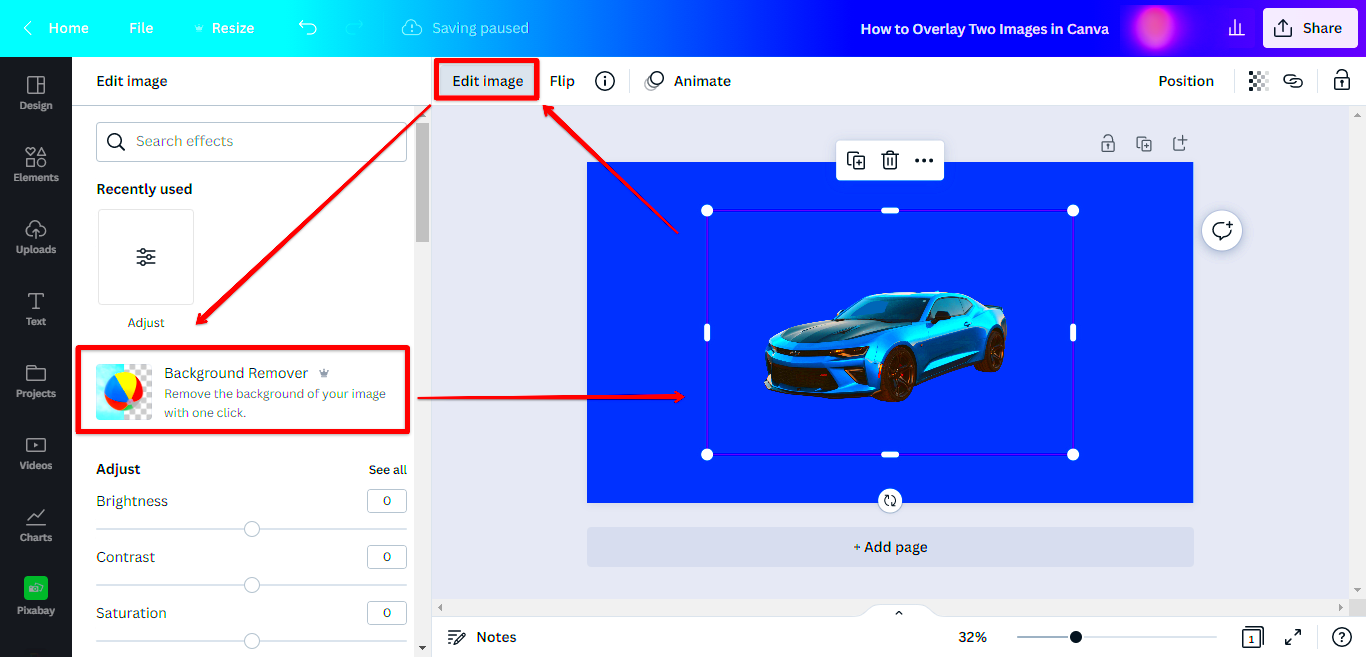
- Upload Images: Upload the images you want to use. This can be from your computer or Canva’s own library. I often mix my own photos with Canva’s stock images. It adds a personal touch.
- Position the Images: Drag the images onto the canvas. Here’s where the fun begins. Move them around, place one on top of the other. Just imagine you’re arranging a scrapbook.
- Use Transparency: If you want a softer overlap, adjust the transparency of the top image. I personally love this feature; it gives a dreamy look.
- Send to Back/Front: Right-click on the image and choose “Send to Back” or “Bring to Front” to control the layering. This is how you fine-tune which image overlaps the other.
- Add Text or Elements: After overlapping images, you can add some text or elements. It’s like adding the final strokes to your masterpiece!
And that’s all there is to it! Pretty simple huh? I only needed a few attempts to master it and now it has become one of my go to tricks on Canva.
Also Read This: How to Make Money on LinkedIn by Monetizing Your Profile
Common Mistakes While Overlapping Images in Canva
To be frank when I began blending images I stumbled upon some beginner blunders. The silver lining is that I gained valuable insights from those missteps and now I can share with you precisely what pitfalls to steer clear of.
- Overcrowding the Design: My biggest mistake was adding too many images. I got carried away and ended up with a cluttered design. Less is definitely more when overlapping images.
- Ignoring Alignment: Another common issue is misalignment. At first, I didn’t realize that slightly misaligned images can throw off the whole design. Now, I always double-check the alignment before finalizing it.
- Overusing Transparency: I love the transparency tool, but too much of it can make the images look faded and lose their impact. I learned to use it sparingly to keep the balance.
- Wrong Image Pairing: Not every image pairs well with another. There were times I used two very busy images together, and it became visually overwhelming. Now, I go for a balance – one detailed image and one simpler one.
- Forgetting to Group: If you move images around a lot like I do, forgetting to group them can be a headache. Grouping them keeps everything in place, especially when you’re making other adjustments.
Once you steer clear of these blunders blending images in Canva turns into a delightful and enjoyable experience. Its all about learning along the way which adds to the excitement!
Also Read This: How to Create Fun Ribbon Headbands with a DIY Project
Creative Ideas for Using Image Overlapping in Canva Designs

When I first came across the feature of overlapping images in Canva it felt like a delightful discovery akin to finding a trove of artistic goodies. The range of creative options it offered was boundless and it truly expanded my artistic horizons. Whether you're working on projects or catering to professional requirements incorporating overlapping images can bring that touch of uniqueness. Here are a few suggestions that have proven to be incredibly effective for me.
- Collages: Creating a collage of family photos for a special occasion is a beautiful way to celebrate memories. I love mixing candid shots with posed ones, overlapping them for a layered effect that tells a story.
- Promotional Graphics: If you're a small business owner like me, using overlapping images can grab attention. I often use product images with lifestyle shots, showcasing the product in action. It helps potential customers visualize how they can use it.
- Social Media Posts: Canva is my go-to for social media graphics. By overlapping images, I can create eye-catching posts that stand out in crowded feeds. For instance, I sometimes layer a quote over a scenic background, giving it a serene vibe.
- Event Invitations: Want to make your invites pop? Layering images related to the theme of your event can set the mood. I once created a wedding invite using floral images overlapping a soft pastel background, and it turned out stunning.
- Infographics: If you’re sharing information, overlapping images can help organize data visually. I like to combine icons with graphs or charts to make complex information more digestible.
These concepts are merely scratching the surface. A dash of imagination coupled with blending visuals in Canva can elevate your creations to a whole new level of uniqueness!
Also Read This: Testing Fortiguard Downloader’s Web Filtering Capabilities
Why Use Canva's Image Overlapping Feature for Your Designs?
Whenever I reflect on my reasons for choosing Canva for my design projects the image overlapping capability emerges as a standout factor. It goes beyond simply stacking images; it enables me to weave a story through visuals. Here are some compelling reasons why I believe you should fully embrace this functionality.
- Enhances Visual Appeal: Overlapping images can create depth and interest. I’ve noticed that my designs grab attention more when they look layered and dimensional.
- Encourages Creativity: Using this feature pushes you to think outside the box. I often find myself experimenting with different images and placements, leading to unexpected but delightful results.
- Customizable: Canva makes it easy to adjust transparency, size, and positioning. I love being able to tweak things until they feel just right, which isn’t always possible with traditional design tools.
- Saves Time: For someone who juggles multiple projects, the ease of overlapping images saves me a lot of time. I can quickly create impactful designs without getting bogged down in details.
- Perfect for Beginners: If you're just starting out, this feature allows you to create professional-looking designs without needing a degree in graphic design. I remember my first attempts feeling like pure magic!
In a society where initial perceptions hold significance Canvas image layering functionality enables you to craft visuals that convey messages silently.
Also Read This: Best Practices for Posting Multiple Photos on LinkedIn
Best Practices to Make Overlapped Images Look Professional
Through numerous late night brainstorming and endless tweaks I've come to realize that blending images can be enjoyable but achieving a polished appearance demands a touch of skill. Here are some key tips I've gathered during my journey.
- Choose Complementary Images: Make sure your images work well together. I always pick images that share a common theme or color palette. This creates harmony in the design.
- Mind the Composition: Pay attention to how the images are arranged. A good balance is essential. I often sketch a rough layout before diving in to ensure everything flows nicely.
- Use Borders or Shadows: Adding subtle borders or shadows can help differentiate overlapping images. I find that a slight shadow can make the top image pop, adding depth.
- Limit the Number of Overlaps: Too many overlapping images can confuse viewers. I usually stick to two or three images to keep the design clean and focused.
- Test on Different Backgrounds: Sometimes, the background can make or break your design. I recommend trying different backgrounds to see which enhances the overlapping effect best.
By adhering to these guidelines, you can make sure that your overlapping visuals not only appear visually appealing but also communicate your message in a clear manner. Enjoy the creative process!
Also Read This: Learn How to Make Your Hair Grow Long Fast with Dailymotion Guidance
Frequently Asked Questions About Canva Image Overlapping
As I’ve explored the capabilities of Canva and its image overlapping functionality I’ve noticed that beginners often have similar questions. It’s completely understandable to seek clarification when venturing into uncharted territory. Below are some of the inquiries along with my thoughts on each one, based on my experiences.
- Can I overlap more than two images?
Absolutely! While I often start with two images, there’s no hard and fast rule against overlapping multiple images. Just keep in mind the overall balance of your design. - How do I ensure the images are aligned properly?
Alignment can be tricky, especially when you’re dealing with multiple layers. I recommend using Canva's grid or guidelines feature, which helps maintain a clean layout. - What file types work best for overlapping images?
PNG and JPG files usually work well. I personally prefer PNGs because they allow for transparency, which can enhance the overlapping effect. - Can I use overlapping images for printing?
Yes, you can! Just ensure that the resolution is high enough. I often check the image quality before sending my designs for printing to avoid any unpleasant surprises. - What should I do if the overlapped images look cluttered?
If you find your design looking too busy, it’s a sign to edit! Try reducing the number of overlapping images or adjust the transparency to allow for better visibility.
When I began exploring image overlapping in Canva I had similar questions that you might have. Grasping these points can enhance your design journey making it more seamless and enjoyable!
Conclusion: Mastering Image Overlapping for Better Designs
To sum it up getting the hang of image overlapping in Canva can really take your design skills to the next level. With some practice and a dash of imagination you'll discover that this approach not adds to the beauty of your work but also adds a special flair to it. So go ahead and explore boldly and let your imagination shine through every layer you overlap!