Canva creates stunning visuals, making it one of the best tools to use. This technique not only improves on the aesthetics that you are designing, but also aids in arranging the content effectively. Shapes can be used as frames that enhance the images and make them noticeable. The ability to insert pictures into shapes is important as you create social media posts, presentations or any other kind of marketing material.
Steps to Insert Images into Shapes in Canva
Inserting images into shapes in canva is an easy process. Let me show you how:
- Open Canva and start a new project or open an existing one.
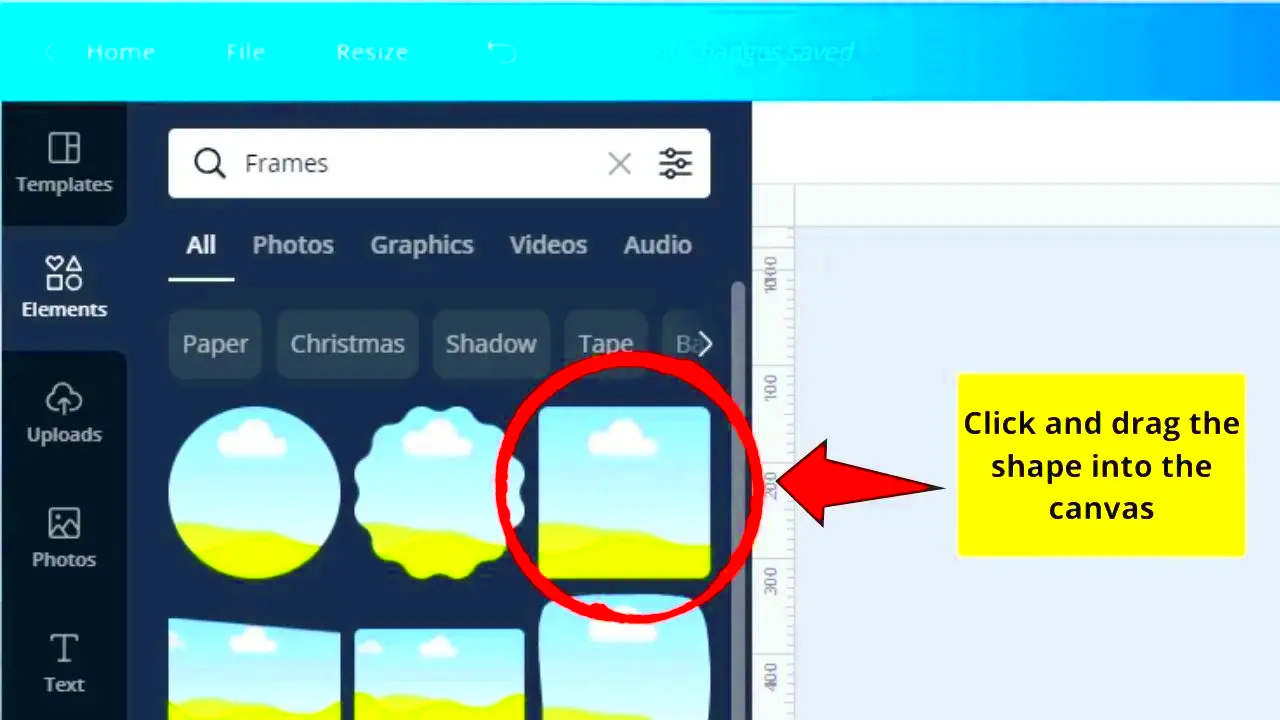
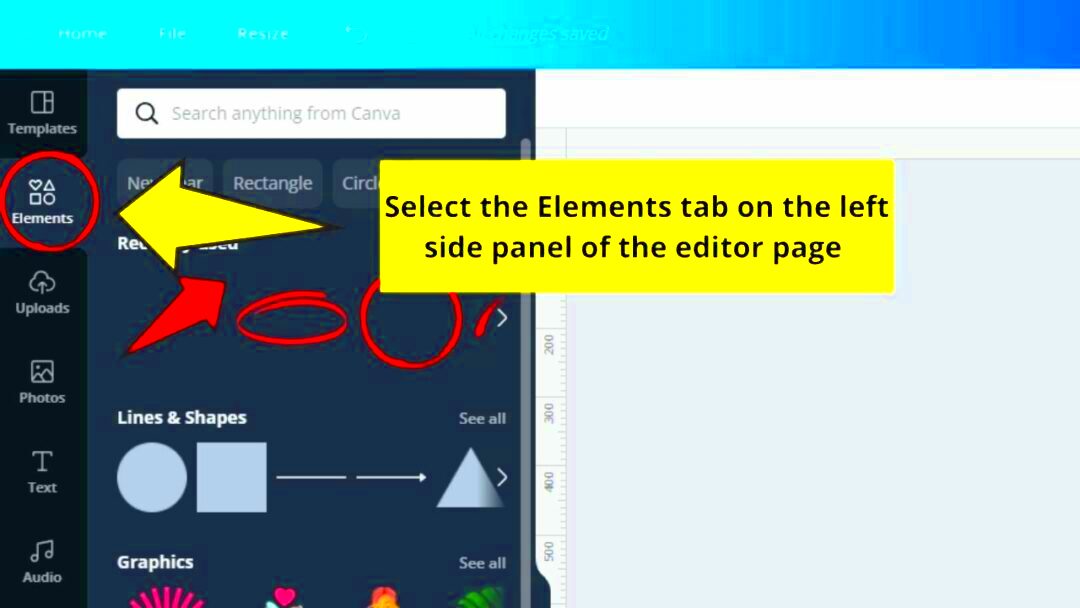
- Select a Shape: On the left sidebar, click on "Elements," and choose "Shapes." Pick a shape you like.
- Resize and Position: Drag the shape onto your canvas, resizing and positioning it as needed.
- Upload an Image: Click on the "Uploads" tab and upload your desired image.
- Insert Image into Shape: Drag your uploaded image over the shape. Right-click and select "Set Image as Mask."
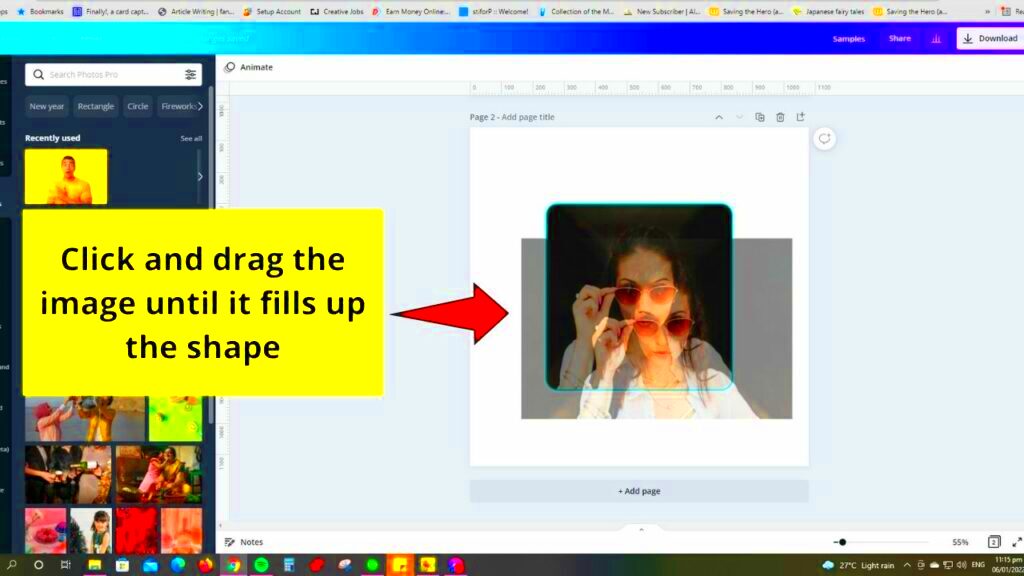
- Adjust Image and Shape: Double-click the image to adjust its positioning within the shape. You can also resize or rotate the shape as necessary.
- Final Touches: Add filters or effects to enhance your image further.
Also Read This: How to Download Locked Videos from Dailymotion
Benefits of Using Shapes for Images
Incorporating shapes into your designs for images has several benefits:
- Visual Interest: Shapes can add unique designs to your images, making them more engaging.
- Focus: Shapes can help direct the viewer's attention to the most important parts of your design.
- Consistency: Using the same shapes across different designs creates a cohesive look.
- Creative Framing: Shapes can act as creative frames that enhance your images rather than just contain them.
- Easy Customization: You can easily adjust the shapes and images to match your brand’s style.
Also Read This: Exploring YouTube's Role as a Social Media Platform in Online Communities
Common Issues When Inserting Images into Shapes
Generally, putting photos in shapes is simple when using Canva; however, there are few common problems that you may face. By knowing them, you will be able to fix the problems and continue designing stunning works of art. Below are some ordinary problems that could arise during your design process.
- Image Not Filling the Shape: Sometimes, your image may not fill the entire shape. This often happens if the aspect ratio of the image doesn't match the shape. To fix this, double-click the image and adjust its position within the shape.
- Shape Overlapping Other Elements: If your shape overlaps with other elements, it can disrupt the layout. You can resolve this by adjusting the position of the shape or other elements using the layering options in Canva.
- Quality Loss: If your image appears blurry or pixelated after inserting it into a shape, ensure that you’re using high-resolution images. Low-quality images may not look good even in shapes.
- Shapes Not Editable: After inserting an image, you may find it challenging to edit the shape itself. To change the shape or size, you may need to delete the current shape and insert a new one.
- Unexpected Background Colors: Sometimes, shapes may have a background color that you didn't intend to include. Click on the shape and select "Background Color" to change or remove it.
Also Read This: How to Create a New Facebook Account on Dailymotion
How to Customize Shapes after Inserting Images
Once an image has been inserted into it, a shape can improve one’s design and make it look more appealing. The following are ways to effectively customize your shapes:
- Change Shape Color: Click on the shape and choose a new color from the color palette. You can use brand colors for consistency.
- Add Borders: To make your shape stand out, consider adding a border. Select the shape, then go to the “Border” option and choose a color and thickness.
- Adjust Shape Size: You can easily resize the shape by dragging its corners. Make sure the image adjusts accordingly.
- Use Effects: Explore Canva’s effects like shadow or glow to give your shapes a three-dimensional look. This can create depth in your design.
- Layering Shapes: To create a complex design, layer multiple shapes together. Adjust their transparency for unique effects.
- Rotate Shapes: Adding a twist to your shapes by rotating them can make your design more dynamic. Click on the shape and drag the circular arrow to rotate.
Also Read This: Uploading a video to Behance
Using Canva for Different Design Projects
Canva is phenomenally multifaceted which makes it usable for designing projects. Whether you are an entrepreneur, a learner or just someone who derives pleasure in creation, canva has equipment to help you meet your objectives.Here are some common projects you may think about:
- Social Media Posts: Create eye-catching graphics for platforms like Instagram, Facebook, and Twitter. Use shapes to frame your images and maintain brand consistency.
- Presentations: Design stunning slides for presentations. Insert images into shapes to keep your slides visually appealing and organized.
- Infographics: Make informative infographics to convey data effectively. Using shapes helps categorize information visually.
- Marketing Materials: Create flyers, brochures, and posters. Shapes can help highlight key points and make your designs pop.
- Event Invitations: Design beautiful invitations for events like weddings and parties. Incorporate images into shapes for a polished look.
- Branding Assets: Build your brand’s visual identity with logos and business cards. Using Canva allows you to experiment with different shapes and layouts.
Also Read This: The Impact of Music and Lyrics Sharing on Platforms Like Dailymotion
Best Practices for Image Quality in Shapes
Shapes that contain images require highest quality since this adds life to the designs. Good quality pictures do not only appear like professionals but also bring out a visual interest in what you have produced. In order for the image to keep its appearance when it is put into a shape, this article presents some of the best practices.
- Use High-Resolution Images: Always start with images that are at least 300 DPI (dots per inch) for print designs and 72 DPI for web. High-resolution images prevent pixelation when resized.
- Choose the Right File Format: Different formats serve different purposes. Use PNG for images with transparent backgrounds and JPEG for photographs. Avoid using GIFs unless they are animated.
- Check Aspect Ratios: Maintain the correct aspect ratio to prevent distortion. This means keeping the same width-to-height ratio when resizing your images.
- Optimize Images for Web: If you're creating images for online use, make sure they are optimized to reduce file size without compromising quality. Tools like TinyPNG can help with this.
- Avoid Over-Editing: While filters and edits can enhance an image, overdoing it can degrade quality. Use adjustments sparingly to maintain clarity.
- Preview Before Finalizing: Always preview your design before downloading or printing. This helps catch any issues with image quality that may not have been visible during editing.
Also Read This: How to Become an Exclusive Contributor on iStock
FAQ about Canva Image Insertion into Shapes
Are you curious on how to put pictures into shapes in Canva? You are not the only one! Checkout these common queries for some helpful guidance:
- Can I insert any image into a shape?
- Yes, you can insert any image, but using high-quality and relevant images will yield the best results.
- What if my image doesn't fit the shape?
- You can double-click the image to adjust its position within the shape. Resize or reposition as necessary.
- Can I use multiple images in one shape?
- Canva allows you to create a collage effect by layering images, but a single shape can only contain one image at a time.
- Is there a limit to the number of shapes I can use?
- No, there is no set limit! Feel free to use as many shapes as your design needs.
- What file types can I upload to Canva?
- You can upload images in various formats, including JPEG, PNG, and GIF.
Conclusion on Using Canva for Image Design
Canva is a wonderful place for any individual wanting to refine their skills in creating images. For example, when you learn how to add photos in different forms, you will be able to create attractive graphics that are very compelling. One important tip that might help make your designs more appealing is to use high-quality pictures, choose appropriate shapes and know what you’re doing.
Thus, regardless of whether you are a marketer who produces promotional content or an amateur who makes images for Facebook, Canva provides all that is required to convert your concepts into reality. Taking into account some creativity along with practice will soon lead you to make impressive designs!