Have you ever attempted to create something on Canva only to feel like something was off? Trust me, I can relate! You move an image here adjust it slightly there and yet the design still feels a bit off. That’s when Canva's image alignment feature comes to the rescue. It assists you in positioning your images flawlessly giving your design a polished and professional appearance. I recall my initial days of designing, being quite chaotic! However once I mastered alignment it completely transformed my approach. Lets explore this together and simplify the process, for you too.
Why Image Alignment is Important for Your Design
Weve all experienced that moment when a design just seems off. More often than not misalignment is to blame. Whether youre creating a social media post a presentation slide or even a basic invitation the way you position your images can greatly impact the overall appearance. Consider alignment as the thread that weaves everything cohesively.
For instance I created a flyer for a gathering once and I was so pressed for time that I skipped aligning the images properly. It turned out pretty chaotic let me tell you! When things are misaligned it diverts the viewers attention away from what matters. Proper alignment brings about balance, harmony and clarity. Moreover it's not solely about looks. When your visuals are well aligned it enhances the readability and digestibility of your content too.
So, why is alignment important?
- Professional look: Properly aligned images make your design look polished.
- Better readability: Good alignment ensures your text and images don’t compete for attention.
- Visual balance: Aligned elements create a natural flow for the viewer’s eye.
Ultimately a design that is in harmony is comparable to a neatly pressed shirt. It may appear to be a minor aspect but it truly has a significant impact.
Also Read This: Canva Image Circle Conversion
Basic Steps to Align Images in Canva
If you're a Canva beginner aligning images could feel a bit challenging. But believe me it's easier than it appears. Allow me to guide you through the process to make it work smoothly. It's similar to organizing your kitchen—each item has its spot and once you learn where everything belongs things run smoothly.
Step 1: Upload Your Images
First, you need to upload the images you want to use. If you’ve got images ready, just drag and drop them into Canva. If not, Canva has a great library of images you can choose from.
Step 2: Select Your Image
Click on the image you want to align. This will activate Canva’s alignment options.
Step 3: Use the Grid and Guidelines
Canva has built-in gridlines that show up when you move your image around. These lines are your best friends—they’ll help you snap your images into place. You can also manually add grids or rulers for more precise control.
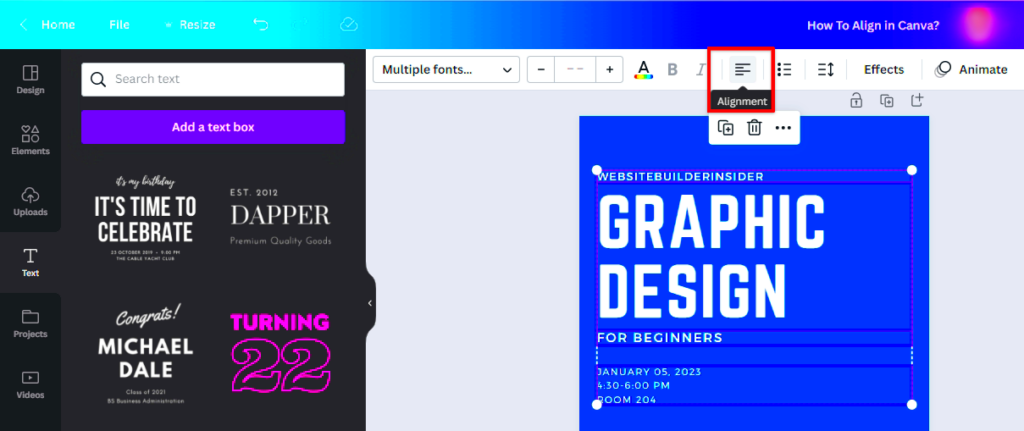
Step 4: Utilize the Alignment Buttons
Canva offers alignment buttons like ‘Align Left,’ ‘Align Center,’ and ‘Align Right.’ These tools ensure that your image is perfectly positioned based on your design needs.
Step 5: Adjust Manually
If the automatic alignment doesn’t feel perfect, you can still fine-tune it by manually adjusting the image. Just drag it gently until it looks right to you.
To be honest once you give it a go aligning images in Canva becomes a breeze. And you know what? The more you do it the more skilled you become just like mastering bike riding. Initially you might feel a bit unsteady but before you realize it you’re gliding smoothly!
Also Read This: How to Build Your Twitter Following: Tips and Strategies for Success
Using Canva’s Alignment Tools for Precise Positioning
Let's dive into the alignment features of Canva – the key to effortlessly positioning everything just right. I still recall my early days with Canva when I would randomly move images around, hoping they'd fall into place. However when I stumbled upon these alignment tools it was like uncovering a hidden trick!
Canva provides an array of features to assist you in achieving precise placement of elements. These tools are not limited to logo or brochure designers they can also make a difference when creating something as straightforward as an Instagram post.
Here’s how you can use them:
- Snap to Grid: Canva automatically aligns elements to a grid as you move them around. This feature ensures your images, text, and shapes snap into place, creating that clean, professional look. It’s like when you’re hanging a photo frame on a wall—you know it’s straight because you used a leveler!
- Align Buttons: At the top of the toolbar, you’ll find buttons to align images left, right, or center. You can even align things vertically or horizontally. It’s as simple as clicking, and boom—everything is where it should be.
- Position Tool: If you want finer control, Canva’s 'Position' tool lets you manually move elements by specifying exact values for their position. This can be super helpful when you’re working on more detailed projects like posters or presentations.
To be frank once you get the hang of these tools you’ll find it hard to imagine functioning without them. It’s akin to stumbling upon the convenience of fast food delivery—once you give it a shot there’s no turning back!
Also Read This: Payment Details for Shutterstock Photos
Common Mistakes to Avoid When Aligning Images
Ah, I must admit I’ve fallen into some of these traps before and I bet you have too. There are moments when you’re pressed for time and other instances when the misalignment only becomes apparent once you view the finished product. But you know what? It’s all part of the learning process. Here are a few alignment mishaps that I’ve stumbled upon during my Canva adventures.
- Not Using the Grid: One of the biggest mistakes is ignoring Canva’s gridlines. The grid is there for a reason, and when you overlook it, your images end up looking scattered and unbalanced. It’s like trying to draw a straight line without a ruler—doable, but why struggle?
- Centering Everything: I get it; centering things feels safe. But when everything in your design is centered, it can actually look boring and predictable. Sometimes, placing elements off-center creates more interest and movement in the design. Just don’t overdo it!
- Overcrowding the Design: Another biggie is trying to fit too many elements into a small space without properly aligning them. It’s like packing for a trip and cramming everything into one suitcase—things just don’t fit well, and it shows.
- Forgetting to Align Text: Aligning only the images and ignoring the text can create an uneven flow in your design. Remember, text needs alignment love too! It’s like dressing up but forgetting to iron your clothes. Sure, you’re dressed, but the wrinkles are all anyone sees.
Steering clear of these blunders will spare you from that unsettling sensation of something being amiss. Believe me, I’ve experienced it more often than I’d like to confess!
Also Read This: How to Download HD Videos from YouTube
Tips for Creating Symmetry and Balance in Canva Designs
Achieving harmony and equilibrium in a design may seem like a skill but once you master it, it becomes instinctive. I like to compare it to cooking – once you're familiar with the ingredients you can adjust the recipe to match your preferences. The principle applies to design too. Once you grasp the art of balancing elements you can effortlessly craft eye catching layouts without getting too caught up in the details.
Here are a few tips that have helped me:
- Use the Rule of Thirds: This is a classic design principle. Imagine your design is divided into nine equal parts with two horizontal and two vertical lines. Placing key elements along these lines or at their intersections can create a balanced and pleasing layout. It’s like taking a photograph—things just look better when they’re framed using this rule.
- Group Similar Elements: Grouping related images or text together helps to create a sense of order. For example, when I design social media graphics, I always group similar items. It’s like organizing your desk—when things are grouped, it just feels more organized.
- Maintain Equal Spacing: One of the simplest ways to ensure balance is to keep the spacing between your elements consistent. Whether it’s images or text, the gaps between them should be uniform. Inconsistent spacing is like wearing mismatched socks—it stands out, and not in a good way!
- Mirror Your Elements: Sometimes, creating a mirror effect with your images or shapes can bring a sense of symmetry. I’ve used this trick in many of my Canva projects, and it always adds a touch of elegance. Just be careful not to overdo it—you don’t want things to look too rigid.
Achieving harmony in design is essential just as maintaining a balanced diet is crucial for overall well being. Once you experiment with these suggestions you'll discover how effortless it is to create designs that exude a sense of balance and warmth.
Also Read This: Understanding Rumble Pricing and Subscription Options
Frequently Asked Questions (FAQ) on Canva Image Alignment
As I’ve spent more time using Canva I’ve come to realize that aligning images can raise quite a few questions, especially for beginners. Some aspects aren’t immediately intuitive. I recall being puzzled by some of these myself and it took some experimentation to work them out. To simplify things for you I’ve compiled a list of the most common inquiries regarding image alignment in Canva. I hope this sheds some light on things!
Q1: How do I center an image perfectly in Canva?
Answer: It’s easier than it seems! Just select the image, and you’ll notice those magical purple guidelines appear as you drag it. When it’s perfectly centered, both a horizontal and vertical line will show up. If you want to be absolutely sure, use the 'Position' tool and select 'Center' to get it right every time.
Q2: Why are my images not snapping to the grid?
Answer: Sometimes, the snap-to-grid feature is turned off, or you might be working on a very small canvas where it doesn’t activate automatically. You can manually enable snapping by going to the 'File' menu and checking the 'Snap to Grid' option. If it’s still not working, try zooming out or increasing the size of your design.
Q3: Can I align multiple images at once in Canva?
Answer: Absolutely! Just hold down the 'Shift' key and select all the images you want to align. Once they’re all selected, you can use the alignment options like ‘Align Left,’ ‘Align Center,’ or ‘Align Right’ to position them perfectly. This is a huge time-saver when you’re working with multiple elements!
Q4: How do I evenly space out images?
Answer: Canva makes this simple. Select all the images you want to space out, then use the 'Position' tool. Under 'Tidy up,' Canva will automatically arrange and evenly space them for you. It’s like magic, really. I use this feature all the time when creating collages or grids!
Q5: What if I accidentally misalign my design? Can I undo it?
Answer: Oh, yes! Canva’s undo feature is your best friend. You can press 'Ctrl + Z' (or 'Cmd + Z' on a Mac) to undo any changes. If you go too far back, you can always redo with 'Ctrl + Y'. Mistakes happen, and Canva’s got you covered.
Conclusion: Achieving Professional Designs with Canva Image Alignment
In the grand scheme of things nailing the alignment can really set apart a design that feels just okay from one that appears refined and polished. Canva has crafted its tools to ensure that this journey is seamless and user friendly. Once you become familiar with it you'll find yourself experimenting with alignment effortlessly. Whether it's for your endeavors or a work related project a design not only enhances aesthetics but also conveys your thoughts more effectively. Trust me this is a valuable skill to perfect!