Canva has revolutionized the way we design visuals. Whether you’re a student tackling a project or a small business owner putting together marketing materials Canva simplifies the process of bringing your ideas to life through design. One standout feature is the option to upload your images. This not enhances your projects but also lets you incorporate distinct elements that reflect your brand or personal taste. I recall the moment I added a photo to a Canva design; it gave me a sense of truly making it my own.
Steps for Uploading Your Own Images in Canva

Uploading pictures to Canva is an easy task. Heres a simple guide on how to get it done.
- Log into Your Canva Account: Open Canva and sign in to your account. If you don’t have one, creating an account is free and easy.
- Select a Design: Choose a template or create a new design. You can use the search bar to find what fits your needs.
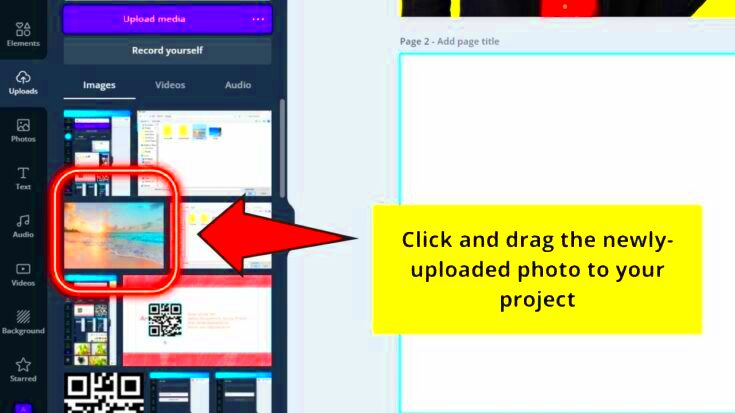
- Access the Uploads Tab: On the left-hand side of the editor, click on the "Uploads" tab. This is where you’ll find all your uploaded images.
- Upload Your Image: Click the “Upload an image or video” button. Select the image from your device that you want to use.
- Drag and Drop: Once uploaded, your image will appear in the uploads section. Simply drag it onto your canvas to start using it.
By taking these actions you can seamlessly incorporate your own pictures into any design making it more distinctive and visually appealing.
Also Read This: Can You Really Make Money Using Storyblocks as a Creator
Choosing the Right Image Format for Canva
When it comes to uploading images to Canva choosing the right format is crucial. The format you use can greatly impact the quality and functionality of your visuals. Here's a brief overview.
| Image Format | Best Use | Notes |
|---|---|---|
| JPEG | Photographs and images with gradients | Common format, but may lose quality when resized. |
| PNG | Images with text or transparent backgrounds | Higher quality, ideal for logos and graphics. |
| GIF | Animated images | Good for simple animations, limited to 256 colors. |
| SVG | Scalable graphics | Perfect for logos and icons; retains quality at any size. |
In my opinion, using PNG logos gives a polished and sharp appearance to my designs based on my own experiences. The format you choose can make a difference in how your visuals are perceived and the message you want to convey. Its important to keep in mind the intended use of your image when picking a format as it can greatly improve your design journey in Canva.
Also Read This: Comparing Two Prominent Stock Image Providers: Alamy vs Adobe Stock
Tips for Editing Uploaded Images in Canva
Editing photos in Canva is like stepping into a world of creativity where you can bring your ideas to life. Once you upload a picture the real excitement starts. I often lose track of time exploring the various editing choices playing around with styles and effects. Here are a few tricks that I’ve picked up along the way.
- Use Filters Wisely: Filters can drastically change the mood of your image. While it's tempting to use them all, choose one that complements your design rather than overshadows it.
- Adjust Brightness and Contrast: Sometimes, an image can look dull. A simple adjustment in brightness and contrast can bring your image to life, making it pop off the page.
- Crop for Impact: Don’t hesitate to crop your image. Focusing on the essential parts can create a stronger visual statement. Remember, less can often be more!
- Layering Effects: Canva allows layering of images and elements. Play with transparency to create depth in your design. I love the ethereal feel it gives my projects.
- Add Text or Graphics: Sometimes, adding a caption or graphic can enhance your message. Make sure the text contrasts well with the image for better readability.
Whenever I tweak a photo I keep in mind that it’s all about bringing out the narrative I wish to convey. So go ahead, try new things enjoy the process and let your imagination take center stage!
Also Read This: Understanding LinkedIn Endorsements and Their Impact
Using Your Images in Different Canva Projects
One of the things I love about Canva is how flexible it is. Once I upload my images I tend to reuse them in different projects which not only saves me time but also gives each design a special flair. Here’s how you can maximize the use of your images in various Canva projects.
- Social Media Posts: Use your images to create eye-catching posts. Tailor the dimensions for platforms like Instagram or Facebook to ensure they fit perfectly.
- Presentations: Incorporate your images into slides. A well-placed image can emphasize your point and keep your audience engaged.
- Flyers and Posters: Design marketing materials by using your images to showcase products or events. Adding your unique images can make your flyers stand out in a crowded market.
- Invitations: Personalize invitations for events like birthdays or weddings with your own images, adding a heartfelt touch that resonates with invitees.
- Website Graphics: Use your images to create visuals for your blog or website. Having a consistent style across platforms helps establish your brand identity.
From what I've seen using images consistently in different projects helps create a unified appearance. Every time I spot my visuals in various settings it gives me a sense that a part of my artistic expression is being shared globally.
Also Read This: How to Embed Videos on Your ShootProof Website for Better Engagement
Common Issues When Uploading Images in Canva
Uploading images to Canva usually goes off without a hitch but there are times when we run into some bumps in the road that can be quite annoying. I’ve experienced my share of these situations and they’ve taught me a thing or two about problem solving. Here are issues that tend to crop up along with their solutions.
- File Size Limitations: Canva has file size restrictions. If your image is too large, consider compressing it using online tools before uploading. This is especially important for high-resolution images.
- Unsupported Formats: If your image doesn’t upload, check the format. Canva supports JPEG, PNG, and other common formats but not all. Converting your image can solve this.
- Slow Upload Speeds: Sometimes, internet connectivity can affect upload times. If this happens, try refreshing the page or restarting your connection.
- Image Quality Loss: If you notice a drop in quality, ensure you’re using a high-resolution image. Uploading low-resolution images can lead to pixelation.
- Missing Images: If you’ve uploaded an image but can’t find it, it might be because it’s in a different folder. Check your uploads tab thoroughly.
Every challenge I encountered has made me wiser and more ready. These days I stick to a small routine before sharing pictures and it spares me from avoidable hassle.
Also Read This: Complete Guide to Sewing a Collar on a Dress
FAQ about Uploading Images in Canva
When it comes to uploading photos in Canva people tend to have questions. Based on my experiences I’ve gathered some commonly asked questions that can assist you in navigating the process seamlessly. Here’s what I frequently come across:
- What file types can I upload to Canva?
Canva supports several file formats, including JPEG, PNG, and SVG. However, you can't upload files like BMP or TIFF. Always check your file format if you encounter issues. - Is there a size limit for uploads?
Yes, each image you upload should not exceed 25MB. If your image is larger, consider compressing it before uploading. I often use online tools for this purpose. - Can I edit my images after uploading them?
Absolutely! Once your image is uploaded, you can edit it using Canva's editing tools. You can adjust brightness, contrast, and even apply filters to enhance your image. - What should I do if my image doesn’t upload?
If you face upload issues, double-check the file format and size. Also, ensure you have a stable internet connection. Sometimes, a simple refresh can do wonders. - Can I use my uploaded images in multiple designs?
Yes! Your uploaded images are saved in your uploads tab, making them easily accessible for any future designs you create. This feature has saved me so much time!
These inquiries capture worries that often arise among users venturing into the realm of uploading images. Each question stems from a sense of wonderment and I can recall having thoughts when I began my journey with Canva.
Conclusion on Using Your Own Images in Canva
Incorporating your own pictures into Canva goes beyond adding a personal touch; it’s about weaving a story that showcases your individuality and flair. Every picture holds a tale and by infusing your unique elements with Canva’s robust features you can produce captivating visuals that connect with your viewers. While you delve deeper and try out new things keep in mind that every creation mirrors your essence. Embrace the journey and relish in designing visuals that genuinely resonate, with your emotions!