Building a house with ice cream sticks is not just a fun and creative project; it’s a delightful way to unleash your inner architect! Whether you’re looking for a unique craft to enjoy with kids, a weekend project, or an educational activity that blends science with art, this DIY endeavor is perfect. Ice cream sticks, also known as popsicle sticks, are versatile, affordable, and readily available, making them an excellent choice for budding builders. In this blog post, we’ll guide you through the materials you’ll need and how to get started on your very own ice cream stick house!
Materials Needed
Before diving into the construction process, it’s essential to gather all the necessary materials. Here’s a detailed list of what you’ll need for your ice cream stick house project:
- Ice Cream Sticks: The main building material. You can buy packs of these at craft stores or online. A typical project requires anywhere from 100 to 400 sticks, depending on the size of the house you wish to build.
- Glue: A strong adhesive is crucial for holding the sticks together. You can use hot glue for quick bonding, or white school glue for a slower, more manageable application.
- Scissors: Handy for cutting sticks to size. If you want precise cuts, consider using a craft knife instead.
- Ruler: To measure and ensure your sticks are cut evenly. Accuracy is key to a sturdy structure!
- Pencil: For marking where to cut or glue the sticks. It’s easier to plan your design this way.
- Base Material: A sturdy base, like a piece of cardboard or a wooden board, will help support your house during construction.
- Decorative Items: Optional, but fun! Think about using paint, markers, or other craft supplies to give your house personality.
Gather these materials before starting your project, and you’ll be ready to build a charming little ice cream stick house in no time!
Also Read This: Advanced Malware Protection with Fortiguard Downloader
3. Steps to Build the Foundation
Building a solid foundation is crucial when crafting a model house with ice cream sticks. Think of it as the bedrock of your project – without it, your house could collapse! Here’s a simple step-by-step guide to get you started:
- Gather Your Materials: You’ll need ice cream sticks, a strong adhesive (like hot glue), and a cutting tool for adjustments.
- Design Your Foundation: Sketch a layout of your house's base on paper. Consider the dimensions and shape. A square or rectangular shape is easiest to start with!
- Cut the Ice Cream Sticks: Depending on your design, cut the sticks to the necessary lengths. Precision is key here; make sure your lengths are consistent for a sturdy base.
- Lay the Base: Start gluing the ice cream sticks together in the shape of your foundation. Use a flat surface to ensure everything is level. Apply glue generously to secure each joint.
- Reinforce the Corners: Add extra sticks at each corner and along the edges for added strength. You might also consider creating a double-layered base for extra sturdiness.
- Let It Dry: Allow the foundation to dry completely before moving on. This will ensure that everything holds together nicely.
Once your foundation is solid, you're well on your way to building a fabulous ice cream stick house!
Also Read This: Learn How to Create Canva Templates
4. Creating the Walls
With a sturdy foundation in place, it's time to raise the walls of your ice cream stick house! This step allows for creativity, as you can design the walls however you like. Here’s how to go about it:
- Plan Your Wall Design: Decide how many walls you want and their height. Sketching your ideas can help visualize the finished product.
- Cut Additional Ice Cream Sticks: Use your previous measurements to cut the sticks for the walls. Remember, they need to match the height of your design!
- Start Assembling: Begin attaching the sticks vertically to the foundation using glue. Make sure to align them properly for a neat finish.
- Add Support Beams: To reinforce your walls, consider adding horizontal sticks every few inches. This will keep them stable and prevent any sagging.
- Create Openings: If you want windows or doors, now's the time to leave gaps between the sticks. You can also use smaller sticks to frame these openings.
- Let It Dry Again: Once all the walls are up, give everything time to dry. This will ensure a strong bond and a durable structure.
And there you have it! Your walls are coming together beautifully, setting the stage for the next exciting phases of your ice cream stick house project!
Also Read This: How to Download Videos from Dailymotion for Free
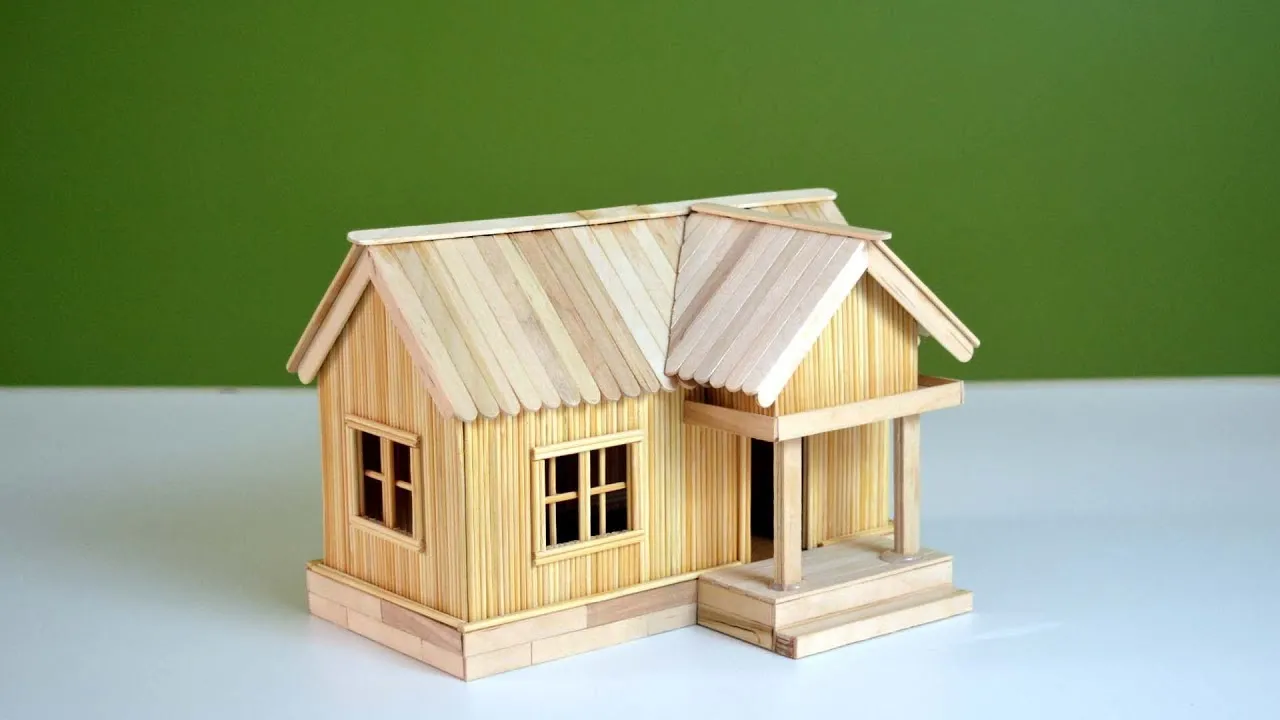
Building the Roof
Ah, the roof! It’s like the cherry on top of your ice cream sundae—essential for completing the overall look of your ice cream stick house. Crafting the roof can be both fun and creative. Here’s how to go about it:
- Choose Your Roof Style: Decide whether you want a flat roof, a gabled roof, or even a more adventurous design like a thatched roof made with sticks. Each style will give your house a unique character.
- Gather Materials: You’ll need a solid base of ice cream sticks, glue, and perhaps a bit of cardboard for support. If you're feeling adventurous, consider using colored sticks or even paint to make your roof pop!
- Construct the Framework: Start by creating a triangular frame for a gabled roof. Use ice cream sticks to form the peaks and secure them with glue. For a flat roof, simply lay ice cream sticks across the top of your walls.
- Add Stability: To ensure your roof doesn’t sag or collapse, reinforce it with additional sticks underneath. You can create cross-braces for added support.
- Final Touches: Once the glue has dried, you can add shingles made from cut-up sticks or even paper for a more textured look.
Remember, the roof is not just functional; it can also be a canvas for your creativity. Don’t hesitate to experiment!
Also Read This: Is ShootProof a Website or Something More?
Adding Decorative Elements
Now that your ice cream stick house is taking shape, it's time to jazz it up with some decorative elements. Think of this as adding sprinkles to your ice cream—it's all about personality!
- Color and Texture: Consider painting some sticks in vibrant colors or using markers to create patterns. Textured surfaces can be achieved by gluing on pieces of fabric or paper.
- Windows and Doors: Cut out small squares or rectangles from cardboard for windows and doors. You can also use clear plastic for a glass effect! Frame these with colored sticks to give them a finished look.
- Garden Details: Use miniature flowers, pebbles, or even tiny figurines to create a garden around your house. A little creative landscaping can bring your project to life!
- Lighting Effects: If you want to go the extra mile, think about how you can incorporate tiny LED lights for a charming glow in the evening.
- Seasonal Decor: Why not add seasonal elements? Decorate your house with paper pumpkins for Halloween or tiny snowflakes for winter. Change it up throughout the year!
These decorative touches will not only enhance the visual appeal of your ice cream stick house but also make it a reflection of your unique style. Have fun and let your imagination run wild!
Also Read This: How to Verify Your Facebook Page for Free on Dailymotion
7. Tips for a Successful Build
Building a house with ice cream sticks can be a fun and rewarding project, whether you're doing it as a hobby or for educational purposes. Here are some handy tips to ensure your construction goes smoothly:
- Choose the Right Materials: Opt for high-quality ice cream sticks that are sturdy and free from cracks. If you can, try to find sticks that have a uniform size for easier alignment.
- Plan Your Design: Sketch out your house design on paper before you start. A clear blueprint will help you visualize the project and keep you organized.
- Use Strong Adhesives: Regular glue might not be enough. Consider using a hot glue gun for a strong bond, or craft glue that dries clear and holds well.
- Start with a Solid Base: Create a sturdy foundation using a piece of cardboard or a wooden board. This will support your structure and prevent it from collapsing.
- Work in Sections: Build your house in manageable sections – like walls, roof, and flooring. This approach makes it easier to handle and assemble later.
- Be Patient: Construction can take time, especially as you wait for glue to dry. Allow each part to set properly before moving on to the next step.
- Get Creative: Don't hesitate to personalize your ice cream stick house with paint, decorations, or additional features like windows and doors.
Remember, the goal is to have fun and let your creativity shine while building your sweet abode!
Also Read This: Build a Business Model with Canvas Business Model Template
8. Conclusion
Building a house with ice cream sticks isn't just a craft; it's an exciting journey filled with creativity, learning, and a bit of engineering. As you've seen, it's an accessible project that can be enjoyed by people of all ages, offering a fantastic way to bond with friends and family.
By applying the tips shared above, you're well on your way to constructing a charming little house that reflects your unique style. Whether you're aiming for a simple cabin or a more elaborate design, the possibilities are endless!
So gather your ice cream sticks, unleash your imagination, and start building! Who knows? You might just inspire someone else to pick up their crafting tools and join in on the fun!
Building a House with Ice Cream Sticks: Where to Find More DIY Videos
Building a house with ice cream sticks is a fun and creative DIY project that can engage people of all ages. It’s not only an excellent way to foster creativity, but it also teaches essential skills like planning, design, and construction. If you're looking to dive deeper into this exciting hobby, numerous resources can guide you through the process.
Here are some platforms where you can find more DIY videos on building with ice cream sticks:
- YouTube: A treasure trove of DIY content, YouTube has countless channels dedicated to crafting. Search for phrases like "ice cream stick house tutorial" or "popsicle stick projects" to find step-by-step guides.
- DIY Blogs: Many bloggers share their experiences and tips for building with ice cream sticks. Websites like Instructables and DIY Network often feature detailed instructions and videos.
- Social Media Platforms: Explore platforms like Instagram and TikTok using hashtags such as #DIYHouse #IceCreamStickCrafts. You’ll discover short, engaging video tutorials that can inspire your project.
- Crafting Apps: Applications like Pinterest and CraftGawker offer a plethora of ideas and links to video tutorials, making it easy to find innovative designs.
As you embark on your journey to build a house with ice cream sticks, these resources will provide you with the inspiration and guidance you need. Happy crafting!