Are you looking for a quick and stylish way to update your look? Hair twisting might be the perfect solution for you! This technique is not only simple and fun but also adds an elegant touch to your hairstyle. Twisting hair is a way of creating beautiful, textured sections that can frame your face or add volume to your locks. It's versatile enough to be worn for casual outings, formal events, or even at the office. In this post, we'll dive into what hair twisting is all about and explore how you can incorporate it into your everyday routine.
Benefits of Twisting Your Hair
So, why should you consider adding hair twisting to your styling repertoire? Here are some compelling benefits that might just convince you:
- Quick and Easy: Twisting your hair is a straightforward process that doesn’t require any intricate skills or too much time. With just a few minutes of practice, you can achieve a chic look!
- Versatile Styles: Whether you want a simple twist, a romantic updo, or a bohemian vibe, twisting gives you endless styling possibilities. You can use it to create elegant looks for a variety of occasions.
- Face Framing: Twists can beautifully frame your face, highlighting your features and adding softness to your overall appearance.
- Creates Texture: Twisting can add much-needed texture and volume to your hair, making it appear fuller and more dynamic, which is great for all hair types!
- Protective Style: This technique can serve as a protective style, especially for natural hair, helping to reduce breakage while promoting healthy growth.
- Low Maintenance: Once twisted, your hair can last several days, allowing for a stylish look with minimal upkeep.
With these benefits in mind, it’s easy to see why hair twisting is gaining popularity. It’s not just a style; it’s an easy way to express your individuality while keeping your locks fabulous!
Also Read This: Who Won the Resurrection Rumble Full Event Recap and Results
Essential Tools for Twisting Hair
Before you dive into the fabulous world of hair twisting, it’s crucial to gather your essential tools. Having the right tools can make all the difference in achieving that chic, stylish look effortlessly. Here's what you'll need:
- Hair Clips: These are essential for sectioning off your hair. They keep your strands in place while you work, making the twisting process much smoother.
- Comb or Brush: A good comb or brush helps detangle your hair and create clean sections. This is especially important for a polished look.
- Hair Elastic Bands: To secure the twisted sections, you’ll need some elastic bands. Opt for soft, snag-free bands to avoid damaging your hair.
- Hair Products: Depending on your hair type, you may want to use a styling cream, gel, or mousse to help control frizz and keep your twists in place.
- Heat Protectant (optional): If you’re using heat tools as part of your styling process, don’t forget to protect your hair with a quality heat protectant spray.
Having these tools on hand will make your twisting experience not just easier but also more enjoyable. A little preparation ahead of time can help you achieve those stunning twists without a hitch!
Also Read This: Evaluating the Reliability of the Business Basics YouTube Channel for Learning Entrepreneurship
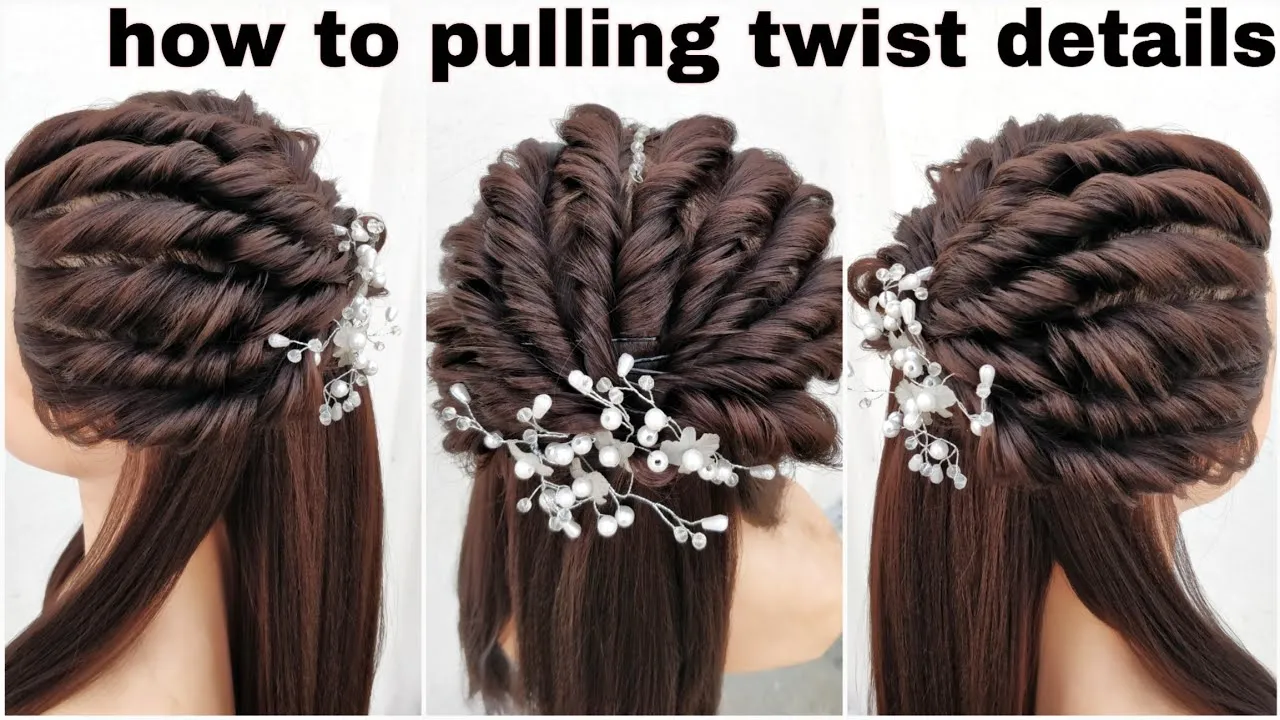
Step-by-Step Guide to Twisting Hair at the Front
Now that you have your tools ready, let's get into the actual twisting! Here’s a simple step-by-step guide to help you twist your hair at the front for a cute and stylish look:
- Start with Clean Hair: Begin with clean, dry hair. If your hair is dirty, consider washing it first. Clean hair holds styles better!
- Detangle Your Hair: Use a comb or brush to detangle your hair thoroughly. This prevents any snags while twisting.
- Section Your Hair: Using your hair clips, section off the front part of your hair where you want the twists. This usually involves taking about 1-2 inches of hair from the front, depending on your preference.
- Apply Hair Product: If you’re using any hair products, apply a small amount to the section you’ve just created. This can help with hold and manageability.
- Begin Twisting: Take two small sections from the front and twist them around each other. Keep twisting until you reach the ends of the hair. Make sure to twist tightly but not too tight to cause discomfort.
- Secure the Twist: Once you’ve reached the end, secure the twist with a hair elastic. You might also want to use a small amount of hair oil or serum to keep the ends looking sleek.
- Repeat: If desired, repeat the twisting process with additional sections of hair. You can create multiple twists or simply work with one for a more understated look.
- Finish Up: Finally, style the rest of your hair as you like! You can leave it down, tie it back, or even create an updo. Make any necessary adjustments to ensure everything looks just right.
And there you have it! With this step-by-step guide, you’ll master the front twist in no time. Enjoy showing off your stylish new look!
Also Read This: How to Turn Off Open to Work on LinkedIn and Manage Job Search Visibility
7. Styling Options to Pair with Twisted Hair
Twisted hair can be an elegant and versatile look, perfect for various occasions, whether it's a casual outing, a professional setting, or a special event. Here are some fabulous styling options you can consider when rocking twisted hair:
- Accessorize with Hair Clips: A simple twist can be elevated by adding elegant hair clips or pins. Choose clips that complement your outfit for a put-together appearance.
- Loose Curls: After twisting, you can enhance your hairstyle by adding loose curls to the ends. This softens the look and adds a romantic touch.
- Messy Bun: For a chic yet relaxed vibe, gather your twists into a messy bun. Allow a few strands to fall naturally around your face for that effortlessly stylish look.
- Half-Up, Half-Down: This style keeps your hair out of your face while still showcasing the beautiful twists. Secure the upper portion with a cute hair tie or clip.
- Use a Headband: A decorative headband can bring a playful and youthful spirit to your twisted hair. It’s especially great for outdoor events or casual days.
- Play with Color: If you’re feeling adventurous, consider temporary hair color or highlights. They can add an exciting twist—pun intended!—to your hairstyle.
- Sleek Low Bun: For a more polished look, gather the twisted sections into a sleek low bun. This is perfect for a formal setting and can easily be dressed up with some accessories.
Each of these options provides a unique way to express your personal style while keeping your twisted hair looking fresh and fashionable.
Also Read This: Behind the Scenes: Exploring Shutterstock Employee Count
8. Common Mistakes to Avoid When Twisting Hair
Twisting hair may seem straightforward, but there are common pitfalls that can detract from your stylish appearance. By avoiding these mistakes, you'll ensure your twisted hair looks its absolute best.
- Skipping Prep: Not preparing your hair can lead to uneven twists. Always start with clean, dry hair. Consider using a leave-in conditioner or styling cream for optimal manageability.
- Using Too Much Product: While some product is important for control, too much can leave your hair greasy or weighed down. A little goes a long way!
- Not Sectioning Properly: If you don’t section your hair correctly, your twists may not turn out uniform. Make sure to divide your hair into even, manageable sections before twisting.
- Twisting Too Tightly: Twists that are pulled too tight can lead to tension on your scalp, causing discomfort and potential hair breakage. Keep it loose but secure.
- Ignoring Length and Texture Differences: Different hair textures will twist differently. Be mindful of your specific hair type and adjust your technique accordingly. Thick, curly hair often requires more moisture than fine or straight hair.
- Neglecting to Protect Your Hair at Night: Failing to protect your hairstyle when you sleep can lead to frizz and unraveling. Use a silk scarf or a satin pillowcase to preserve your twists.
- Forgetting Regular Maintenance: Twists can loosen over time. Regularly check and redo any parts that have come undone to keep your look sharp and stylish.
By steering clear of these common mistakes, you can master the art of twisting your hair and enjoy a fabulous, eye-catching style that turns heads!
```html
Learn How to Twist Hair at the Front for a Quick Stylish Look
Twisting your hair at the front can be a quick and easy way to elevate your hairstyle and add an element of style without much effort. This technique is perfect for casual outings, professional settings, or even special occasions. Follow these steps to achieve a chic twisted look!
Tools You’ll Need
- Hairbrush or comb
- Hair ties or clips
- Hair spray (optional for hold)
- Bobby pins (for secure hold)
Step-by-Step Instructions
- Prepare Your Hair: Start with clean, dry hair. You can add some texture spray or mousse to give your hair better grip.
- Section Your Hair: Use a comb to create a section at the front of your hair that you wish to twist. This can be any width you prefer, depending on the desired look.
- Begin Twisting: Take a small subsection of hair from the front and divide it into two equal parts. Begin twisting these two strands together away from your face.
- Continue Twisting: Include additional hair from the sides as you twist—similar to a French braid. Keep twisting until you reach the desired length.
- Secure the Twist: Once done, use a hair tie or bobby pins to secure the twist at the back or side of your head.
- Final Touches: Adjust the twist for a more relaxed look, spray with hair spray for extra hold if desired, and add any accessories for flair!
Tips for a Perfect Twist
Here are some additional tips to keep in mind:
| Tip | Description |
|---|---|
| Use Products Wisely | A lightweight mousse can add texture without making hair stiff. |
| Practice | The more you twist, the easier it gets—don’t be discouraged. |
| Experiment with Variations | Try different sizes and directions for unique looks! |
Conclusion and Final Thoughts
Twisting hair at the front is a stylish, versatile, and easy technique that can enhance your overall look in just minutes. With a little practice and experimentation, you can master this quick hairstyle for any occasion!
```