Changing the background in Photoshop CS3 can seem daunting, especially if you're just starting out. But fear not! With a little guidance, you'll be able to transform your images effortlessly. This guide will walk you through the steps needed to change backgrounds, ensuring you grasp the basics while having fun in the process. So, grab your computer and let’s dive into the world of Photoshop!
Getting Started with Photoshop CS3
Before we jump into changing backgrounds, let's familiarize ourselves with the essentials of Photoshop CS3. This older version of Photoshop may not have all the bells and whistles of newer releases, but it still packs a punch when it comes to photo editing. Here’s how you can get started:
- Open Photoshop CS3: Launch the program from your desktop or applications folder. You’ll be greeted with a clean interface, ready for your creative touch.
- Create or Open a Project: You can either create a new project by going to File > New or open an existing image by selecting File > Open and choosing your desired photo.
- Familiarize Yourself with the Toolbar: On the left side, you’ll see the toolbox, which contains various tools like the Selection Tool, Brush Tool, and Eraser. Spend a few moments hovering over each tool to see what they do.
- Explore the Menu Bar: At the top, you’ll find the menu bar. It contains options for editing, image adjustments, and layers. Understanding this will make your editing process smoother.
- Practice Basic Techniques: Before diving into background changes, practice basic skills like selecting areas, using layers, and adjusting colors. This foundational knowledge will come in handy.
By getting comfortable with the interface and tools in Photoshop CS3, you’ll set yourself up for success as you learn to change backgrounds and create stunning images. So, don’t hesitate—start exploring your creative potential today!
Also Read This: Artistic Adventures: Create and Share Art on DeviantArt
Opening Your Image
Alright, let’s kick things off by opening the image you want to work on in Photoshop CS3! This step is super simple, and you’ll be ready to dive into the fun stuff in no time.
To open your image, follow these easy steps:
- Launch Photoshop CS3 on your computer.
- Go to the top menu bar and click on File.
- From the dropdown menu, select Open. This will prompt a dialog box to appear.
- Navigate to the folder where your image is stored. You can select any file type that Photoshop supports, like .jpg, .png, or .tiff.
- Once you find your image, click on it to highlight it, and then hit the Open button.
And just like that, your image will pop up on your screen! If you need to adjust the image view, you can use the zoom tool or the hand tool to reposition your image. Now that you have your image ready, let’s move on to the next step!
Also Read This: How to Get Recommended on LinkedIn for Peer Recognition
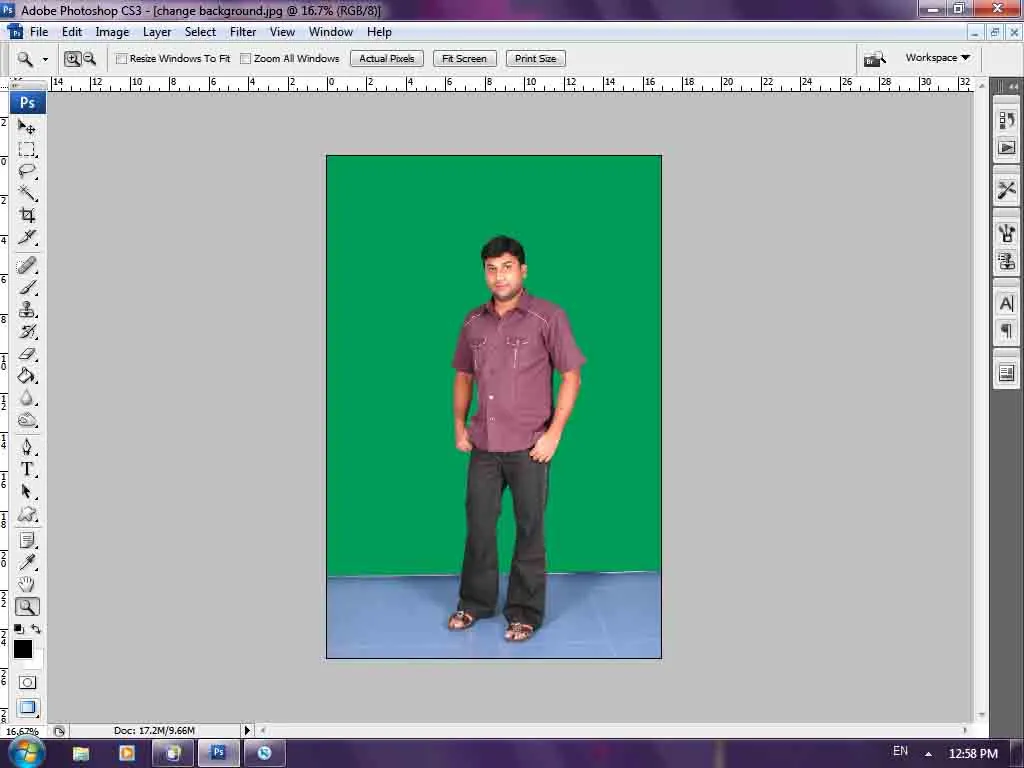
Selecting the Background

Now that your image is open, it’s time to select the background you want to change. This part is crucial because it determines how cleanly you can replace the background later on. Don’t worry; with a little practice, you’ll get the hang of it!
Here are some methods you can use to select your background:
- Magic Wand Tool: This is a fantastic tool for selecting areas of similar color. You can find it on the left toolbar. Just click on it, and then click on the background. Adjust the Tolerance level in the options bar to refine your selection.
- Lasso Tool: If your background has complex edges, you might prefer the Lasso Tool. It allows you to draw freehand around the area you want to select. Simply click and drag your mouse to trace around the background.
- Quick Selection Tool: This tool is perfect for quickly highlighting areas. Click and drag over the background, and the tool will automatically select the area based on the contours of the image.
After selecting the background, you can refine your selection by using the Select and Mask option in the menu. This lets you smooth out the edges and get a more precise selection. Once you’re satisfied, you’re all set to change that background!
Also Read This: Adding a new project on Behance
5. Removing the Background
Removing the background in Photoshop CS3 is a fundamental skill for any beginner looking to enhance their images. It allows you to isolate the subject of your photo, making it stand out or preparing it for a new background. Here’s how you can do it:
Step 1: Open Your Image
Start by opening your image in Photoshop CS3. You can do this by navigating to File > Open and selecting your desired image file.
Step 2: Use the Magic Wand Tool
On the left toolbar, find the Magic Wand Tool (or press W on your keyboard). Click on the area of the background that you want to remove. The Magic Wand Tool selects areas of similar color, so you might need to adjust the Tolerance level in the options bar if it doesn’t select everything you want.
Step 3: Refine Your Selection
- If the selection isn’t perfect, hold down the Shift key and click on additional areas to add to your selection.
- Conversely, hold down Alt (or Option on Mac) to remove areas from the selection.
Step 4: Delete the Background
Once you are satisfied with your selection, simply hit the Delete key. Voilà! The background is now removed, leaving you with just the subject of your image.
Step 5: Save Your Work
Don’t forget to save your edited photo! Go to File > Save As to keep an original copy intact while saving your changes.
Also Read This: Exploring Ludacris' Performance Insights on Dailymotion
6. Adding a New Background
Now that you’ve successfully removed the old background, it’s time to add a new one! This step is where creativity comes into play. Here’s a simple guide to help you through the process:
Step 1: Choose Your New Background
First off, find an image that you want to use as your new background. This could be anything from a scenic landscape to a solid color. Open this image in Photoshop CS3 using File > Open.
Step 2: Copy the Background Image
Select the entire background image by pressing Ctrl + A (or Cmd + A on Mac). Then, copy it using Ctrl + C (or Cmd + C). Now, switch back to your original photo.
Step 3: Paste the New Background
Simply paste the new background into your working image by pressing Ctrl + V (or Cmd + V). This will place the new background as a new layer above your subject.
Step 4: Arrange the Layers
In the Layers panel, drag the new background layer below your subject layer. This way, your subject will appear in front of the new background.
Step 5: Adjust and Fine-Tune
You may want to resize or reposition the background to fit your composition better. Use the Transform Tool (Ctrl + T) to make adjustments as needed. Don’t hesitate to play around with layer effects and adjustments to blend everything seamlessly!
Step 6: Save Your Final Image
Once you’re happy with how everything looks, save your final masterpiece using File > Save As. Choose a format that suits your needs, and you’re all set!
Also Read This: Can You Find Porn on YouTube
7. Final Touches and Adjustments
Alright, you’ve made it this far, and your background looks amazing! But before you call it a day, let’s add some final touches and adjustments to ensure everything blends seamlessly. This is where you can elevate your work from “good” to “wow!”
First, let’s talk about color correction. Sometimes the colors of your subject and the background can clash or look off. You can use the Adjustment Layers to tweak brightness, contrast, or color balance. Here’s how:
- Go to the top menu and select Layer > New Adjustment Layer.
- Choose your desired adjustment (like Brightness/Contrast or Hue/Saturation).
- Play around with the sliders until you find a blend that feels right.
Next, don’t forget about shadows and highlights. Adding a little shadow can create depth and make your subject feel grounded in the new background. Use the Brush Tool with a soft edge, pick a dark color, and paint gently around the edges of your subject.
Finally, zoom in and check for any edges that might look a little rough. You can use the Eraser Tool or a soft brush to refine those edges. Trust me, a little attention to detail goes a long way!
Also Read This: Understanding Your Earnings Potential with Adobe Stock
8. Saving Your Work
Now that your masterpiece is complete, it’s time to save it! You wouldn’t want to lose all your hard work, right? In Photoshop CS3, you have a couple of options when it comes to saving your project.
First, let’s save it in the Photoshop format (.PSD). This is essential if you want to keep all your layers intact for future edits. Here’s how:
- Click on File in the top menu.
- Select Save As.
- Choose a location, name your file, and make sure the format is set to Photoshop (.PSD).
- Hit Save.
Now, if you want to share your work or post it online, you’ll need to save it in a more common format like JPEG or PNG. To do this:
- Go to File > Save for Web & Devices.
- Select the format you prefer, like JPEG for photos or PNG for images with transparency.
- Adjust the quality settings if needed and hit Save.
And there you have it! Your stunning background change is now saved and ready to be shared with the world. Happy editing!
Also Read This: Unlocking Revenue: A Deep Dive into Getty Images Earnings
9. Tips for Better Results
Changing the background in Photoshop CS3 can be a fun and rewarding experience, especially if you want to enhance your images. Here are some tips to help you achieve better results:
- Use High-Quality Images: Always start with high-resolution images for both your foreground and background. This ensures that your final product looks sharp and professional.
- Pay Attention to Lighting: Make sure the lighting in your background matches the subject. If your subject is brightly lit, a dark background might look out of place. Adjust the brightness and contrast of your background image accordingly.
- Consider Depth of Field: To create a more realistic composition, blur the background slightly. This mimics how cameras focus on the subject while the background fades out of focus.
- Use Layer Masks: Instead of erasing parts of the image, use layer masks. This allows you to refine your edges without permanently losing any details.
- Check Edge Cleanliness: Zoom in and check the edges of your subject. Clean edges can make a huge difference. You can use the 'Refine Edge' tool to smooth out any jagged lines.
- Experiment with Blending Modes: Sometimes, blending modes can help integrate your subject with the new background more seamlessly. Try different modes to see which one works best.
- Practice Makes Perfect: Don’t be discouraged if your first attempts don’t turn out as expected. Keep practicing, and you’ll improve over time!
10. Conclusion
Changing backgrounds in Photoshop CS3 can seem daunting at first, especially for beginners. However, with patience and practice, you can master this skill and enhance your creative projects. Remember, the key steps involve selecting your subject, refining edges, and seamlessly integrating it with a new background.
As you’ve learned, tools like the Magic Wand, Lasso Tool, and Layer Masks are invaluable in this process. By following the tips provided, you can ensure your final images look polished and professional. Keep experimenting with different backgrounds and techniques to find your unique style.
So, grab your Photoshop CS3, unleash your creativity, and have fun transforming your images! The more you practice, the more confident you’ll become in your abilities. Happy editing!