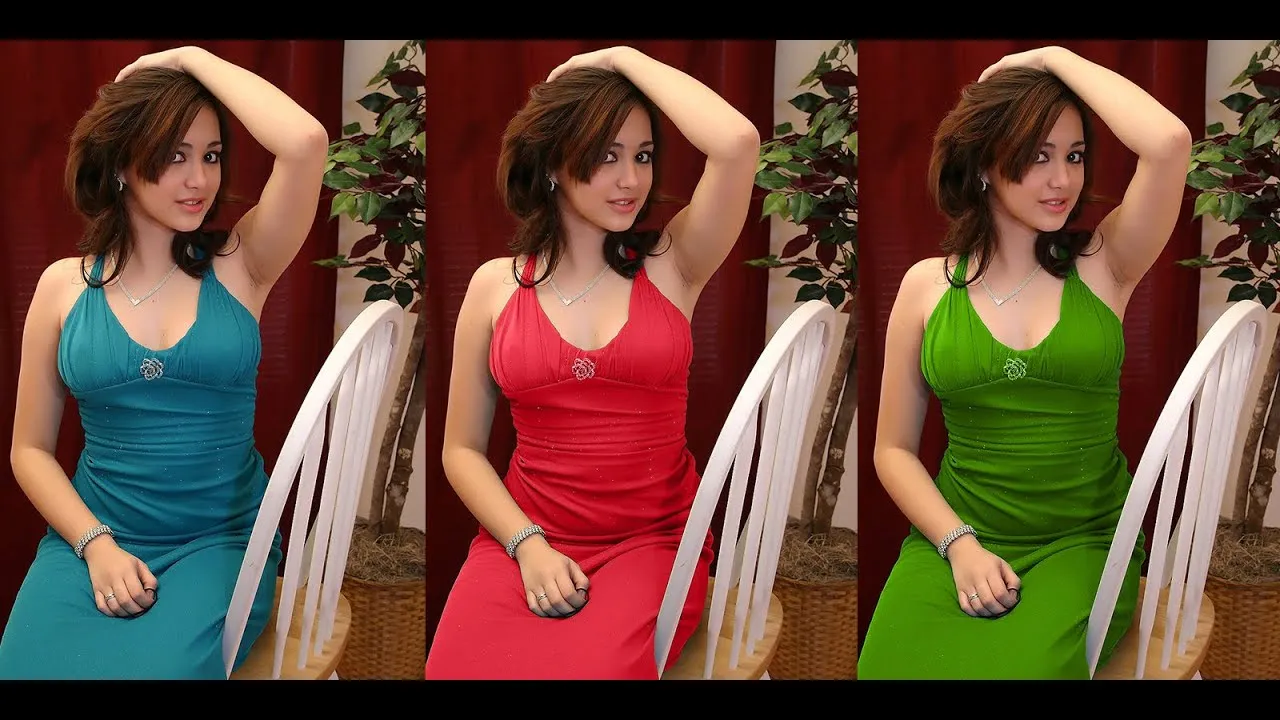
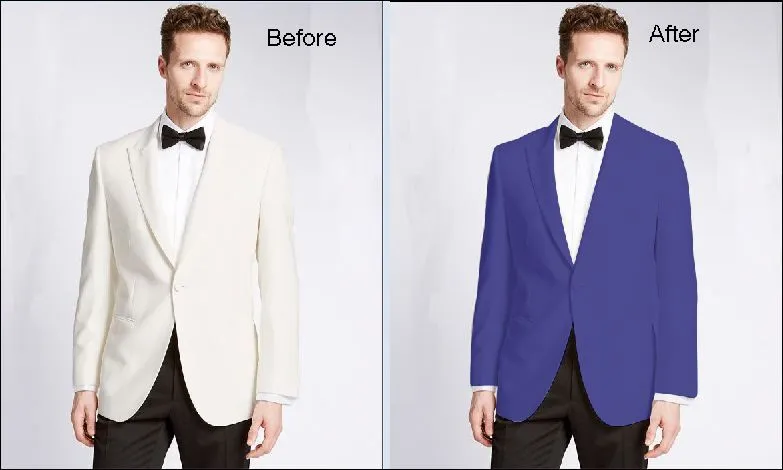
Changing the color of a dress in Photoshop 7.0 can be a fun and creative way to enhance your images. Whether you want to try out a new look for a special occasion or simply experiment with different styles, this guide will walk you through the process. With just a few steps, you can transform the color of a dress and breathe new life into your photographs. Let’s dive into the essentials you'll need to get started!
Tools Needed for Color Change

Before you begin changing dress colors in Photoshop 7.0, it’s important to familiarize yourself with the tools that will make this task easier. Here’s a handy list of tools you’ll need:
- Photoshop 7.0 Software: Ensure you have this version installed on your computer. It contains all the features you'll require for color manipulation.
- Selection Tool: This includes tools like the Lasso Tool or the Magic Wand Tool, which help you select the dress precisely.
- Brush Tool: Useful for refining your selection and for any touch-ups after the color change.
- Color Picker: This tool allows you to choose the new color for the dress. Familiarize yourself with the color palette.
- Adjustment Layers: Layers like Hue/Saturation or Color Balance will be crucial for adjusting the color to your liking.
Having these tools at your fingertips will streamline the process, making it easier to achieve the perfect color change. Each tool plays a vital role in ensuring your edits look seamless and professional.
Also Read This: How Much Does Foap Pay for Getty Sold Image Earnings for Foap Contributors through Getty Licensing
Step 1: Open Your Image in Photoshop 7.0
First things first, let’s get your image ready in Photoshop 7.0. This step sets the stage for all the magic you're about to do! Here’s how to do it:
- Launch Photoshop 7.0: Click on the Photoshop icon on your desktop or find it in your programs menu. Once it’s open, you’ll be greeted by a familiar workspace.
- Open Your Image: Go to the top menu bar and click on File, then select Open. A dialog box will pop up.
- Locate Your Image: Navigate through your folders to find the image you want to edit. Once you find it, click on it to highlight it.
- Click Open: After selecting your image, click the Open button in the dialog box. Your image will instantly appear in the workspace, ready for editing!
Make sure to check that your image is in a format that Photoshop supports, such as JPEG, PNG, or TIFF. If the image doesn’t look right, you might want to adjust its size or resolution before diving into the fun part.
Also Read This: How to Delete Your Behance Account with Ease
Step 2: Select the Dress Using the Magic Wand Tool
Now that your image is open, it's time to select the dress you want to change color! The Magic Wand Tool is your best friend here. It’s quick and efficient, making selections based on color similarity. Here’s how to use it:
- Select the Magic Wand Tool: On the left toolbar, find the Magic Wand Tool. It looks like a wand with a star at the tip. If you can’t find it, it might be nested under the Quick Selection Tool, so just click and hold to reveal it.
- Adjust the Tolerance: At the top, you’ll see an option for Tolerance. This setting determines how closely the tool will match colors. A lower number (like 20) selects colors very similar to the one you click, while a higher number (around 50) will select a broader range. Start with 30 and adjust as needed!
- Click on the Dress: With the Magic Wand Tool active, click on the dress. You should see a selection outline appear around it. If the selection isn’t perfect, hold down the Shift key and click on other areas of the dress to add to your selection.
- Refine Your Selection: If the selection includes parts of the background you don’t want, you can hold the Alt key (or Option on Mac) and click on those areas to remove them from the selection.
And voilà! You’ve successfully selected the dress. This selection will allow you to change its color without affecting the rest of the image. Get ready to unleash your creativity!
Also Read This: Unraveling the Sweetness: Cookies and Shutterstock – What You Need to Know
Step 3: Adjust the Selection for Accuracy
Now that you’ve made your initial selection, it’s crucial to refine it for the best possible results. A precise selection can make a significant difference in how natural the color change appears.
To adjust your selection, follow these steps:
- Zoom In: Use the zoom tool (Ctrl + +) to get a closer look at the edges of your selection. This will help you see any areas that may need fine-tuning.
- Use the Refine Edge Tool: Go to Select > Refine Edge. Here, you can smooth the edges, feather them slightly, or adjust the contrast. This tool is fantastic for softening hard edges and making the selection look more natural.
- Brush Tool for Fine-tuning: If you notice any areas outside the selection that need to be included or excluded, simply switch to the brush tool. You can paint over the selection using the add or subtract options to perfect it.
- Check Your Work: Toggle the visibility of the selection to ensure everything looks seamless. If some areas don’t blend well, take a little extra time to refine them.
Remember, patience is key! Taking the time to accurately adjust your selection will pay off in the final result.
Also Read This: How Dailymotion Blends Nostalgia, Fun, and Education Together
Step 4: Create a New Adjustment Layer
With your selection perfectly refined, it’s time to create a new adjustment layer. This step allows you to change the dress color without affecting the entire image, giving you flexibility and control.
Here’s how to create your adjustment layer:
- Access the Layers Panel: If it’s not already open, go to Window > Layers to bring it up. You’ll want to keep this handy as you work.
- Create the Adjustment Layer: With your selection active, navigate to the bottom of the Layers panel and click on the Adjustment Layer icon (it looks like a half-filled circle). Choose Hue/Saturation from the list.
- Adjust the Colors: A properties panel will pop up. Here, you can tweak the Hue, Saturation, and Lightness sliders until you achieve the desired color for the dress. Play around with these settings!
- Blend Mode and Opacity: If the new color is too intense, you can adjust the layer’s opacity or change the blend mode for a more subtle effect.
And there you have it! By following these steps, you can change the dress color effectively while maintaining the integrity of your image.
Also Read This: Storyblocks Subscription Cancellation: What You Need to Know
7. Step 5: Change the Color Using Hue/Saturation
Alright, now that you've selected your dress with the magic wand tool, it’s time to have some fun with color! The Hue/Saturation adjustment is a fantastic way to alter the dress color in Photoshop 7.0. Here’s how you do it:
- Navigate to the top menu and click on Image.
- Then, go to Adjustments and select Hue/Saturation from the dropdown.
This will open a new dialog box with sliders for Hue, Saturation, and Lightness. Here’s a breakdown:
- Hue: This slider allows you to change the overall color of the dress. Moving it left or right will shift the color spectrum, enabling you to find the perfect shade.
- Saturation: Adjusting this will control the intensity of the color. If you want a vibrant look, slide it to the right; for a more muted tone, slide it left.
- Lightness: This helps in making your dress lighter or darker. It’s handy for matching the dress to a specific mood or lighting condition.
Experiment with the sliders until you find a color that makes your dress pop! Once you're happy, hit OK to apply the changes. Remember, you can always undo your adjustments if you’re not satisfied!
Also Read This: Is CoryxKenshin Leaving YouTube What Fans Should Be Aware Of
8. Step 6: Fine-Tune the Color Adjustment
Now that you've changed the color of the dress, it’s time for some fine-tuning to make it look just right. This step is all about enhancing the overall quality and ensuring the new color blends seamlessly with the rest of your image.
Start by zooming in on the dress to inspect the edges and color distribution. Here are a few tips to help you get it perfect:
- Use the Clone Stamp Tool: If there are any areas where the color change looks uneven, use the clone stamp tool to blend those spots.
- Adjust Layer Opacity: Sometimes, lowering the opacity of the color layer can create a more natural look, letting some of the original color peek through.
- Add Layer Masks: You can apply a layer mask to selectively hide or reveal parts of the color adjustment. This is great for adding shadows or highlights where necessary.
Finally, give your image a once-over. Check for any color casts or unnatural transitions. A little patience goes a long way here—adjustments might take time, but the results are worth it!
Also Read This: Enhanced License Pricing on Shutterstock
Step 7: Save Your Edited Image
Now that you've successfully changed the dress color to your liking, it's time to save your masterpiece! Saving in Photoshop 7.0 is straightforward, but there are a few options to consider based on how you plan to use your edited image.
Here’s a simple guide to save your edited image:
- Go to the File Menu: Click on "File" at the top left corner of your screen.
- Select Save As: Choose “Save As” from the dropdown menu. This allows you to create a copy of your edited file without overwriting the original.
- Choose the Right Format: In the “Save As” dialog box, you’ll see several format options. Depending on your needs, you might choose:
- JPEG: Great for web use, but it loses some quality due to compression.
- PNG: Excellent for preserving quality and transparency. Ideal for graphics.
- PSD: If you want to keep all layers intact for future editing, save it as a Photoshop file.
And just like that, your beautifully edited image is ready to share with the world or keep for personal use!
Conclusion
Changing the color of a dress in Photoshop 7.0 is not just about technical skills; it’s also about unleashing your creativity! By following these straightforward steps, you can completely transform an image, giving it a fresh and exciting look. Whether you’re prepping photos for an online shop or just experimenting for fun, mastering the color-changing technique can elevate your photo editing game significantly.
Remember, practice makes perfect! The more you play around with color adjustments, the more natural it will become. Don't hesitate to try different shades and methods; you might discover new favorites along the way!
So, gather your images, fire up Photoshop, and let your imagination run wild! Whether you’re aiming for subtle changes or bold transformations, you now have the tools to make your dress color dreams come true. Happy editing!