Creating a fishtail rubber band bracelet is not just a fun craft; it’s a great way to express your creativity! Whether you want to make something special for yourself or as a gift, these colorful bracelets are sure to impress. In this tutorial, we’ll walk you through the steps to create a fishtail bracelet, breaking it down into easy-to-follow sections. So, grab your materials, and let’s dive into this exciting crafting adventure!
Materials Needed
Before you get started, make sure you have all the necessary materials at hand. Here’s a list of what you’ll need to create your delightful fishtail rubber band bracelet:
- Rubber Bands: Choose a variety of colors for a vibrant design. You’ll need around 50-60 bands, depending on the bracelet length.
- Hook Tool: This tool, often in the shape of a crochet hook, will help you weave the rubber bands together smoothly.
- Bracelet Loom (optional): If you prefer using a loom, it can make the process easier, especially for beginners.
- Clip or S-Clasp: You’ll need a way to secure your bracelet at the end. A clip or S-clasp works perfectly.
- Scissors: For trimming any excess rubber bands after you finish weaving.
- Table or Flat Surface: A clean, flat area to work on will help keep your materials organized.
Having everything ready before you start will make the process smoother and more enjoyable. Plus, it’s always nice to have a colorful array of rubber bands to choose from! Now that you have your materials, you’re all set to begin crafting your fishtail bracelet!
Also Read This: How to Download iStock Images Without Watermarks
3. Step-by-Step Instructions

Creating a fishtail rubber band bracelet is a fun and creative project that anyone can enjoy! Let’s dive right in with these easy-to-follow steps:
- Gather Your Supplies: You’ll need rubber bands (in your favorite colors), a loom (or your fingers), and a hook tool if you have one.
- Rubber Bands: Choose at least 2 colors.
- Loom: A traditional loom works best, but your fingers can also do the trick!
- Hook Tool: This makes it easier to pull bands through others.
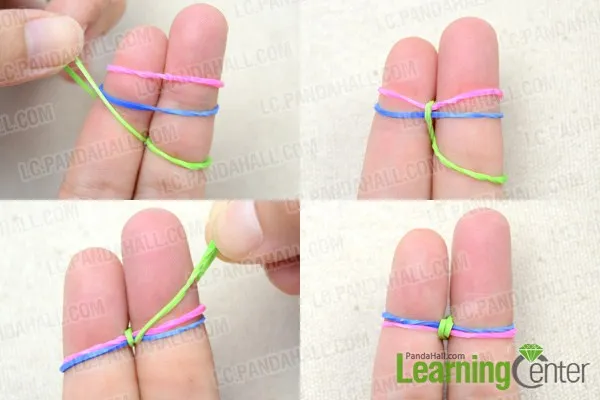
- Start Your Base: Begin with the first rubber band. Place it on the loom or your fingers in a figure-eight shape to create the base.
- Add the Second Band: Place your second rubber band directly over the first one. Make sure it is in the same figure-eight orientation.
- Weaving the Fishtail: Use your hook or fingers to pull the bottom band over the top one. Repeat this process, alternating colors as you go, until you reach your desired length.
- Finish Off: Once your bracelet is long enough, secure it by pulling the last rubber band through the final loops. Attach a clip or tie a knot to keep it secure.
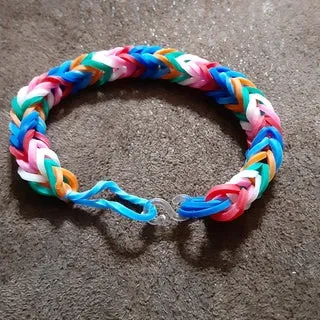
And there you have it! Your own fishtail rubber band bracelet, ready to wear or gift!
Also Read This: Uploading and Sharing Color Blind Friendly Images Online
4. Tips for Success
Creating your fishtail bracelet can be a breeze if you keep these handy tips in mind:
- Choose the Right Bands: Opt for high-quality rubber bands to prevent breakage while weaving.
- Color Combinations: Experiment with color patterns. Using a gradient or contrasting colors can add a unique flair to your bracelet.
- Practice Makes Perfect: If you're new to this, don’t be discouraged if it doesn’t turn out perfect the first time. Keep practicing!
- Take Your Time: Rushing can lead to mistakes. Enjoy the process and take it slow, especially when pulling bands through.
- Watch Tutorials: If you’re a visual learner, check out video tutorials on platforms like YouTube for additional guidance.
Following these tips will not only make your crafting easier but also more enjoyable. Happy crafting!
Also Read This: Is the Song "Does He Know" Available on Dailymotion?
5. Variations and Customizations
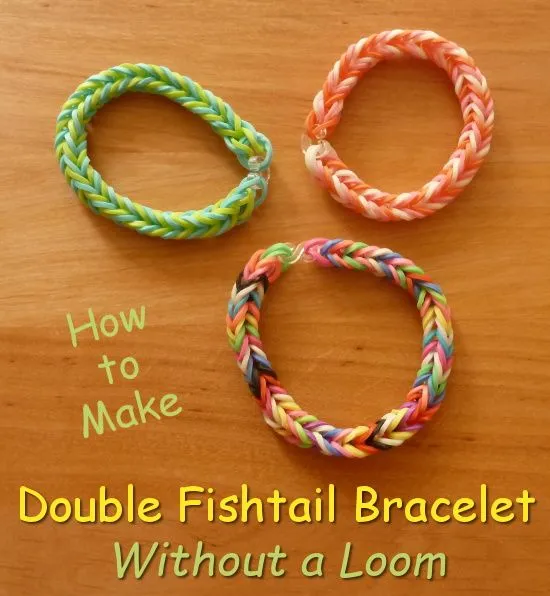
Once you've mastered the basic fishtail rubber band bracelet, the fun really begins! There are countless variations and customizations you can explore to make your bracelet uniquely yours. Here are some creative ideas to get you started:
- Color Combinations: Experiment with different color schemes. Try using a gradient effect by selecting shades that flow into one another. For instance, start with light blue, transition to dark blue, and then add a pop of white!
- Patterned Bands: Instead of solid colors, use patterned rubber bands like polka dots or stripes to add flair. Mixing and matching them can give your bracelet a fun aesthetic.
- Beads and Charms: Incorporate beads or charms into your design. You can thread them onto the rubber bands as you weave to add a personal touch. For example, adding a small charm that represents your favorite hobby can make the bracelet even more special.
- Different Styles: Try out variations like the triple fishtail or the spiral fishtail. Each style has its own charm and can change the look of your bracelet drastically.
- Size Adjustments: Customize the width and length of your bracelet. You can make wider bracelets using more bands or create dainty versions for a subtle look.
With these options, the only limit is your imagination! Dive into your collection of rubber bands and see what unique creations you can come up with.
6. Conclusion
Creating a fishtail rubber band bracelet is not just a fun craft; it's a fantastic way to express your creativity and style. This tutorial has provided you with the basics to get started and the variations to let your imagination run wild. Whether you're making them for yourself or as gifts for friends, these bracelets are sure to be a hit!
Remember, the joy of crafting comes from experimenting and making mistakes. So don’t be afraid to try new patterns, colors, and styles. Gather your friends for a crafting session or join an online community to exchange ideas and showcase your creations.
In conclusion, the world of rubber band bracelets is vast and exciting! So grab your supplies, put on some music, and let the creativity flow. Happy crafting!