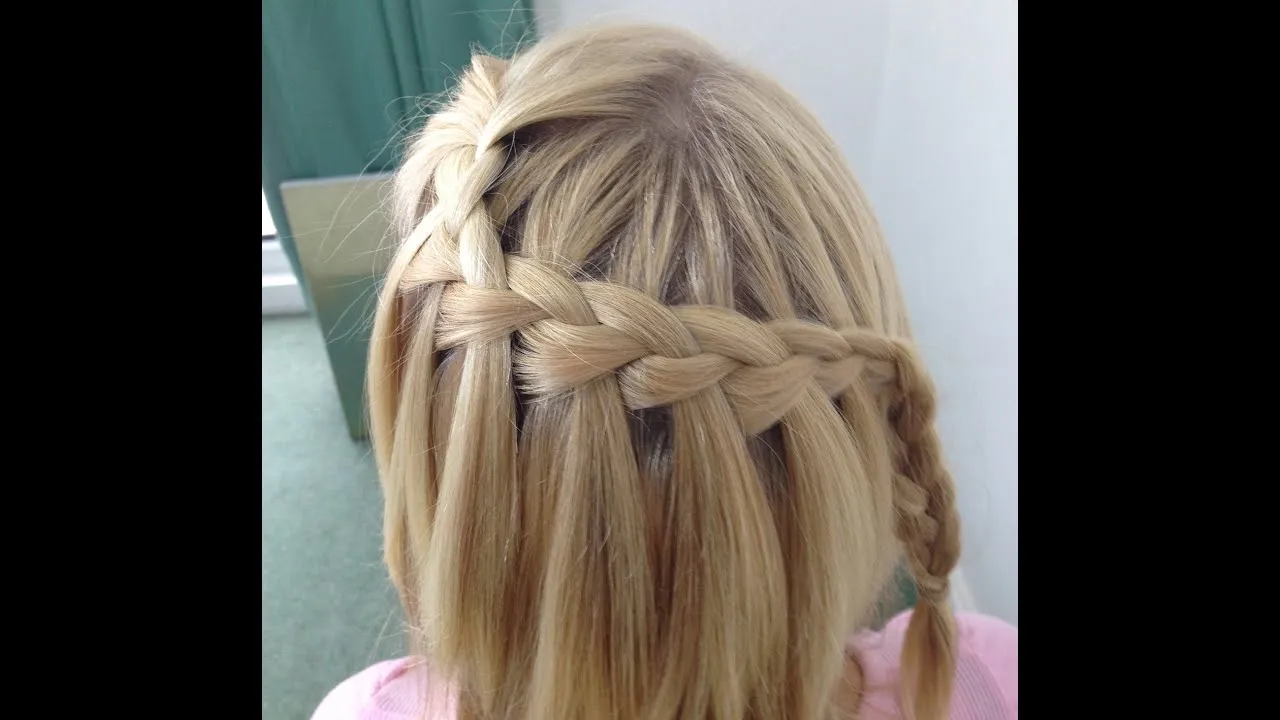
Waterfall braids are one of the most enchanting hairstyles you can master. They are not only gorgeous but also add a touch of elegance and whimsy to any look. Imagine cascading strands of hair that mimic a beautiful waterfall, flowing effortlessly down your back. This style is perfect for special occasions, casual outings, or even a day at the office. With a little practice, you can create this stunning braid that will turn heads and earn you compliments. Let’s dive into the world of waterfall braids and discover how easy it can be to achieve this fabulous look!
Essential Tools and Products Needed
Before you start braiding, it's essential to gather the right tools and products to make the process smoother and more enjoyable. Here’s a handy list of what you’ll need:
- Hair Brush or Comb: To detangle your hair and ensure a smooth foundation.
- Hair Ties: Clear or matching to your hair color, these will help secure your braid.
- Hair Clips: Useful for sectioning your hair and keeping it out of the way while you work.
- Texturizing Spray: A light spray can add grip to your hair, making it easier to braid.
- Hairspray: For those finishing touches, a bit of hairspray can hold your braid in place all day.
In addition to these tools, consider using products tailored to your hair type. For instance, if you have fine hair, a volumizing mousse can give your braid extra body. For thicker hair, a smoothing serum can help control frizz and flyaways. Having the right tools and products will set you up for success as you learn to master the waterfall braid!
Also Read This: How to Determine If You're Shadowbanned on YouTube
Step-by-Step Instructions to Create a Waterfall Braid
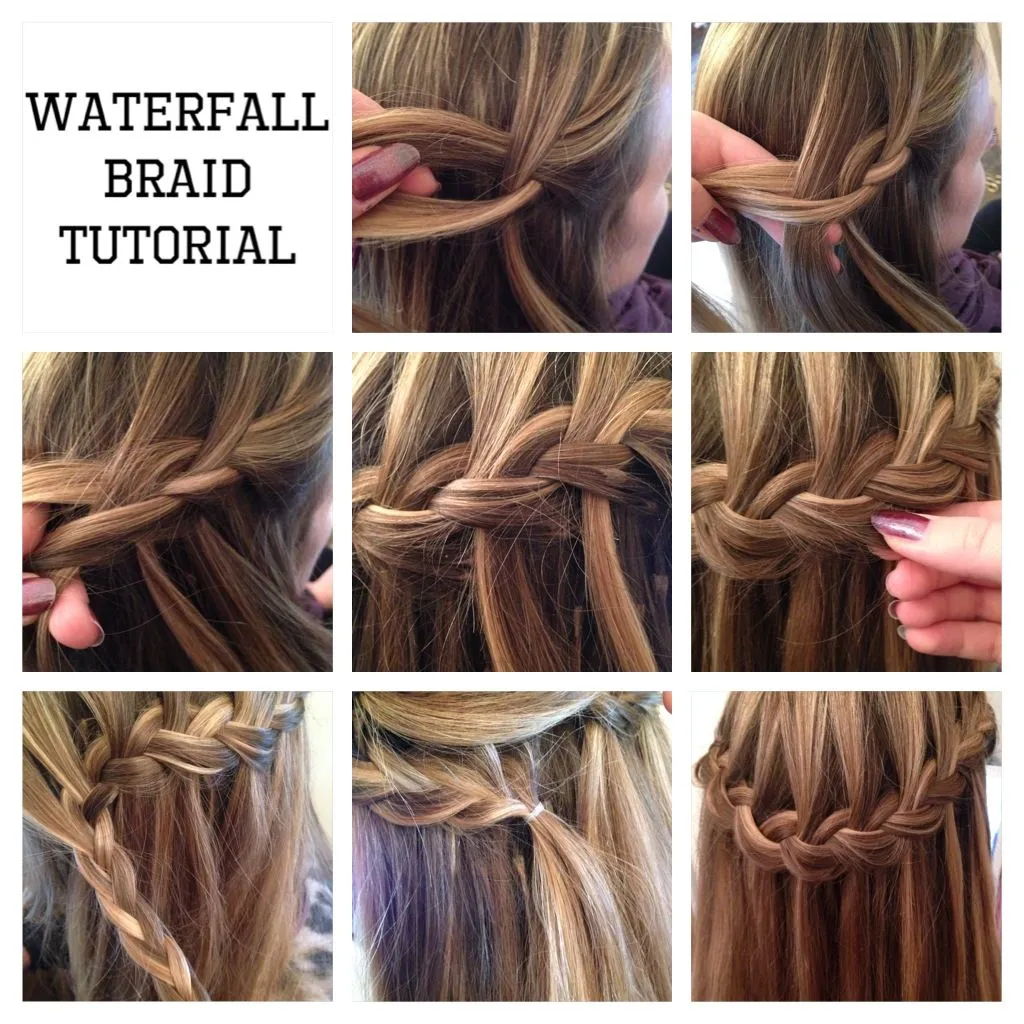
Creating a stunning waterfall braid might seem intimidating at first, but with a little practice, you can master it. Here’s a simple step-by-step guide to help you achieve that gorgeous look!
- Gather Your Supplies: Before you start, make sure you have the following:
- A brush or comb
- Hair ties
- Bobby pins
- Hairspray (optional)
- Prep Your Hair: Start with clean, dry hair. If your hair is a bit slippery, consider using a texturizing spray to give it some grip.
- Section Your Hair: Divide your hair into two sections: Left and Right. Clip one side out of the way for now.
- Start the Braid: Take a small section of hair from the front of the left side. Divide it into three equal parts. This will be the beginning of your braid.
- Braid It Down: Cross the right section over the middle section, then the left over the new middle. As you braid, let the bottom section drop down, creating the “waterfall” effect.
- Add New Hair: When you bring the left section over the middle again, grab a small piece of hair from the left side to add to the braid. Repeat this process, alternating sides.
- Secure the Braid: Once you reach the desired length, secure the braid with a hair tie. You can let the rest of your hair fall freely or gather it into a ponytail.
- Finishing Touches: Gently pull on the braid to loosen it for a fuller look. Add some hairspray for extra hold, if desired.
Also Read This: How to Sell Footage on Shutterstock and Attract Buyers
Tips for Perfecting Your Waterfall Braid
Perfecting your waterfall braid takes a bit of patience and practice, but these tips will help you achieve a flawless look every time!
- Select the Right Hair Type: Waterfall braids work best with medium to long hair. If your hair is too short, consider adding hair extensions for added length.
- Practice Makes Perfect: Don’t be discouraged if it doesn’t look perfect on your first try. Keep practicing, and soon you’ll find your rhythm.
- Use the Right Tools: A good quality brush or comb can make a world of difference. Consider using a wide-tooth comb to prevent breakage.
- Mind Your Tension: Keep the tension consistent while braiding. Too tight can lead to discomfort, and too loose can make the braid fall apart.
- Accessorize: Add cute hair clips or flowers to your braid for an extra pop. This can elevate your look for special occasions!
- Practice on Different Hair Textures: Whether your hair is straight, wavy, or curly, practice creating waterfall braids on various textures to see what works best for you.
By following these tips and steps, you’ll soon be a pro at creating beautiful waterfall braids that will turn heads wherever you go!
Also Read This: How to Connect with People on LinkedIn Networking Tips
5. Styling Variations of the Waterfall Braid
The waterfall braid is a stunning hairstyle that can be adapted in various ways to suit different occasions and personal styles. Here are some exciting variations you can try:
- Double Waterfall Braid: For a more intricate look, create two waterfall braids on either side of your head. This style adds volume and depth, making it perfect for formal events.
- Waterfall Braid Updo: Combine the waterfall braid with an elegant bun or chignon. Start by creating a waterfall braid, then pin it up into a chic updo for a sophisticated finish.
- Half-Up Waterfall Braid: This is an excellent choice for casual outings. Simply braid the top section of your hair and let the rest flow freely. It keeps hair out of your face while still looking relaxed and pretty.
- Waterfall Braid with Curls: Add some loose curls to your hair for a romantic twist. The curls frame your face beautifully and enhance the waterfall effect.
- Faux Waterfall Braid: If you're short on time, a faux waterfall braid can be a lifesaver. Use hair extensions to create the illusion of a waterfall braid without the actual braiding.
Experiment with these variations to find the one that resonates with your personal style. The waterfall braid can easily transition from day to night, making it a versatile choice for any occasion!
Also Read This: How to Stream Rumble on Roku Devices with Simple Steps
6. Common Mistakes to Avoid
While mastering the waterfall braid is fun, there are a few common pitfalls that can hinder your progress. Let’s explore these mistakes so you can dodge them on your hairstyling journey:
| Mistake | Tip to Avoid |
|---|---|
| Tight Braiding: | Keep the braid loose. A tight braid can look stiff and unflattering. |
| Ignoring Hair Texture: | Consider your hair's texture. Use products that work with your hair type for the best results. |
| Not Securing Ends: | Always secure the ends of your braid. Use a clear elastic band or a hair tie to prevent it from unraveling. |
| Skipping the Prep: | Prep your hair with texturizing spray or mousse. This adds grip, making it easier to braid. |
| Forgetting to Balance: | Ensure both sides of the braid are even. Check in the mirror frequently to maintain symmetry. |
By avoiding these common mistakes, you'll find it much easier to create a stunning waterfall braid that turns heads. Happy styling!
Mastering the Waterfall Braid with Dailymotion's Easy Hairstyling Guide
The waterfall braid is a stunning hairstyle that adds a touch of elegance to any look, making it perfect for various occasions from casual outings to formal events. This flowing braid looks intricate but can be mastered with a little practice. Dailymotion's easy hairstyling guide offers step-by-step instructions to help you achieve this beautiful style effortlessly.
What You'll Need:
- Hairbrush or comb
- Hair ties (clear or colored)
- Hairpins
- Texturizing spray (optional)
Step-by-Step Instructions:
- Prepare Your Hair: Start with clean, dry hair. Brush through to remove any tangles.
- Section Your Hair: Take a small section of hair from the front and divide it into three equal parts.
- Begin the Braid: Braid the three sections as you would for a traditional braid, but let the bottom strand drop after each crossover.
- Add Hair: Every time you cross a section, grab a new piece of hair from the top and add it to the braid.
- Continue Braiding: Repeat the process, allowing the dropped strands to cascade down, creating the waterfall effect.
- Secure the Braid: Once you reach your desired length, secure the braid with a hair tie or pin.
Tips for a Perfect Waterfall Braid:
| Tip | Description |
|---|---|
| Use Texturizing Spray | This adds grip to your hair, making it easier to braid. |
| Practice Makes Perfect | Don't be discouraged if it doesn't look perfect the first time! |
| Accessorize | Add flowers or hairpins for a more festive look. |
With Dailymotion's easy hairstyling guide, mastering the waterfall braid is within reach. Follow these steps, be patient with your practice, and enjoy the process of creating a beautiful hairstyle that will surely turn heads.
Conclusion and Final Thoughts
By following these simple steps and tips, you can easily master the waterfall braid and elevate your hairstyling skills, bringing a new level of creativity to your everyday looks.