Adobe Photoshop CS5 is a powerful image editing software that has become a staple for photographers, graphic designers, and artists around the world. Released in April 2010, it introduced several innovative features that made photo editing more intuitive and efficient. Whether you’re a professional or an enthusiast, mastering Photoshop CS5 can significantly enhance your editing skills and transform your photos into stunning works of art.
With a user-friendly interface, Photoshop CS5 allows you to manipulate images with precision, offering tools that cater to both basic and advanced needs. From retouching images to creating intricate designs, this software provides endless possibilities. Let's dive into some essential tools that will help you unlock your creative potential!
Essential Tools for Photo Editing
When it comes to photo editing in Adobe Photoshop CS5, knowing the right tools can make all the difference. Here’s a breakdown of some essential tools that every user should be familiar with:
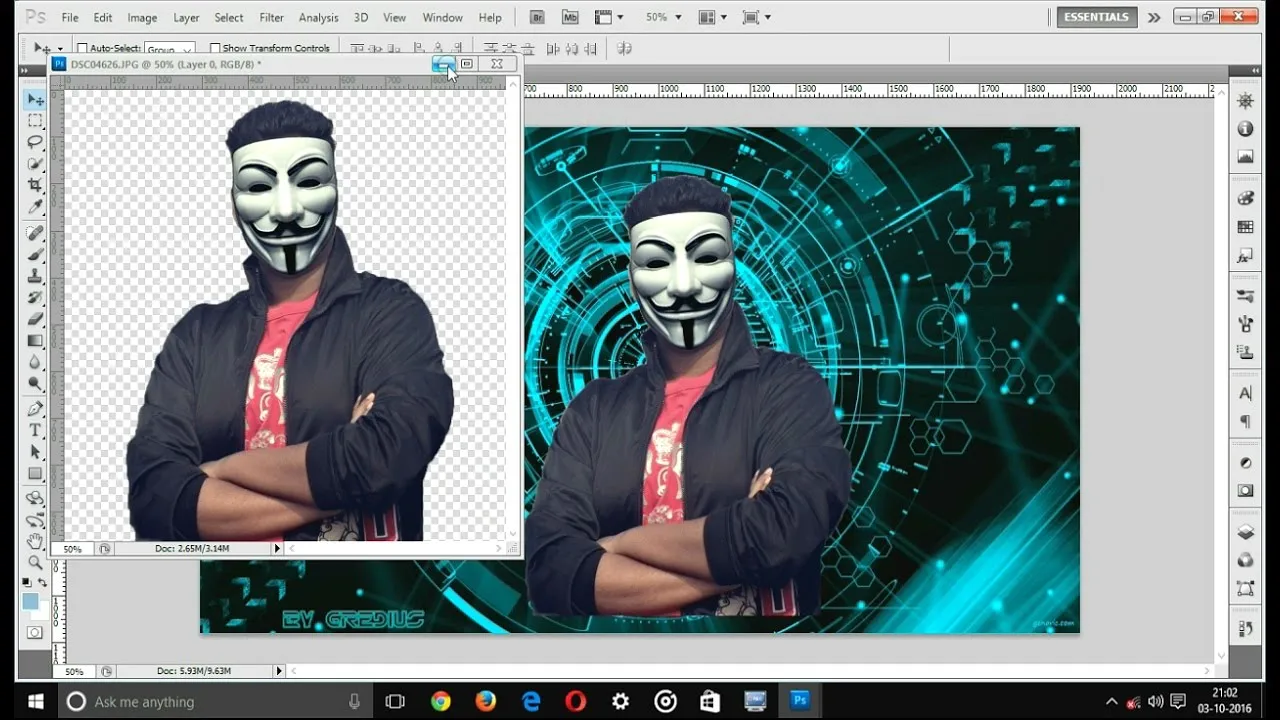
- Selection Tools: These include the Marquee Tool, Lasso Tool, and Magic Wand Tool. They allow you to select specific areas of your image for editing. For instance, the Magic Wand Tool is perfect for selecting areas of similar color, making it easier to isolate subjects.
- Brush Tool: This versatile tool lets you paint on your images. You can adjust the size, hardness, and opacity of the brush to create unique effects—perfect for retouching and adding artistic flair.
- Clone Stamp Tool: Need to remove blemishes or unwanted objects? The Clone Stamp Tool allows you to sample pixels from one area and paint over another, making seamless edits.
- Adjustment Layers: These layers let you modify the brightness, contrast, saturation, and color of your images non-destructively, ensuring your original image remains intact.
- Text Tool: Add typography to your images with the Text Tool. You can choose different fonts, sizes, and styles to create captivating visuals and captions.
Understanding how to effectively use these tools can elevate your photo editing game, allowing you to create stunning images that truly capture the essence of your vision. Experiment with these tools to discover what works best for your style!
Also Read This: How Shutterstock Pays Contributors and What You Should Know
Preparing Your Images for Editing
Before diving into the exciting world of photo editing in Adobe Photoshop CS5, it's essential to prepare your images properly. This step sets the foundation for a smooth editing process and helps you achieve the best results.
Here are some key steps to ensure your images are ready:
- Choose the Right Format: Make sure your images are in a suitable format for editing. JPEGs are common, but for maximum quality, consider using RAW files. They contain more data, which allows for greater flexibility in editing.
- Resolution Matters: Check the resolution of your images. Higher resolution images provide more detail, making them easier to edit. Aim for at least 300 DPI (dots per inch) for print quality.
- Organize Your Files: Keep your images organized in folders. This way, you can quickly locate what you need when working on multiple projects. Use descriptive names to help you remember the contents easily.
- Backup Your Files: Never underestimate the importance of backups. Use an external hard drive or a cloud service to ensure your original images are safe before you start editing.
By following these steps, you'll set yourself up for success and ensure that your editing process in Photoshop CS5 is efficient and enjoyable!
Also Read This: How Dailymotion Empowers Niche Content Creators Globally
Basic Adjustments for Enhancing Photos
Once your images are prepared, it's time to dive into the fun part: making basic adjustments to enhance your photos! Adobe Photoshop CS5 offers a variety of tools that can transform an ordinary image into something extraordinary.
Here are some essential adjustments to consider:
| Adjustment | Description |
|---|---|
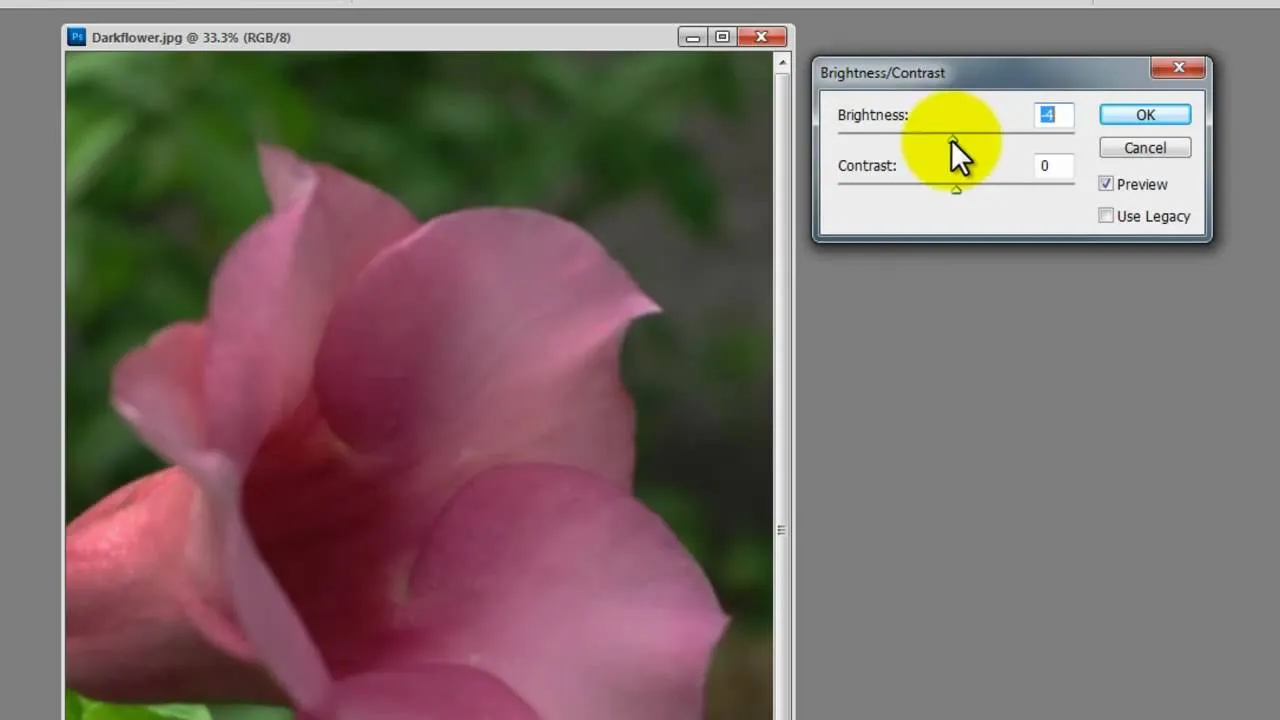
| Brightness/Contrast: | Adjust the brightness and contrast to bring out details in your image. Use the sliders to find the perfect balance. |
| Color Balance: | Tweak the color tones to enhance the mood. Adjusting the reds, greens, and blues can drastically change the feel of your photo. |
| Sharpening: | Use the sharpening tool to make your images crisper. Be careful not to overdo it; a subtle touch goes a long way. |
| Cropping: | Crop your image to improve composition and focus on the subject. Use the rule of thirds to guide your cropping decisions. |
These basic adjustments are just the beginning. Experimenting with these tools in Photoshop CS5 will help you discover your unique editing style and enhance your photos beautifully!
Also Read This: How to Get Featured in Behance Galleries
5. Advanced Techniques for Professional Edits
When it comes to achieving that professional quality in your photo edits, mastering advanced techniques in Adobe Photoshop CS5 is essential. These techniques can elevate your work from good to exceptional, and they’re easier than you might think!
One advanced technique is the *use of the Clone Stamp tool. This tool allows you to paint over areas of your image, effectively removing blemishes or unwanted objects. It’s especially useful for retouching portraits or landscapes. Here’s a quick guide on how to use it:
- Select the Clone Stamp tool from the toolbar.
- Hold down the Alt key and click on the area you want to clone.
- Release the Alt key and paint over the area you wish to cover.
Another powerful method is Color Grading. This technique helps you set the mood of the image by adjusting the color tones. You can do this through the Color Balance adjustments or by using the Hue/Saturation layer. Experiment with sliders until you find the perfect vibe!
Don't forget about Sharpening. Subtly sharpening your image can really enhance details. Use the Unsharp Mask filter, but be careful not to overdo it; a little goes a long way!
Lastly, consider using Blending Modes. These allow you to combine layers in creative ways, creating unique effects. Try out modes like Multiply or Overlay to see how they transform your images.
Also Read This: Organize Your Schedule with Canva Schedule Template
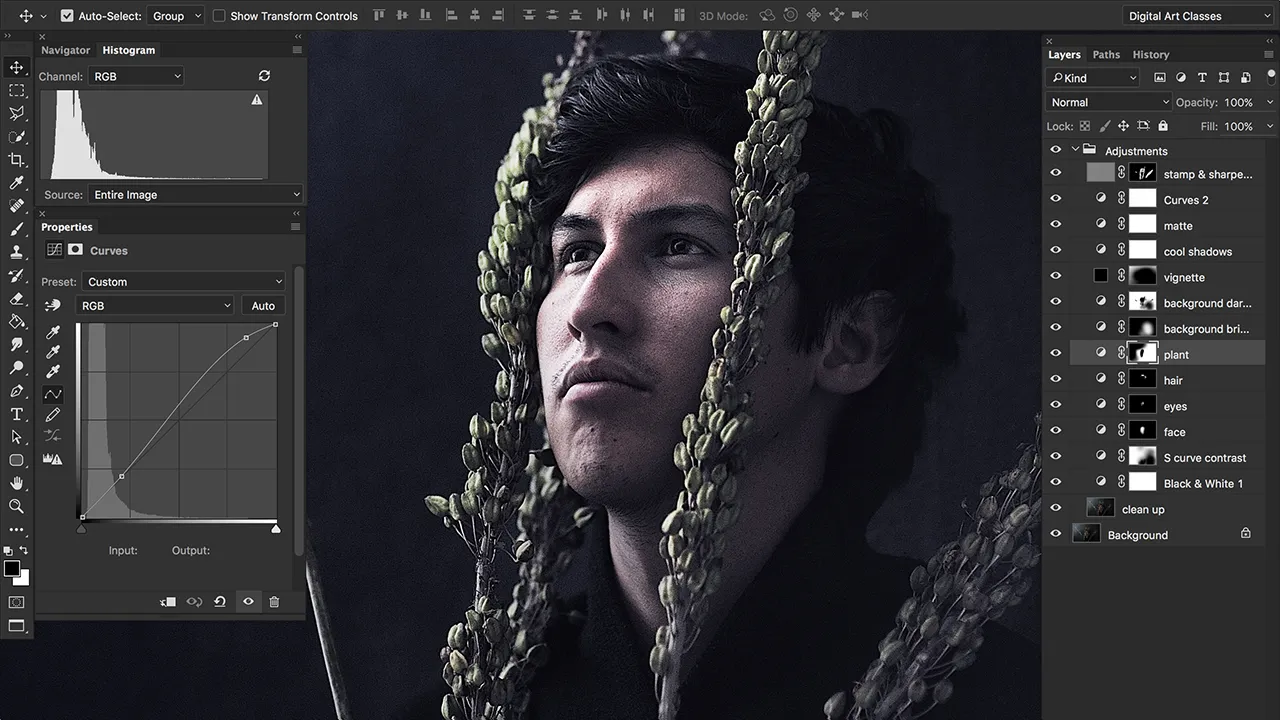
6. Using Layers and Masks Effectively
Layers and masks are the backbone of any professional photo editing workflow in Photoshop CS5. Understanding how to use them effectively can dramatically change your editing game!
First, let’s talk about layers. Each edit you make can be placed on a separate layer. This allows for non-destructive editing, meaning you can go back and tweak any part of your work without starting from scratch. To create a new layer:
- Go to the Layers panel and click the “New Layer” icon.
- Or use the shortcut Shift + Ctrl + N (Cmd on Mac).
Now, on to masks! Masks let you control which parts of a layer are visible. For instance, if you want to bring back some details from the background while keeping your subject intact, masking is your best friend. Here’s how to use them:
- Select the layer you want to mask.
- Click the "Add Layer Mask" button at the bottom of the Layers panel.
- With a soft brush, paint with black to hide and white to reveal parts of the layer.
Additionally, consider utilizing Adjustment Layers*. These are layers that let you apply color and tonal adjustments non-destructively. You can always go back to tweak them later!
By mastering layers and masks, you’ll find that your edits become more flexible and creative, allowing you to explore different styles without the fear of ruining your original photo.
Also Read This: How to Subscribe to Rumble and Access Premium Content
7. Color Correction and Grading
Color correction and grading are essential skills in photography that can dramatically enhance your images. In Adobe Photoshop CS5, these processes help you adjust colors to achieve a natural look or create a specific mood. Think of color correction as the foundation, where you fix any color imbalances, and grading as the artistic touch that gives your photos a unique flair.
To start color correction, you'll want to use tools like the Curves and Levels adjustments. Here’s a simple step-by-step guide:
- Open your image: Load your photo into Photoshop CS5.
- Access Curves: Go to Image > Adjustments > Curves. This allows you to adjust the tonal range and color balance.
- Adjust the RGB channels: Click on the dropdown to select Red, Green, or Blue and adjust the curve until the colors look balanced.
- Use Levels: Navigate to Image > Adjustments > Levels to set the highlights, midtones, and shadows more precisely.
Once your colors are corrected, it’s time for grading. You can use the Color Balance adjustment layer to tweak shadows, midtones, and highlights. This is where you can turn a standard image into something that feels more dramatic or vintage by playing around with the color sliders. Experimentation is key!
Also Read This: Exploring the Impact of the Rumbling and Its Casualties
8. Sharpening and Noise Reduction
Sharpening and noise reduction are crucial for achieving that polished, professional look in your photos. While sharpening enhances the details, noise reduction helps tackle those unwanted grainy artifacts that can detract from your image quality.
To sharpen your images effectively in Photoshop CS5, you can use the Unsharp Mask filter:
- Navigate to Filters: Go to Filter > Sharpen > Unsharp Mask.
- Adjust the settings: Play with the Amount, Radius, and Threshold sliders. A common starting point is an Amount of 150%, Radius of 1.0 pixels, and a Threshold of 0.
Be cautious; over-sharpening can lead to unnatural-looking edges. Always zoom in to check your adjustments!
On the flip side, for noise reduction, you can use the Reduce Noise filter:
- Access the filter: Go to Filter > Noise > Reduce Noise.
- Fine-tune settings: Adjust the Strength, Preserve Details, Reduce Color Noise, and Sharpen Details sliders to achieve a smoother image without losing too much detail.
Combining these techniques will help you create stunning images that stand out, making your editing skills shine in your photography journey!
Also Read This: Effortless Methods to Move Videos from Dailymotion to YouTube
9. Final Touches and Exporting Your Edits
Once you've invested time and creativity into your photo edits, the final touches can elevate your work to a professional level. These steps are often subtle but can make a significant difference in the final output.
Start by zooming in on your image and checking for any imperfections. Use the Healing Brush Tool to remove blemishes or distractions that might have slipped through during the editing process. This tool allows you to blend the surrounding pixels, ensuring a smooth finish.
Next, consider adjusting the levels or curves for better contrast. Go to Image > Adjustments > Levels or Curves. This can dramatically enhance the depth of your photo, making colors pop and shadows more defined.
Now, let’s talk about exporting. Go to File > Save As and choose the right format based on your intended use:
- JPEG for web use—this strikes a great balance between quality and file size.
- PNG if you require a transparent background.
- TIFF for high-quality prints or further editing.
Finally, ensure you manage your export settings. For web usage, adjust the quality slider to find a sweet spot between size and clarity. A quality setting of around 70-80% usually works well.
10. Conclusion and Tips for Continued Learning
Congratulations! You've made it through the journey of mastering professional photo edits in Adobe Photoshop CS5. Remember, the key to great photography editing lies not just in the tools you use, but in your willingness to experiment and learn. Here are some final thoughts:
First, practice makes perfect. The more you play around with different tools and techniques, the more proficient you'll become. Don’t hesitate to revisit older photos; applying new skills can yield surprising results!
Second, consider joining online communities like Adobe Forums or Reddit’s /r/photography. These platforms are goldmines for feedback, tips, and inspiration from fellow photographers.
Lastly, keep learning! Adobe offers a plethora of tutorials, and platforms like Skillshare and Udemy have specialized courses that can help you dive deeper into specific areas of photo editing.
Remember, every edit is a new opportunity to express your creativity. So grab your tools, keep honing your craft, and let every photo you edit tell a story!