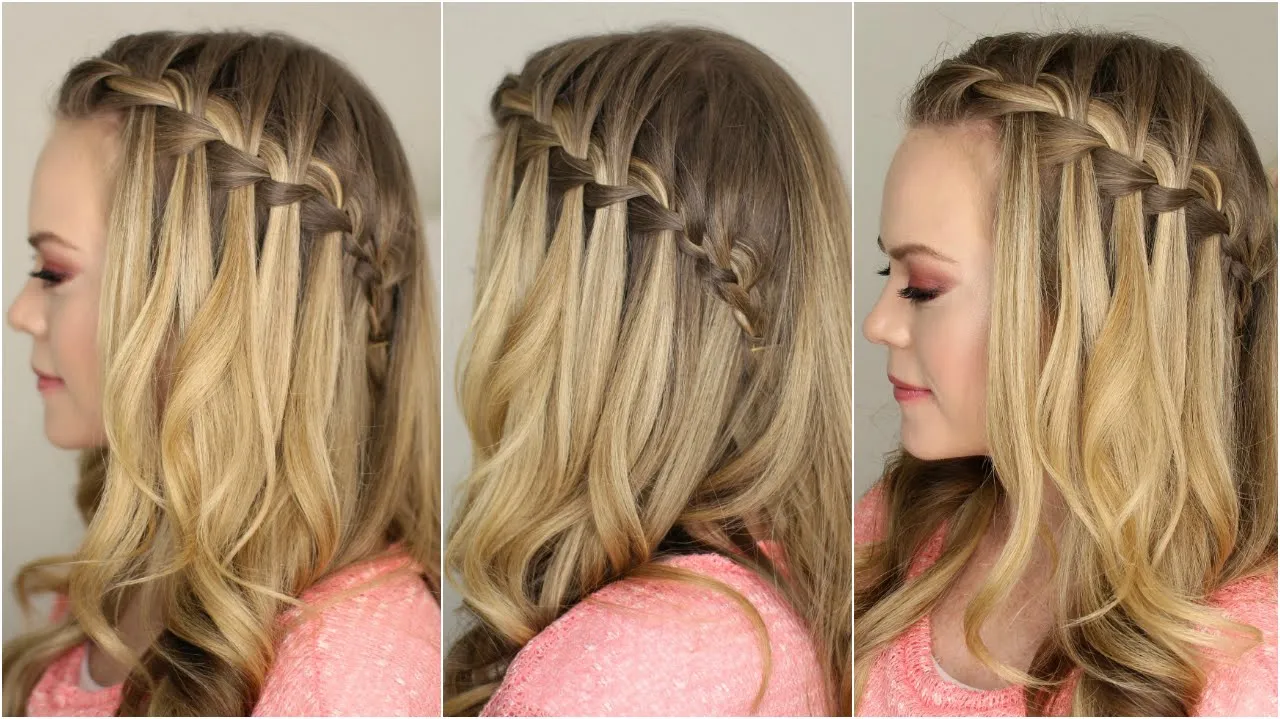
Waterfall braids are a stunning hairstyle that effortlessly combines elegance with a touch of whimsy. Ideal for both casual outings and formal events, this braid offers a unique way to showcase your hair. The beauty of waterfall braids lies in their flowing aesthetic — it looks intricate but is surprisingly easy to master with a bit of practice. Whether you're prepping for a wedding, a date night, or just want to elevate your everyday look, waterfall braids can add that perfect finishing touch. Let’s dive into what makes this braid so special and how you can create it on yourself!
Tools and Products You Will Need
Before you start crafting your beautiful waterfall braid, it’s essential to gather the right tools and products. Having everything ready will make the process smoother and more enjoyable. Here’s a comprehensive list to get you started:
- Hairbrush or Comb: A good-quality brush or comb will help detangle your hair, ensuring a smooth braid.
- Hair Ties: Use clear or matching hair ties to secure the braid at the end.
- Hair Clips: These will help you section off hair effortlessly while you braid.
- Texturizing Spray: A light texturizing spray can add grip to your hair, which is particularly helpful if you have fine or slippery hair.
- Hair Spray: A flexible hold hairspray can keep your braid in place without making it stiff.
- Mirror: A handheld mirror is useful to check your work from different angles.
With these tools and products at your disposal, you're set to create a gorgeous waterfall braid that will turn heads and make you feel fabulous!
Also Read This: How to Use Getty Images Free and Legally Without Violating Copyright
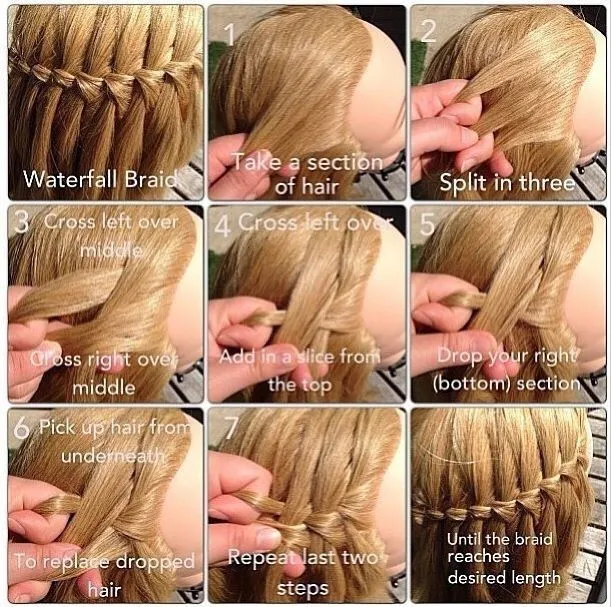
Step-by-Step Instructions for Creating a Waterfall Braid
Creating a waterfall braid might seem daunting at first, but breaking it down into steps can make it a breezy process! Here’s how to achieve that stunning look:
- Prepare Your Hair: Start with clean, dry hair. It's easier to braid if your hair is smooth, so consider using a bit of styling cream or mousse for added texture.
- Section Your Hair: Part your hair down the middle or to one side, depending on your preference. Take a section of hair from the front, around 2-3 inches wide.
- Begin the Braid: Divide the section into three strands, just like a regular braid. Cross the right strand over the middle strand, then the left strand over the new middle strand.
- Release and Add: Now, instead of continuing the braid, let the bottom strand fall and take a new section of hair from the front to replace it. This is what makes the braid look like a waterfall!
- Repeat: Continue this process, alternating sides, and adding new hair until you reach the back of your head or your desired length.
- Secure the Braid: Once you’ve reached your stopping point, secure the braid with a small hair tie. You can also pin it for extra hold.
- Finish It Off: Gently pull at the braid to give it a fuller look and spray it with hairspray to keep everything in place.
Also Read This: How to Sell Photos on Getty Images as a Beginner Contributor
Tips for Perfecting Your Waterfall Braid
Want to take your waterfall braid from good to gorgeous? Here are some handy tips that can help you nail that perfect look:
- Practice Makes Perfect: Don’t be discouraged if it doesn’t look perfect on the first try. Keep practicing, and it will get easier!
- Use the Right Tools: Invest in a good quality hairbrush and some elastic bands that match your hair color. This will make your braid look seamless.
- Consider Your Hair Type: If you have fine hair, using a volumizing mousse before you start can help! For thicker hair, a bit of smoothing serum can tame any flyaways.
- Add Accessories: Once your braid is complete, consider adding flowers, clips, or ribbons for a personal touch, especially if it’s for a special occasion.
- Practice Different Variations: Experiment with different styles, like starting your braid lower or combining it with a fishtail braid for a unique look!
Remember, the key to a beautiful waterfall braid is confidence and a little creativity. Enjoy the process, and don’t forget to have fun with your hair!
Also Read This: Understanding First Second and Third Connections on LinkedIn
5. Styling Options to Enhance Your Waterfall Braid
Once you've mastered the waterfall braid, the fun doesn't stop there! You can elevate your look with a few simple styling options that add flair and personality. Here are some creative ideas to enhance your stunning braid:
- Accessorize with Flowers: Nothing says “boho-chic” quite like adding fresh or faux flowers to your braid. Tuck small blossoms into the braid for a romantic touch. For a more whimsical look, try using colorful hair clips or pins.
- Texture Play: To add volume and interest, consider curling the remaining hair that falls below the braid. Loose waves can create a beautiful contrast against the structured braid, making your hairstyle more dynamic.
- Half-Up, Half-Down: For a playful look, combine your waterfall braid with a half-up, half-down style. This keeps your hair off your face while allowing the rest to flow freely. You can even try braiding a section on each side for a more balanced appearance.
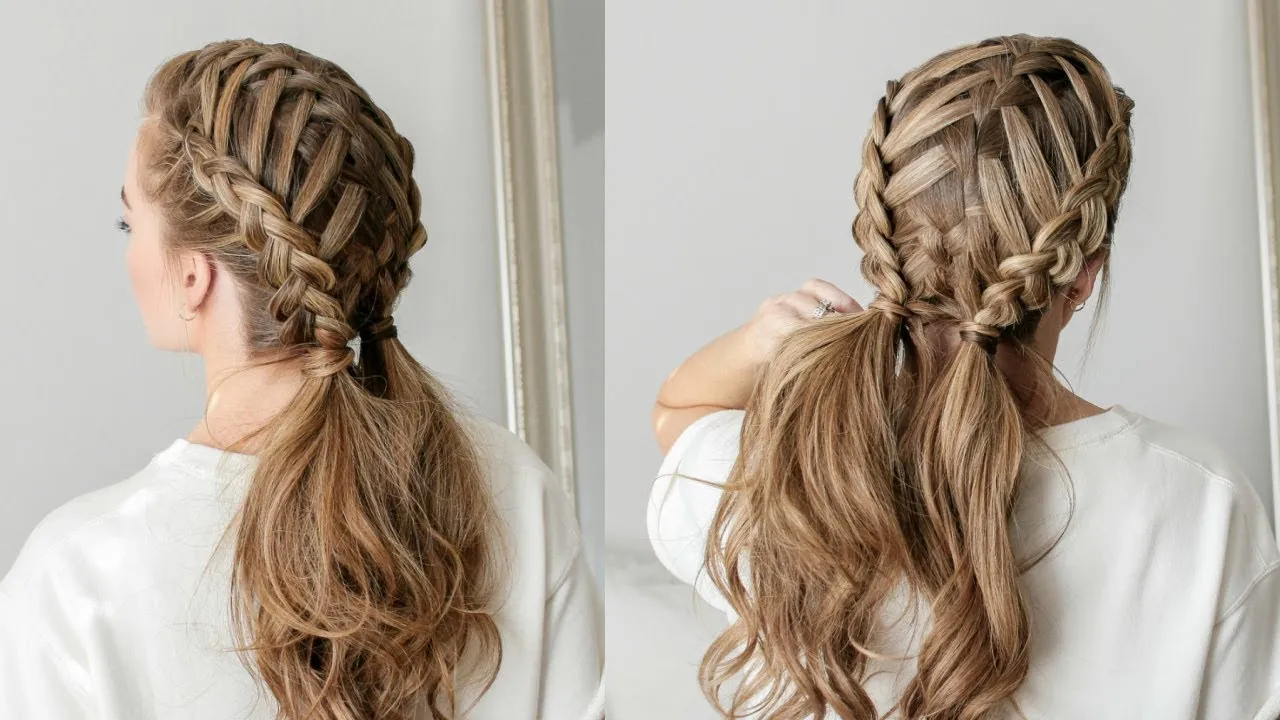
- Layered Braid Styles: Experiment with multiple waterfall braids by incorporating smaller braids into your main braid. This layered effect creates a stunning, intricate look that’s bound to turn heads.
- Sleek and Polished: If you’re preparing for a formal event, a sleek finish can be just the thing. Use hair gel or serum to smooth down any flyaways, giving your waterfall braid a polished and sophisticated appearance.
These styling options not only enhance the beauty of your waterfall braid but also allow you to express your unique style and creativity!
6. Conclusion and Final Thoughts
Creating a stunning waterfall braid is a delightful way to express your creativity and enhance your hairstyle repertoire. Whether you’re preparing for a casual outing or a special event, this braid adds a touch of elegance and charm to your look. Remember, practice is key! The more you practice, the more natural and effortless your braid will appear.
As you experiment with different styling options, don’t shy away from personalizing your waterfall braid to suit your style. Whether it’s adding accessories, playing with textures, or incorporating multiple braids, there’s no right or wrong way to make it your own. Keep in mind:
| Tip | Description |
|---|---|
| Practice Regularly | The more you braid, the better you'll become at it! |
| Have Fun | Experiment with styles and colors to discover what you love. |
| Be Patient | It might take some time to perfect your technique, and that’s okay! |
So grab your hairbrush, some accessories, and have fun creating your beautiful waterfall braid! You got this!