Creating a fun Minion cake is a delightful way to celebrate a birthday or special occasion. These little yellow characters from the "Despicable Me" franchise bring joy and laughter to both kids and adults alike. With their quirky smiles and playful demeanor, a Minion cake is sure to be the centerpiece of any event. In this guide, we'll walk you through the creative process of making a Minion cake that not only looks fantastic but also tastes delicious. So, grab your baking supplies and let’s get this fun project started!
Ingredients Needed
Before you dive into baking, it's essential to gather all your ingredients. Below is a comprehensive list to ensure your Minion cake turns out perfectly!
- Cake Base:
- 2 cups all-purpose flour
- 2 cups granulated sugar
- 1 cup unsalted butter (softened)
- 4 large eggs
- 1 cup milk
- 1 tablespoon baking powder
- 1 teaspoon vanilla extract
- Minion Frosting:
- 1 cup unsalted butter (softened)
- 4 cups powdered sugar
- 2 tablespoons milk
- 1 teaspoon vanilla extract
- Yellow food coloring
- Decorations:
- Blue fondant (for overalls)
- Black fondant (for goggles and mouth)
- White fondant (for eyes)
- Chocolate chips or candies (for eyes)
Having everything ready will make the baking process smoother and more enjoyable. Don't forget, you can always customize your ingredients to fit dietary preferences or to add your own twist to this fun cake!
Also Read This: How to Upload and Sell Photos on Shutterstock Successfully
Tools Required

Creating a fun Minion cake can be an exciting project, but having the right tools is essential to ensure everything goes smoothly. Here’s a handy list of tools you’ll need:
- Mixing Bowls: A couple of medium-sized mixing bowls will be perfect for combining your ingredients.
- Measuring Cups and Spoons: Accurate measurements are crucial for baking, so make sure you have both dry and liquid measuring tools.
- Whisk and Spatula: A whisk is great for mixing batter, while a spatula will help you scrape down the sides and fold in ingredients.
- Cake Pans: You’ll need round cake pans, preferably 8-inch or 9-inch, to create the body of the Minion.
- Cooling Rack: After baking, it’s essential to let your cakes cool evenly on a rack.
- Fondant Tools: If you’re using fondant for decorations, a rolling pin and fondant cutters will be super helpful.
- Offset Spatula: This tool is perfect for frosting evenly and getting sharp edges on your cake.
- Piping Bags and Tips: For those intricate details, having piping bags will make your life a lot easier.
- Food Coloring: Get vibrant colors to achieve the classic Minion yellow and other fun shades.
- Turntable: A cake turntable will help you frost and decorate your cake from all angles.
Once you have these tools ready, you're all set to embark on your Minion cake adventure!
Also Read This: How to Create a 3D Drawing on Paper with Dailymotionâs Easy Methods
Step-by-Step Instructions
Now that you’re equipped with the right tools, let’s dive into the delicious process of creating your Minion cake. Follow these step-by-step instructions for a fun baking experience:
- Preheat Your Oven: Start by preheating your oven to 350°F (175°C). This ensures that your cakes bake evenly.
- Prepare Your Cake Batter: In a mixing bowl, combine your dry ingredients (flour, sugar, baking powder) and whisk them together. In another bowl, mix your wet ingredients (eggs, milk, butter), then combine the two mixtures until smooth.
- Bake the Cakes: Divide the batter between your prepared cake pans and bake for about 25-30 minutes. A toothpick inserted into the center should come out clean.
- Cool the Cakes: Once baked, let the cakes cool in the pans for 10 minutes before transferring them to a cooling rack.
- Level the Cakes: Once cool, carefully level the tops of the cakes with a serrated knife to ensure they stack neatly.
- Frost and Stack: Place one layer on your turntable, spread a layer of frosting, then top with the next layer. Repeat until all layers are stacked.
- Create the Minion Features: Use fondant to craft eyes, goggles, and a mouth. Roll out yellow fondant to cover the entire cake, making it look like a Minion.
- Details Matter: Add black fondant straps for goggles and use edible markers for facial details to bring your Minion to life!
- Final Touch: Once decorated, let your cake set for a bit, and then it’s ready to serve!
Enjoy the process and have fun with your creation. Your Minion cake will surely be a hit at any gathering!
Also Read This: Submitting Your Vector Art Designs to Adobe Stock
Decorating Your Minion Cake
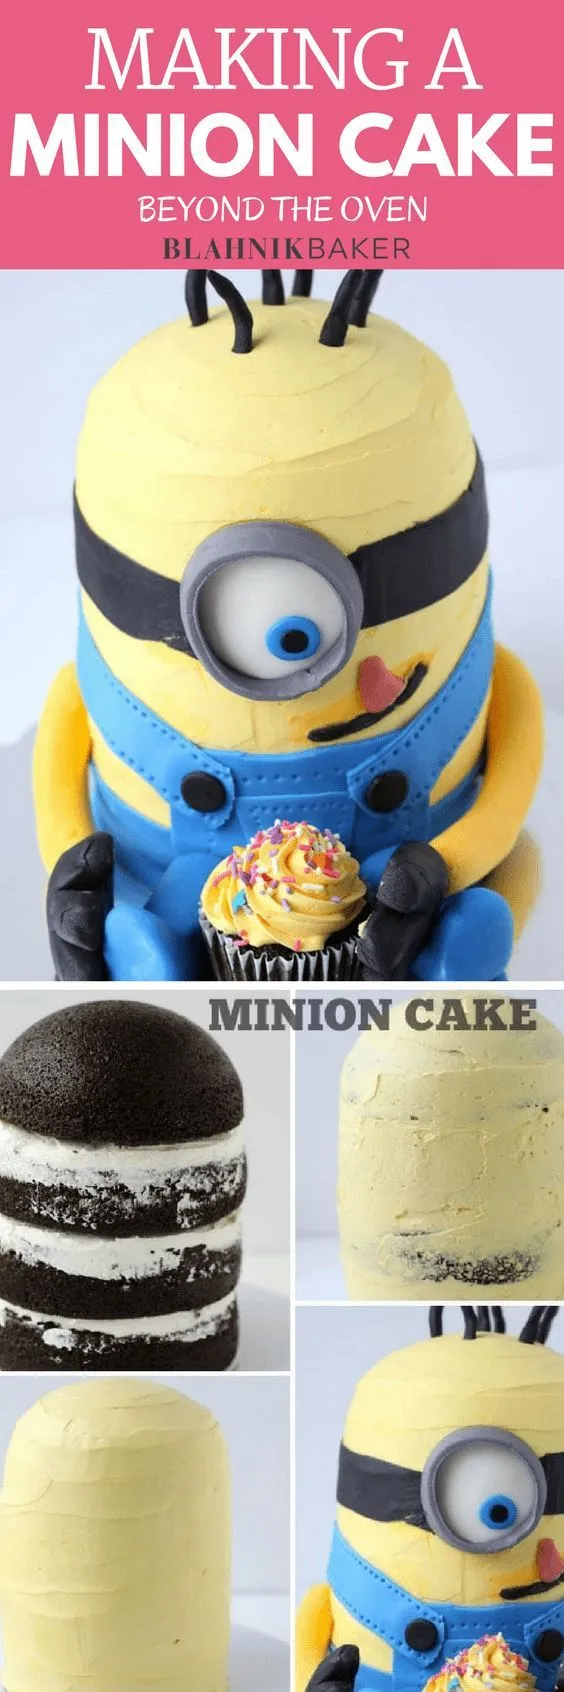
Decorating your Minion cake is where the magic really happens! This is the stage where you get to bring your cake to life and let your creativity shine. Here’s a step-by-step guide to make your cake look just like those adorable little Minions!
1. Start with a Smooth Base: Before you even think of adding Minion features, ensure your cake is beautifully frosted. Use yellow buttercream frosting to cover the entire cake, giving it that classic Minion color. A spatula can help achieve a smooth finish.
2. Add the Minion Eyes: For the eyes, use round cookies or chocolate-covered candies. Place one or two on the front of the cake, depending on whether you’re making a one-eyed or two-eyed Minion. You can use a small amount of white frosting to attach them securely.
3. Create the Overalls: To make the Minion’s iconic overalls, use blue fondant or blue buttercream. You can roll out the fondant and cut out shapes that resemble overalls, or pipe blue frosting in a way that mimics the overall look.
4. Add Fun Details: Use black icing to pipe on the smile and other facial features. Don’t forget the little gloves at the bottom! You can make these using black fondant or pipe them on with black icing.
5. Final Touches: Consider adding edible glitter or sprinkles for a fun, festive look. Display the cake with some Minion toys around it for extra flair!
Also Read This: Mastering YouTube Adblock Detection for Uninterrupted Streaming
Tips for Success
Creating a Minion cake can be a delightful experience, especially with the right tips up your sleeve. Here are some handy pointers to ensure your cake turns out perfectly:
- Plan Your Design: Before you start baking, sketch out your cake design. This will give you a clear vision and help you gather all necessary materials.
- Use Quality Ingredients: Invest in good quality ingredients. Fresh butter, high-quality chocolate, and vibrant food coloring make a noticeable difference!
- Practice Piping: If you’re new to piping, practice on parchment paper first. This can help you get comfortable with different designs before applying them to your cake.
- Keep It Cool: Always keep your cake in a cool place while decorating to prevent melting. If using fondant, ensure your cake is chilled to help it set nicely.
- Don’t Rush: Take your time! Enjoy the process of decorating, and don’t be afraid to make adjustments as you go along.
Remember, the key to a fun Minion cake is your creativity and enthusiasm. Have fun with it, and your cake will surely be a hit!
How to Create a Fun Minion Cake
Creating a fun Minion cake is a delightful project that can be enjoyed by both novice and experienced bakers. The iconic yellow characters from the "Despicable Me" franchise are not only adorable but also relatively easy to replicate in cake form. Below is a step-by-step guide to help you create your very own Minion cake that will impress both kids and adults alike.
Ingredients
- For the Cake:
- 2 cups all-purpose flour
- 1 ½ cups sugar
- 1 cup unsalted butter
- 4 large eggs
- 1 cup milk
- 2 teaspoons baking powder
- 1 teaspoon vanilla extract
- For the Frosting:
- 3 cups powdered sugar
- 1 ½ cups unsalted butter
- 1 teaspoon vanilla extract
- Yellow food coloring
- Black food coloring (for details)
Instructions
- Preheat your oven to 350°F (175°C) and grease your cake pans.
- In a large bowl, mix the butter and sugar until creamy. Add eggs and vanilla, then mix again.
- Combine the dry ingredients in another bowl, then gradually add to the wet mixture, alternating with milk.
- Pour the batter into the prepared pans and bake for 25-30 minutes or until a toothpick comes out clean.
- Once cooled, stack the cakes and cover with yellow frosting.
- Use black frosting to create the Minion's eyes, goggles, and mouth.
With a little creativity and the right ingredients, you can create a fun Minion cake that will be the centerpiece of any celebration. Enjoy the process and have fun decorating!