Changing your IP address in Windows XP can be a straightforward process, whether you're looking to enhance your privacy, troubleshoot connectivity issues, or simply refresh your connection. This guide will walk you through the steps, ensuring that even if you're not a tech wizard, you can handle it with confidence. Let’s dive in!
Understanding IP Addresses
Before we jump into the how-to, let’s clarify what an IP address is and why it matters. An IP address, or Internet Protocol address, is a unique string of numbers separated by periods (IPv4) or colons (IPv6) that identifies each computer using the Internet Protocol to communicate over a network. Think of it as your device's home address on the internet.
Here are some key points about IP addresses:
- Types of IP Addresses: There are two main types of IP addresses: Static and Dynamic. Static IPs are fixed and do not change, while dynamic ones are assigned by your Internet Service Provider (ISP) and can vary each time you connect.
- Importance of IP Addresses: Your IP address is crucial for routing internet traffic to your device. When you visit a website, your request is sent to the server, which uses your IP address to send the data back.
- Privacy Concerns: Changing your IP address can enhance your privacy online. Websites and ISPs can track your online activities through your IP, so changing it can help with anonymity.
In summary, understanding your IP address is key to managing your internet connection effectively. Now that we have a grasp on what an IP address is, let's move on to how to change it in Windows XP!
Also Read This: How to Change Background in Photoshop CS3 for Beginners
Accessing Network Connections
To change your IP address in Windows XP, the first step is to access the Network Connections settings. This might sound a bit technical, but it's quite straightforward! Here’s how you can do it:
- Click on the Start button located at the bottom left of your screen.
- Select Control Panel from the menu. If you don’t see it, look for Settings first.
- In the Control Panel, find and click on Network Connections. You might see it as an icon or a list depending on your view settings.
Once you’re in Network Connections, you'll see all the network interfaces available on your computer. This includes your local area connection (LAN) and any wireless connections. It’s important to identify which connection you want to modify—typically, this will be your active network connection. If you're unsure, look for the one that says "Connected."
Now that you have accessed the Network Connections, you’re ready to change your IP address. Just remember that managing network settings can impact your internet connectivity; proceed with caution!
Also Read This: Understanding Fortiguard Downloader DLP Services
Changing the IP Address
Now that you’re in the right place, let’s change that IP address! It’s a simple process, and I’ll guide you through it step by step. Here’s what to do:
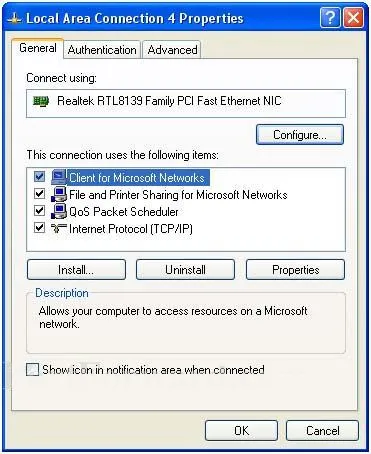
- Right-click on the connection you want to modify (for example, Local Area Connection) and select Properties.
- In the Properties window, scroll down and highlight Internet Protocol (TCP/IP), then click the Properties button.
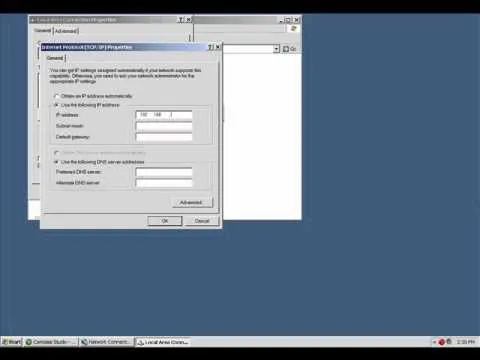
Here’s where the magic happens! You’ll see two options:
- Obtain an IP address automatically – This is what most users have, where your router assigns an IP.
- Use the following IP address – This is where you can manually set your IP address.
If you want to set a static IP:
- Select Use the following IP address.
- Enter your desired IP address in the IP address field (e.g., 192.168.1.10).
- Fill in the Subnet mask (usually 255.255.255.0) and Default gateway (your router's IP, often 192.168.1.1).
Finally, click OK to save your changes, then click Close to exit the Properties window. Voila! Your IP address is now changed, and you’re ready to go!
Also Read This: Guide to Recovering a Deleted Telegram Account
5. Verifying the New IP Address
Once you’ve successfully changed your IP address on Windows XP, it’s essential to verify that the new settings are in effect. This step ensures that your computer is communicating with the network correctly and that the new IP address is working as intended.
To check your new IP address, follow these steps:
- Click on the Start menu.
- Go to Run and type
cmdto open the Command Prompt. - In the Command Prompt window, type
ipconfigand press Enter.
This command will display a list of network adapters and their respective IP addresses. Look for the section that corresponds to your active network connection, which is typically labeled as Ethernet adapter or Wireless LAN adapter.
Make sure the following details are correct:
- IPv4 Address: This should match the new IP address you assigned.
- Subnet Mask: Ensure this is correct as it determines the network range.
- Default Gateway: This should reflect your router’s IP address.
If everything looks good, congratulations! You’ve successfully changed your IP address. If not, you might need to revisit your settings or check your network connection.
6. Troubleshooting Common Issues
After changing your IP address, you might encounter some common issues that could affect your internet connectivity. Don’t worry; we’ll walk through some troubleshooting steps to help resolve these problems.
Here are a few typical scenarios and how to address them:
| Issue | Possible Cause | Solution |
|---|---|---|
| No Internet Connection | Incorrect IP address or subnet mask | Double-check your IP settings and ensure they match your network's requirements. |
| Cannot Access Local Network | Default gateway settings are incorrect | Verify that the default gateway is set to your router's IP address. |
| IP Address Conflict | Another device is using the same IP | Change your IP address to a different one within the allowed range. |
If you follow these troubleshooting steps and still face issues, consider restarting your computer and router. Sometimes, a simple reboot can resolve connectivity problems. And remember, patience is key—network settings can take a moment to refresh!