Eyebrow pencils are a staple in the beauty world, offering a simple solution for achieving natural-looking, defined brows. Whether you’re looking to fill in sparse areas, create a fuller shape, or simply enhance your brow's natural color, an eyebrow pencil can be your best friend. They are available in various formulas, shades, and styles, making it easy to find one that suits your needs. Let’s explore what makes eyebrow pencils such an essential tool in your makeup kit!
Choosing the Right Eyebrow Pencil
Finding the perfect eyebrow pencil can feel overwhelming with so many options on the market. However, selecting the right one doesn't have to be a daunting task. Here are some key factors to consider when making your choice:
- Shade: Choose a color that closely resembles your natural brow shade. If you have light hair, go for a pencil that is one or two shades darker. For those with darker hair, a slightly lighter shade can create a more natural look.
- Formula: Eyebrow pencils come in various formulas, from waxy to creamy. Waxy pencils generally offer a more precise application, while creamy ones are great for blending and achieving a softer look.
- Tip Type: The tip of the pencil can vary. Fine-tipped pencils allow for precise strokes that mimic natural hair, while broader tips can be used for filling in larger areas quickly.
- Long-lasting: Look for pencils that claim to be long-lasting or waterproof if you want your brows to stay put all day. This is especially important for those with oily skin or if you live in a humid climate.
By considering these factors, you can find an eyebrow pencil that not only complements your look but also fits your lifestyle. Happy brow filling!
Also Read This: Why YouTube TV Lacks the History Channel and What It Means for Viewers
Preparing Your Brows for Application
Before diving into the world of eyebrow pencils, it’s essential to lay a solid foundation. Just like prepping a canvas before painting, your brows need some TLC. Here’s how to get them ready:
- Cleanse: Start with a clean slate! Use a gentle cleanser to remove any makeup or oils from your brows to ensure the pencil adheres well.
- Brush Them Out: Grab an eyebrow spoolie and gently brush your hairs upwards. This helps in identifying the natural shape of your brows and any sparse areas that need filling.
- Trim and Shape: If your brows are on the bushy side, consider trimming any unruly hairs. Use small scissors for precision, and don’t forget to pluck any stray hairs outside the desired shape.
- Moisturize: Apply a light brow gel or clear mascara to condition your hairs. This step is crucial if you have dry brows, ensuring the pencil glides on smoothly.
- Choose the Right Shade: Selecting the perfect shade is vital. Pick a pencil that matches your brow color closely or is one shade lighter. This will ensure a natural look.
With these steps, you’ll have beautifully prepped brows that are ready for your eyebrow pencil application. Let’s move on to the fun part!
Also Read This: Accessing College Sports on YouTube TV Including Big Ten Network
Step-by-Step Guide to Applying Eyebrow Pencil
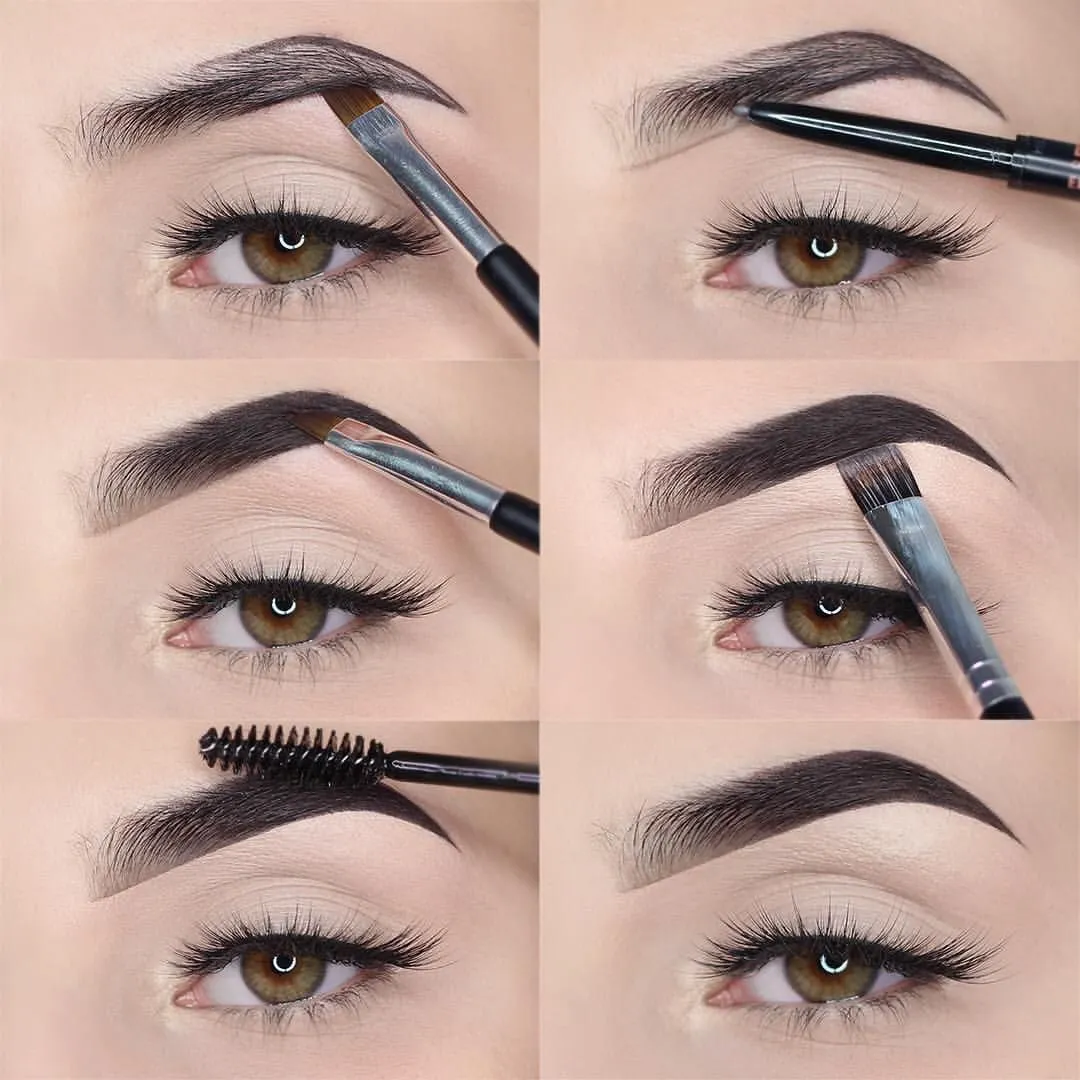
Now that your brows are prepped, it's time to bring them to life with your eyebrow pencil. Follow this simple step-by-step guide for flawless brows:
- Start at the Bottom: Begin by drawing a line along the bottom of your brow, following its natural shape. This will serve as a foundation for your arch and tail.
- Create the Arch: Determine where your arch should be. Typically, it’s about two-thirds of the way out from the inner corner. Draw a subtle line upwards to establish that arch.
- Define the Tail: Next, extend the line to create the tail. Aim for a natural taper; the tail should be thinner than the rest of the brow. Use gentle strokes to avoid harsh lines.
- Fill in Sparsely: Now, lightly fill in any sparse areas by using short, flicking motions. This mimics natural hair growth and keeps things soft.
- Blend, Blend, Blend: Use your spoolie once more to blend the pencil into your brows. This step is crucial for achieving that natural look!
- Set with Gel: Finish with a clear brow gel to keep everything in place. This adds a polished touch and keeps your brows looking fresh all day.
With these steps, you’ll master the art of applying eyebrow pencil, creating beautifully defined and natural brows that frame your face perfectly!
Also Read This: Managing Your Downloads in Adobe Stock
Tips for Achieving a Natural Look
When it comes to achieving that effortlessly beautiful, natural brow look, there are a few key tips to keep in mind. Think of your eyebrows as the frame for your face; you want them to enhance your features without stealing the show.
- Choose the Right Shade: Picking a pencil that closely matches your natural hair color is crucial. If you're a blonde, opt for a light taupe; for brunettes, a shade that’s just a shade darker than your hair will work wonders.
- Light Hand: Apply the pencil with a light touch. It’s easy to go overboard and create harsh lines. Use short, feathery strokes to mimic the look of real hair.
- Blend, Blend, Blend: After applying, use a clean spoolie brush to blend the product in. This softens any harsh lines and gives your brows a more natural appearance.
- Follow Your Natural Shape: Instead of trying to reshape your brows entirely, enhance your natural arch. This helps maintain a more authentic look.
- Set with Clear Gel: Finish off with a clear brow gel to hold everything in place. This adds a subtle shine and keeps your brows looking polished without excessive product.
Also Read This: Pin Your Favorite Content from Behance to Keep it Accessible
How to Define Your Brows for a Bold Look
For those days when you want your brows to make a statement, defining them boldly can elevate your entire look. Here’s how to achieve that striking effect while still keeping it classy.
- Choose a Darker Pencil: For a bolder look, select an eyebrow pencil that’s a couple of shades darker than your natural brow color. This contrast will create a more defined appearance.
- Outline and Fill: Start by outlining the top and bottom of your brows with the pencil. Then, fill in the spaces, paying special attention to the tail end, which usually needs more depth.
- Use a Flat Brush: After filling in, use a flat, stiff brush to blend the pencil into your brows. This will help to diffuse the product and avoid any harsh lines while enhancing definition.
- Highlight the Brow Bone: Apply a bit of concealer or a highlighting pencil just below your brow bone. This creates contrast and emphasizes the defined shape of your brows.
- Finish with Gel: To lock everything in place, use a tinted brow gel. This will add color, definition, and hold to your bold brows, ensuring they stay fierce all day long.
Also Read This: How to Do Crunches Properly on Dailymotion for Best Results
Common Mistakes to Avoid
When it comes to applying eyebrow pencil, even the pros can slip up. Here are some common mistakes you might want to steer clear of:
- Choosing the Wrong Shade: Picking a shade that’s too dark or too light can make your brows look unnatural. Always opt for a color that complements your hair. For instance, if you’re a blonde, a taupe or soft brown typically works wonders.
- Overdrawing the Shape: It’s easy to get carried away, but overdrawing can lead to a harsh look. Stick to your natural brow shape and fill in only where needed.
- Skipping Blending: After applying the pencil, don’t forget to blend! Use a spoolie brush to soften the edges. This will create a more seamless look, making your brows appear naturally fuller.
- Forgetting to Set: Applying a clear brow gel after filling in your brows helps them stay in place all day. Neglecting this step can lead to smudging or fading.
- Too Much Product: Less is more! Applying too much pencil can lead to a cakey appearance. Start with light strokes and build up as necessary.
Avoiding these pitfalls can make a significant difference in your brow game. Remember, practice makes perfect!
Conclusion and Final Thoughts
Mastering the art of applying eyebrow pencil is not just about technique; it’s about finding what works for you. With the right tools, proper application, and a little bit of patience, you can achieve those stunning, natural-looking brows that enhance your features.
To recap:
- Start with clean, prepped brows.
- Choose a pencil shade that compliments your natural color.
- Use light strokes to fill in sparse areas, following your natural brow shape.
- Blend well for a seamless finish.
- Set your brows with gel for all-day wear.
Remember, it’s all about enhancing your natural beauty. Don’t be afraid to experiment and adjust your technique until you find your perfect brow routine. After all, confidence is the best accessory you can wear!