Welcome to the delightful world of Barbie cakes! Whether you're celebrating a birthday or just want to add a splash of fun to your baking routine, a Barbie cake is sure to bring smiles. This creative guide will walk you through the steps to make a stunning cake that not only looks fabulous but tastes amazing too. So, put on your apron, and let's dive into the whimsical realm of Barbie baking!
Gathering Your Ingredients and Tools
Before you start the magical journey of creating your Barbie cake, it's essential to gather all the necessary ingredients and tools. Here’s a comprehensive list to ensure a smooth baking experience:
Ingredients
- Cake Mix: Choose a flavor your child loves, such as vanilla, chocolate, or strawberry. You’ll need enough for two round cakes.
- Butter: 1 cup of unsalted butter, softened to room temperature.
- Sugar: 2 cups of granulated sugar for a sweet base.
- Eggs: 4 large eggs to provide richness.
- Milk: 1 cup of milk to keep the cake moist.
- Vanilla Extract: 2 teaspoons for added flavor.
- Food Coloring: Pink, purple, or any color of your choice to create a vibrant look.
- Frosting: About 4 cups of buttercream or fondant for decorating.
Tools
- Mixing Bowls: You’ll need a couple of mixing bowls for your batter and frosting.
- Electric Mixer: A hand mixer or stand mixer will save you time and effort.
- Baking Pans: Two 8-inch round or one doll cake pan.
- Cooling Rack: Essential for cooling your cakes evenly.
- Spatula: A good offset spatula for smoothing frosting.
- Barbie Doll: The star of the show; ensure her legs fit into the cake.
- Decorating Tools: Piping bags, tips, and any other decorations like sprinkles or edible glitter.
With everything in place, you're ready to start baking your fabulous Barbie cake! Let the creativity flow as you transform these ingredients into a masterpiece.
Also Read This: Canva Image Resolution Change
Preparing the Cake Batter
When it comes to making a Barbie cake, the magic truly begins with preparing the cake batter. This is where you set the stage for your masterpiece, so let’s dive into the fun process!
First things first, choose your cake flavor! Popular choices include vanilla, chocolate, or even strawberry. Here’s a simple recipe for a classic vanilla cake:
- 2 cups all-purpose flour
- 1 ½ cups sugar
- 1 cup unsalted butter (softened)
- 4 large eggs
- 1 cup milk
- 2 ½ tsp baking powder
- 1 tsp vanilla extract
- ½ tsp salt
Now, let’s get mixing! Start by preheating your oven to 350°F (175°C). In a large mixing bowl, cream the softened butter and sugar until fluffy and light. This step is crucial for a moist cake! Next, add the eggs one at a time, mixing well after each addition.
Once your egg mixture is smooth, stir in the milk and vanilla extract. In another bowl, whisk together the flour, baking powder, and salt. Gradually combine the dry ingredients with the wet ingredients until just blended. Be careful not to overmix; a few lumps are perfectly fine!
That’s it! Your cake batter is now ready. For a Barbie cake, you might want to divide the batter into two round pans (for the skirt) and perhaps a smaller one for the bodice. Let’s get ready for the next exciting step!
Also Read This: Mastering the Art of Smoke Rings with Our Easy Video Guide
Baking the Cake
With your cake batter prepped and ready, it’s time to move on to the baking process. This is where your creation starts to take shape, so let’s make sure everything goes smoothly!
Pour the prepared batter evenly into your greased and floured cake pans. If you’re using two round pans for the skirt, filling them about two-thirds full will give you the right height. For the bodice, a smaller pan will do just fine.
Now, place the cake pans in the preheated oven (remember, it’s set to 350°F or 175°C). Here’s a quick baking guide:
| Pan Size | Baking Time |
|---|---|
| 8-inch round | 25-30 minutes |
| 6-inch round | 20-25 minutes |
Keep an eye on your cakes as they bake. When they’re ready, a toothpick inserted in the center should come out clean. Don’t forget to rotate the pans halfway through for even baking!
Once baked, remove the cakes from the oven and allow them to cool in the pans for about 10 minutes. Then, transfer them onto a wire rack to cool completely. This step is crucial; a well-cooled cake will hold up better during decorating!
There you have it! Your Barbie cake layers are now baked and ready for the next stage of construction. Get ready to let your creativity shine in the decorating phase!
Also Read This: How to Increase Your Sharechat Followers: Tips and Tricks
5. Assembling the Barbie Cake
Assembling your Barbie cake is where the magic truly begins! This step is all about bringing your cake to life and making it look like the princess Barbie cake you envisioned. Here’s how to do it:
- Prepare Your Cake Layers: Start by leveling your cake layers with a knife or cake leveler. This will ensure they stack neatly.
- Add Filling: If you want to add a burst of flavor, spread a layer of frosting or filling (like raspberry jam or buttercream) between each cake layer. This adds moisture and taste!
- Stack the Layers: Place your first cake layer on a cake board or plate, then add a generous amount of frosting before placing the next layer on top. Repeat until all layers are stacked.
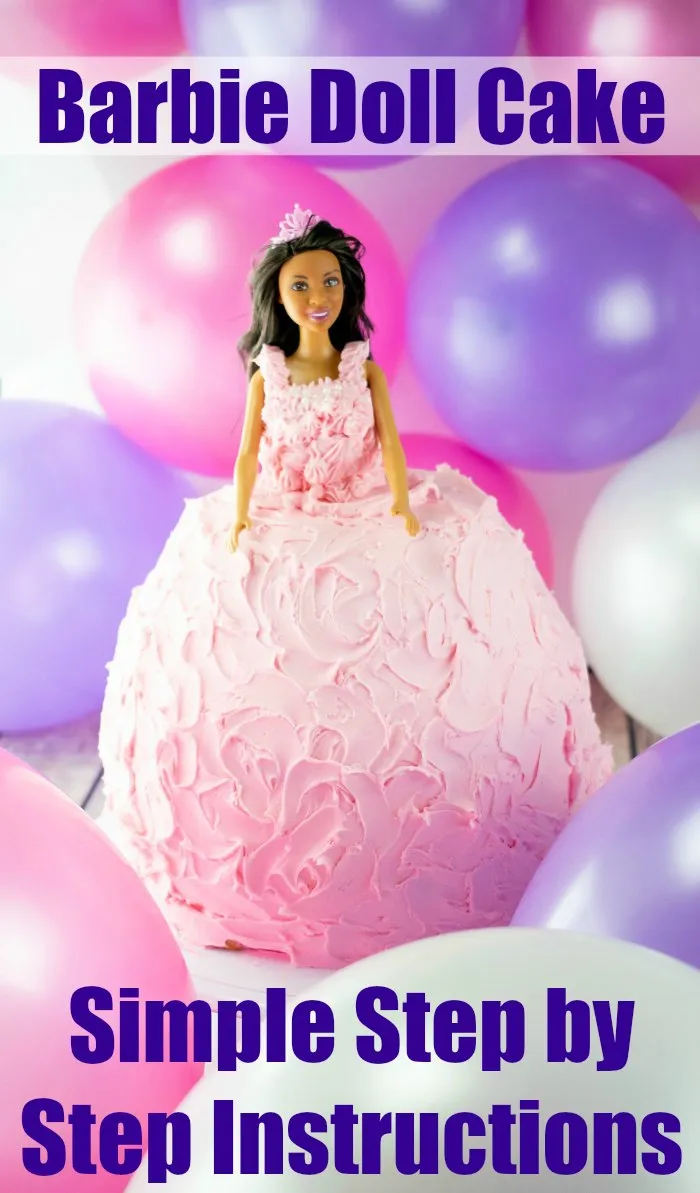
- Insert the Barbie Doll: Before adding the final cake layer, carefully insert the Barbie doll into the center of the cake. Make sure to cover her legs with a layer of cake to hide them.
- Crumb Coat: Apply a thin layer of frosting over the entire cake to seal in crumbs. This is known as the crumb coat. Chill the cake for about 30 minutes to set.
Once assembled, your cake should stand tall and ready for the fun part—decoration!
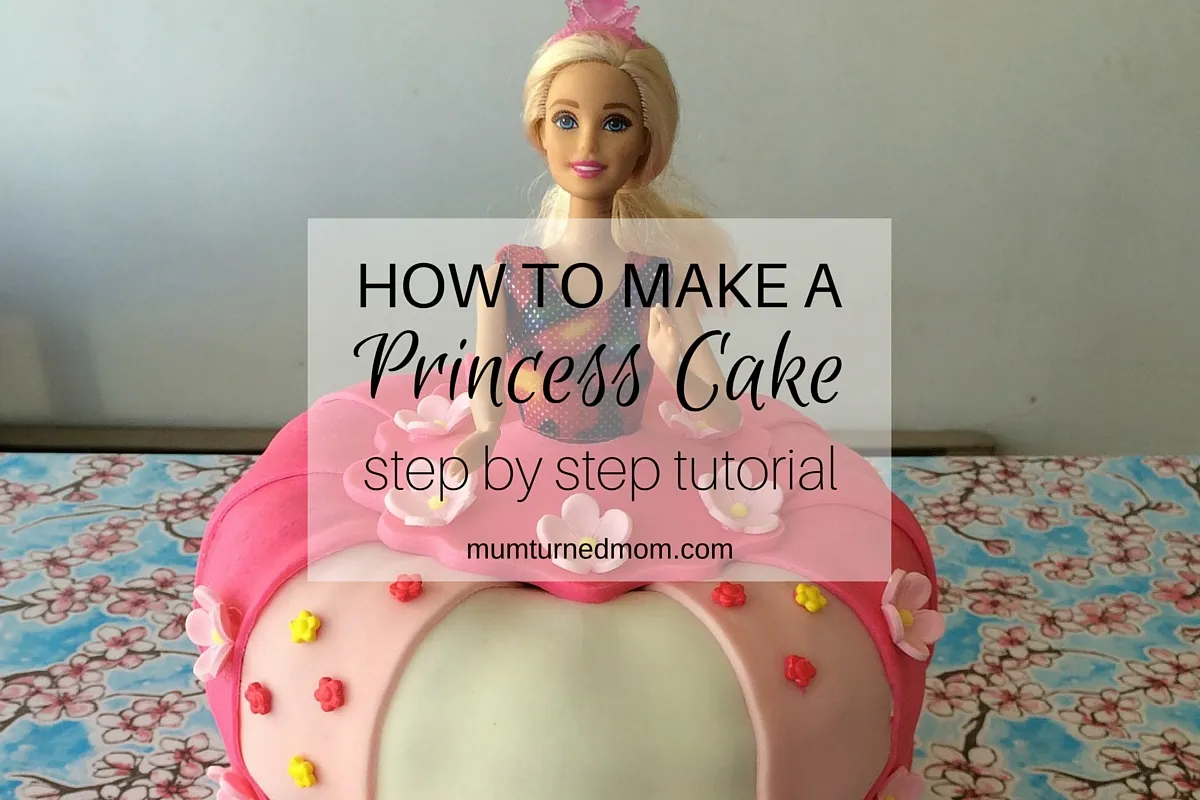
6. Decorating the Barbie Cake
Now comes the fun part—decorating your Barbie cake! This is where you can let your creativity shine. Here are some tips to help you create a stunning cake:
- Choose a Color Palette: Think of Barbie’s signature colors—pink, purple, and sparkles! Choose a color scheme that will make your cake pop.
- Frosting Techniques: Use different piping techniques to create beautiful textures. A star tip can create lovely rosettes, while a round tip is perfect for borders.
- Edible Decorations: Add edible glitter, sugar flowers, or even edible pearls to give your cake that extra bling. These small touches can make a big difference!
- Doll Dress: Use colored frosting or fondant to create a beautiful dress for your Barbie. You can even add ruffles or layers for a more dramatic effect.
- Top It Off: Complete your decoration with a tiara or a themed cake topper to add that finishing touch!
Remember, the key is to have fun and enjoy the process. Your Barbie cake will not only look fabulous but also taste amazing!