Welcome to the exciting world of paper airplanes! Whether you’re looking to impress your friends, participate in competitions, or simply enjoy a relaxing afternoon crafting, making a paper airplane is a delightful activity for all ages. This guide will walk you through the steps and tips to create your very own paper aeroplane. So, grab your materials, and let’s get started on this fun journey!
Materials Needed
Before diving into the folding process, it's essential to gather all the materials you'll need. Luckily, crafting a paper airplane requires just a few simple items that you likely already have at home. Here’s the list:
- Paper: Standard printer paper (A4 or letter size) works great. You can also experiment with heavier paper for different flight characteristics.
- Scissors: Optional, but if you want to create specific designs or trims, scissors can be handy.
- Ruler: Perfect for ensuring accurate measurements and straight edges, though not mandatory.
- Pencil: Useful for marking guidelines or making adjustments as you fold.
- Tape or Glue: Not necessary for basic designs, but can help secure parts in more advanced planes.
Here’s a simple table summarizing the materials:
| Material | Purpose |
|---|---|
| Paper | Main body of the airplane |
| Scissors | Optional trimming and design |
| Ruler | For accurate measurements |
| Pencil | Marking guidelines |
| Tape/Glue | Securing parts (optional) |
With these materials in hand, you're all set to embark on your paper airplane-making adventure!
Also Read This: Understanding the Rumbling Noise Outside
Step 1: Choose Your Paper
Before you dive into the exciting world of paper aeroplanes, the first thing you'll need to do is choose the right paper. Now, you might think any old paper will do, but let's be honest—your choice can greatly affect the performance of your aeroplane!
Here are some great options:
- Standard A4 or Letter Paper: This is the go-to choice for most. It’s lightweight, easy to fold, and widely available.
- Cardstock: If you’re looking for a sturdier design that can withstand a bit of wind, cardstock is perfect. Just keep in mind it’s a bit heavier, which can affect how far it flies.
- Recycled Paper: Want to go green? Recycled paper is not only eco-friendly but often has a nice texture that can add character to your plane.
- Origami Paper: If you’re feeling fancy, use origami paper. It comes in various colors and patterns, making your aeroplane visually appealing!
Ultimately, the best paper for your aeroplane will depend on what you want to achieve. Lightweight paper is great for distance, while heavier options are better for tricks. So, which one will you choose?
Also Read This: Achieving Natural Eyebrows on Dailymotion
Step 2: Folding the Paper
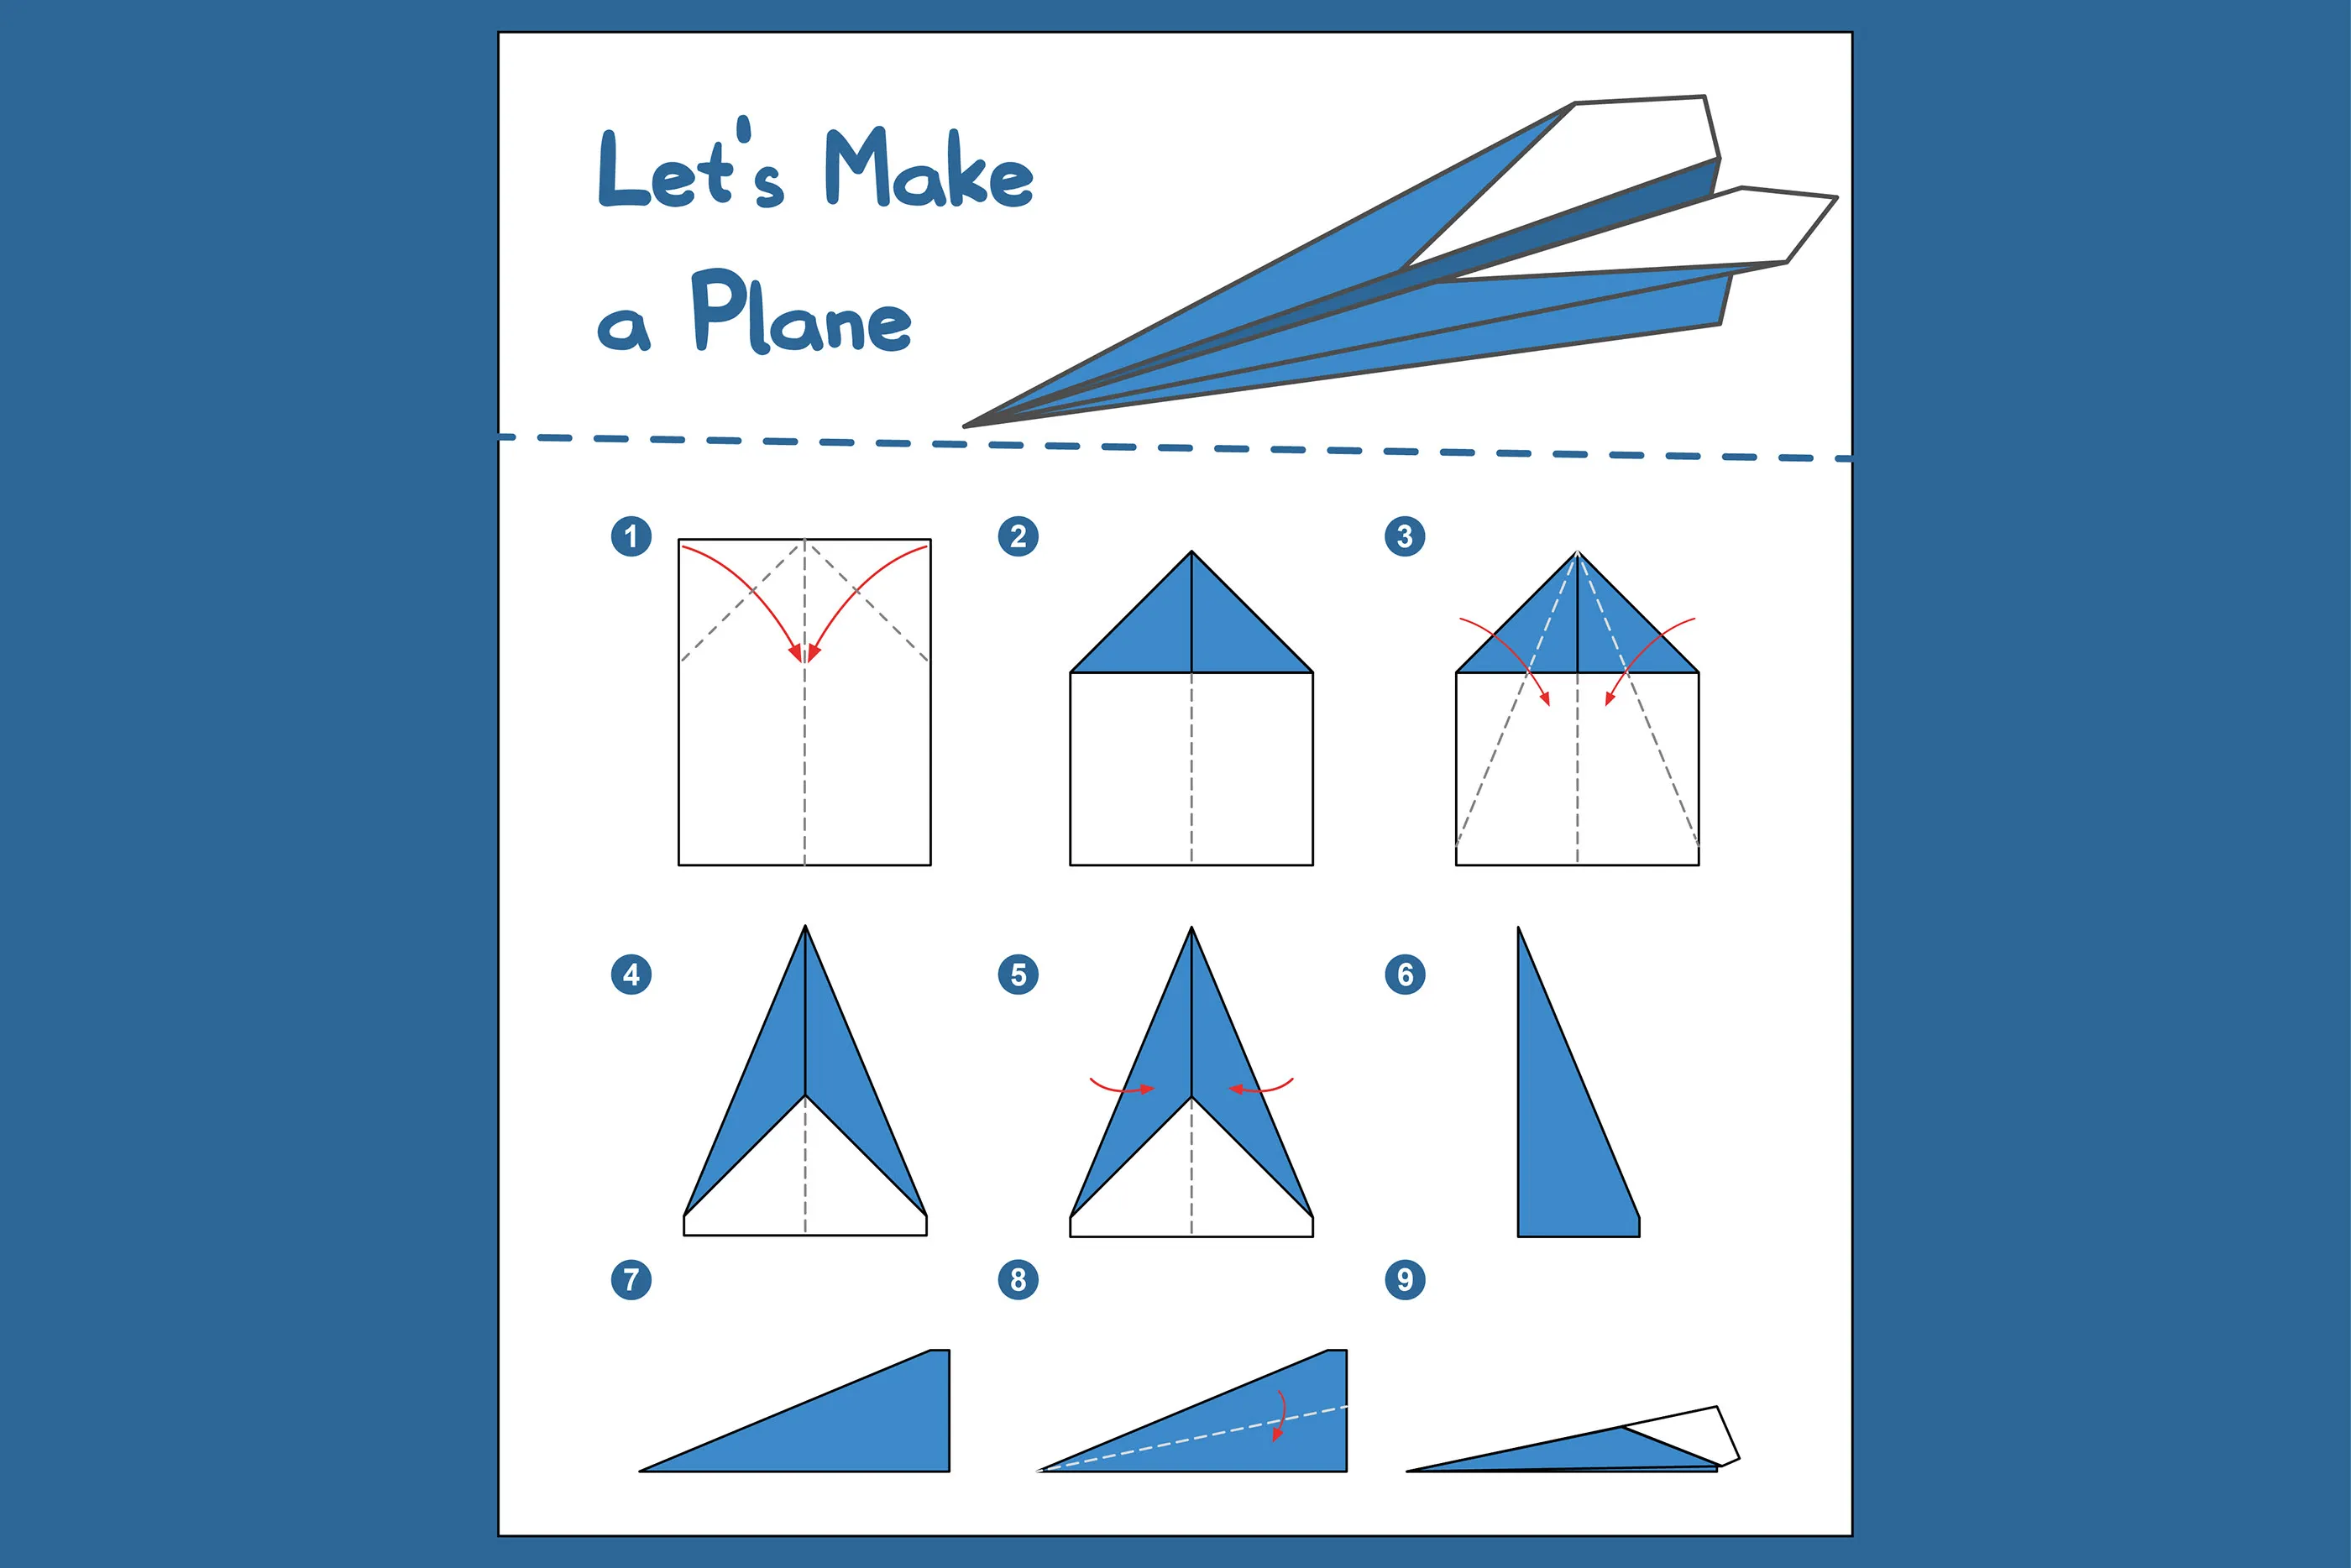
Alright, it’s time to get your hands a little crafty! Folding the paper correctly is crucial for a successful paper aeroplane, and the good news is that it's pretty straightforward. Follow these steps for the perfect fold:
- Start with a Flat Sheet: Lay your paper on a flat surface. Make sure it’s aligned properly, as this will help with even folds.
- Fold in Half: Take the top edge and fold it down to the bottom edge, creating a crease in the middle. This is your center line and will serve as a guide for further folds.
- Unfold and Create the Nose: Open the paper back up, and fold the top corners downward to meet the center line. This will form the nose of your aeroplane.
- Secure the Nose: For added stability, fold the triangle that’s formed at the top down over the previous folds. It should look like a pointy nose now!
- Fold the Wings: Next, fold the sides down to create the wings, making sure they are even and extend out from the body of the plane.
And there you have it! With these steps, you’ll have a beautifully folded paper aeroplane ready to soar. Remember, practice makes perfect, so don’t hesitate to experiment with different designs and folds!
Also Read This: Can You Watch Bally Sports South on YouTube TV?
Step 3: Adjusting the Wings
Now that your paper aeroplane has taken shape, it’s time to focus on the wings. Adjusting the wings can significantly influence how well your aeroplane flies. Here’s what you can do:
- Wing Angle: Slightly bend the tips of your wings upwards, creating a small angle. This can help increase lift. Aim for about a 15-degree angle.
- Wing Width: Make sure your wings are even on both sides. Uneven wings can cause your aeroplane to veer off course.
- Wing Length: If you want a glider that stays in the air longer, consider extending the wings by adding small paper strips on the edges.
To check the stability, hold your aeroplane by the body and gently shake it. The wings should stay aligned without drooping or rising unevenly. Adjust them as needed until they feel balanced. Remember, small tweaks can make a big difference in flight performance!
Also Read This: Educate with Impact: Dynamic Canva Presentations for Teachers
Step 4: Testing Your Aeroplane
With your wings perfectly adjusted, it’s time for the moment of truth: testing your aeroplane! Follow these steps for a successful trial flight:
- Select a Testing Area: Find an open space, preferably outdoors, free from obstacles like trees and power lines. A calm day is ideal!
- Ready for Launch: Hold your aeroplane firmly at the base. Make sure your grip is secure, but not too tight that it crumples the paper.
- The Perfect Throw: Aim your throw at a slight upward angle, about 30 degrees. Use a smooth motion, like you’re tossing a frisbee.
Once you launch it, observe how it flies. Does it soar straight, or does it dive? Take notes on its flight pattern and make adjustments as necessary. Maybe it needs a little more wing lift or redirecting the nose. Testing is all about experimentation, so don’t be afraid to try different throwing techniques!
Also Read This: How to Get Likes on Behance and Increase Engagement with Your Projects
7. Tips for Better Flight
Creating the perfect paper aeroplane is an art, and with a few handy tips, you can enhance its flight performance significantly. Let's dive into some expert suggestions!
- Choose the Right Paper: Lightweight paper works best. Standard printer paper (A4) is a great choice, but you can also experiment with origami paper or cardstock for different effects.
- Perfect Your Folds: Precision is key! Make sure your folds are sharp and even. Use a ruler or the edge of a table to press down on your folds to ensure they are crisp.
- Adjust Wing Shape: The wings play a critical role in flight. For gliding, broader wings are excellent, while for speed, narrower wings are better. Play around with the angle to see what works best!
- Balance is Essential: Ensure that the centre of gravity of your plane is towards the front. You can add small weights like paper clips to the nose to achieve this balance.
- Test and Tweak: Don’t be afraid to make adjustments after your test flights. A slight change in wing position or fold can drastically affect how your plane flies!
- Choose the Right Launch Technique: The way you throw your plane matters. A gentle but firm toss usually gets the best results, so avoid throwing it too hard.
By applying these tips, you’ll be well on your way to mastering the art of paper aeroplane flying. Happy flying!
8. Conclusion
And there you have it! Making a paper aeroplane is not only a fun activity but also a fantastic way to learn about aerodynamics and engineering principles.
Throughout this guide, we've covered:
- The materials you'll need to get started.
- Different folding techniques for various designs.
- How to decorate your plane for a personal touch.
- Essential tips to improve flight performance.
Remember, practice makes perfect! Don’t be discouraged if your first few attempts don’t fly as far or as gracefully as you’d like. Each trial is an opportunity to learn and improve.
So, gather your friends, challenge each other to friendly competitions, and most importantly, have fun! Whether you aim for distance, time aloft, or style, creating and flying paper aeroplanes is a delightful way to embrace creativity and science. Happy soaring!