Creating small roses with paper strips is a delightful craft that combines creativity with a touch of elegance. Whether you want to beautify your home, create unique gifts, or simply enjoy a relaxing afternoon, crafting these roses is an enjoyable and rewarding experience. Paper strip roses are not only stunning but also versatile; they can be used in various decorations, from bouquets to gift wrapping. Plus, the best part is that you can use materials you might already have at home!
Materials Needed for Crafting
Before diving into the creation process, it’s essential to gather all the materials you'll need. Here’s a handy list to ensure you have everything for making your paper strip roses:
- Colorful Paper Strips: You can use colored craft paper, old magazines, or even wrapping paper. Aim for strips about 1 inch wide and 12-18 inches long.
- Scissors: A good pair of scissors is vital for cutting your paper into strips if you’re starting with larger sheets.
- Glue: A glue stick or craft glue will work perfectly to secure your rose's petals together.
- Green Floral Tape or Green Paper: This will be used to create the stem of the rose, giving it a realistic touch.
- Wire (optional): If you want sturdier stems, consider using thin floral wire.
- Pencil or Marker: For outlining any shapes or designs on your paper if needed.
- Ruler: To measure and cut your strips evenly, ensuring a uniform look.
With these materials in hand, you’re all set to embark on your journey of crafting beautiful paper roses. So gather your supplies and let your creativity blossom!
Also Read This: Understanding Ear Rumble and Its Significance in Gaming
Step-by-Step Instructions
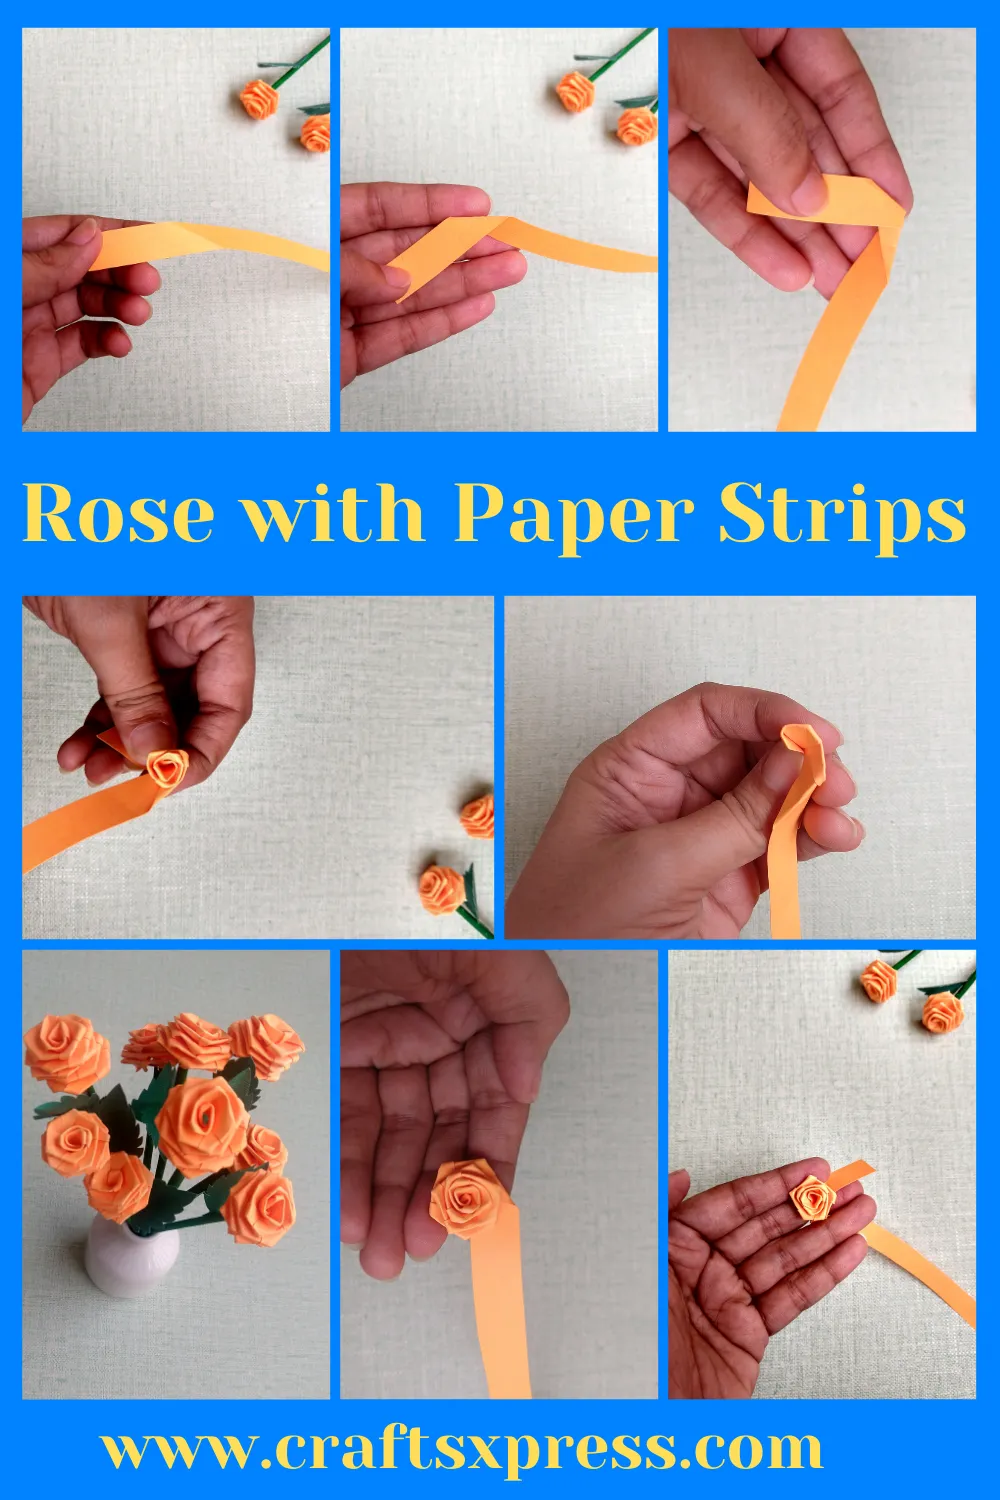
Creating small roses from paper strips is a delightful and easy craft project that anyone can enjoy. Follow these simple steps to make your own beautiful paper roses:
- Gather Your Materials: You'll need colored paper strips (about 1 inch wide), scissors, a glue stick, and a pencil.
- Cut the Strips: If you haven't done so already, cut your paper into strips. Each strip should be around 12 inches long for a small rose.
- Create the Petals: Take one strip and gradually curl it with your fingers to create a petal shape. It helps to start from one end and twist as you go.
- Forming the Rose: Begin by rolling the first petal tightly at the base. This will be the center of your rose. Make sure to hold it securely.
- Adding More Petals: Take your next petal, and wrap it around the center. Apply a bit of glue to secure it in place. Continue adding petals one by one, gluing each as you go. You can use 4-6 strips for a fuller rose.
- Final Touches: Once you’ve added all your petals, adjust their position for a natural look. You can trim any edges if needed.
- Let It Dry: Allow your rose to dry completely before handling it further.
And there you have it! A lovely small paper rose ready to brighten up your home or as a lovely gift!
Also Read This: How to Change Your Website URL in Behance
Tips for Perfecting Your Roses
Creating perfect paper roses can take a little practice, but here are some tips to help you achieve beautiful results every time:
- Choose the Right Paper: Use lightweight paper like craft paper or origami paper. This makes it easier to manipulate and curl.
- Experiment with Colors: Don’t be afraid to mix and match colors. You can create stunning ombre effects by gradually changing shades.
- Vary Petal Sizes: For a more dynamic look, try using strips of varying lengths and widths. Shorter petals can give a fuller appearance.
- Use a Curling Tool: If you want perfectly curled petals, consider using a curling tool or a pencil to get those clean curves.
- Practice, Practice, Practice: The more roses you make, the better you'll become. Each rose will teach you something new!
With these tips, you’ll be on your way to crafting exquisite paper roses that look fantastic and make thoughtful gifts or decorations!
Also Read This: Understanding Telegram's Ban Policies and Why Your Number Might Be Blocked
5. Creative Ways to Use Paper Roses
Paper roses are not just delightful decorations; they can serve multiple purposes, adding a touch of charm to various projects. Here are some creative ways to incorporate your handmade paper roses:
- Home Decor: Use paper roses to adorn your living space. Create a beautiful wall display by arranging them in a shadow box or simply pinning them to a corkboard. They make for stunning focal points!
- Gift Wrapping: Elevate your gift presentation! Attach a paper rose to your gift wrap as a lovely embellishment. It adds a personal touch that store-bought bows simply can't match.
- Table Centerpieces: Design vibrant centerpieces for special occasions like weddings or birthday parties. Arrange them in a vase, combine with greenery, and you’ll create an eye-catching display that guests will admire.
- Cards and Invitations: Add a paper rose to greeting cards or invitations for that extra flair. Whether it’s for a birthday, anniversary, or wedding invitation, it’ll bring a smile to anyone’s face!
- Hair Accessories: Transform your paper roses into stylish hair clips or headbands. They can be the perfect accessory for a wedding or a fun day out.
- DIY Projects: Incorporate paper roses into other crafts, like scrapbooking or making bookmarks. They can add an artistic touch to almost anything!
6. Conclusion
Making small roses with paper strips is not only a fun and engaging craft but also opens up a world of creative possibilities. Whether you want to beautify your home, personalize gifts, or enhance your special events, these charming little flowers can do it all.
So, gather your paper strips and unleash your creativity! Experiment with colors and designs, and don’t forget to share your creations with friends and family. Who knows, you might even inspire them to start their own paper rose journey!
In the end, crafting is about expressing yourself and enjoying the process. Happy crafting!