Friendship bracelets are more than just colorful accessories; they symbolize the bond between friends, capturing moments of joy, creativity, and shared experiences. These charming pieces of art can be customized to reflect your unique style or the tastes of the friend you're making them for. Whether you’re a seasoned crafter or a newbie, making friendship bracelets is a delightful way to express your feelings and strengthen your connections. So, let’s dive into the world of friendship bracelets and discover how you can create your very own masterpiece!
Materials Needed for Making Friendship Bracelets
Before you start weaving your friendship bracelet, gathering the right materials is essential. Here’s a comprehensive list of what you’ll need:
- Embroidery Floss or Thread: Choose vibrant colors to make your bracelet stand out. A typical bracelet uses about 3-6 strands.
- Scissors: For trimming the threads to your desired lengths.
- Tape or Clip Board: This will help secure your work while you braid or knot the threads.
- Measuring Tape: To cut your threads to the right length; typically, you want each strand to be about 24-30 inches long.
- Beads (optional): Adding beads can enhance your bracelet’s design. Consider using letter beads for personalization.
- Ruler: Useful for measuring and cutting threads accurately.
Once you have all your materials in hand, you’re ready to embark on your friendship bracelet-making journey. Remember, the most important ingredient is your creativity and love for your friends!
Also Read This: What Happened to iStock Contributor Information Updates and Insights
3. Step-by-Step Instructions
Creating friendship bracelets can be a fun and rewarding activity! Follow these simple steps to craft your very own bracelet:
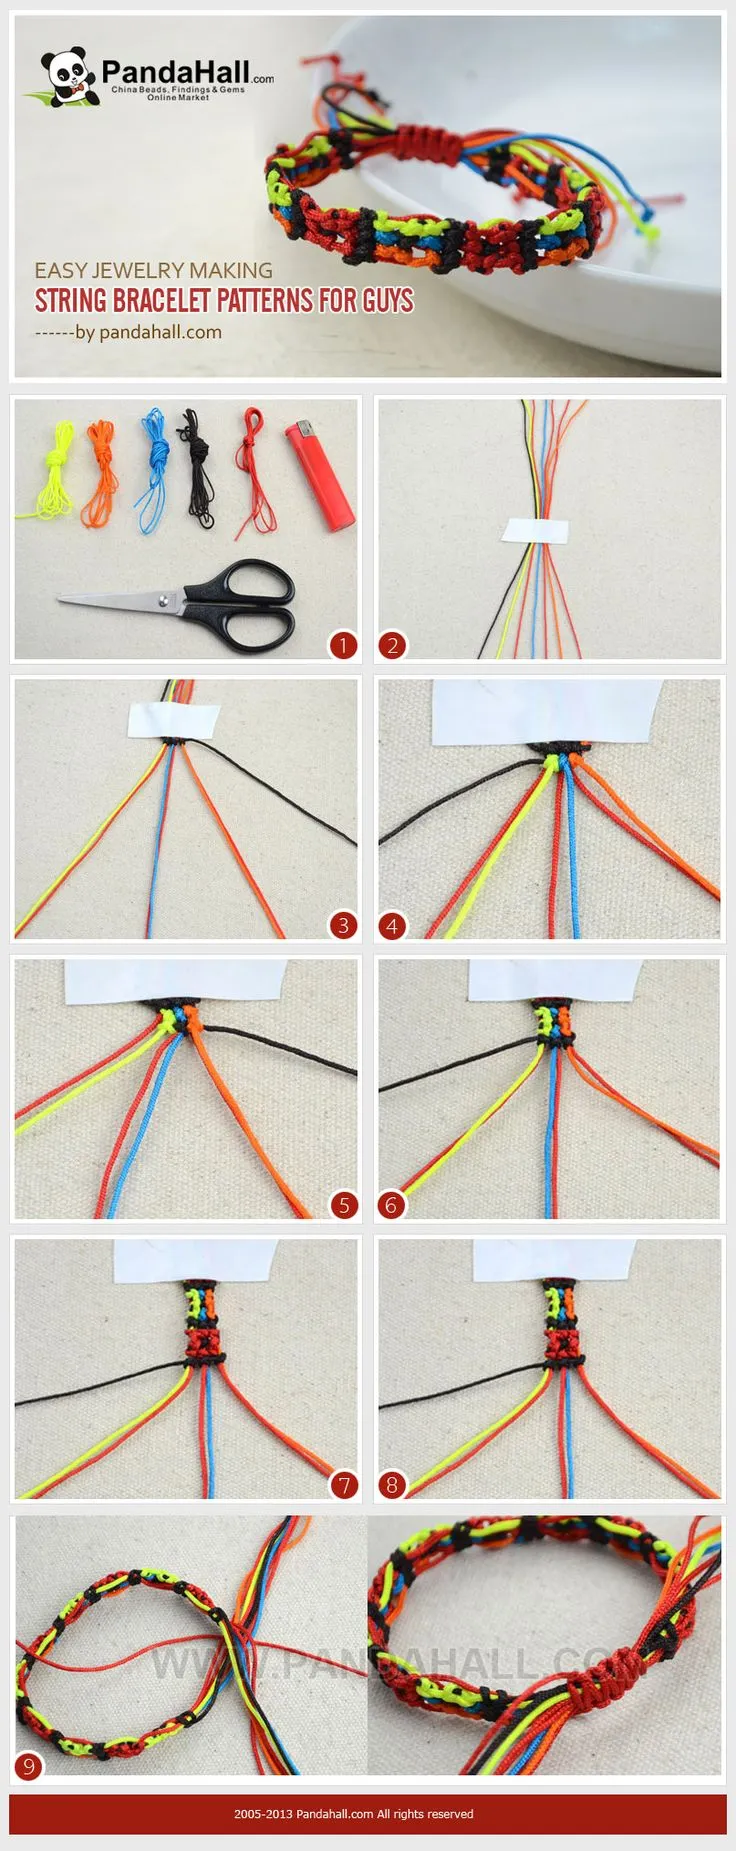
- Gather Your Materials: You'll need embroidery floss, scissors, and tape or a clipboard. Pick vibrant colors that represent your friendship!
- Cut Your Floss: Cut strands of floss about 24 inches long. For a basic bracelet, 3 to 6 strands work well. Remember, the more strands you use, the wider your bracelet will be.
- Arrange the Strands: Line up the strands in the order you prefer. This is where your creativity can shine! Make sure to tie a knot at the top, leaving about an inch of space.
- Secure Your Bracelet: Use tape to secure the knot to a flat surface or clip it onto a clipboard. This will hold it in place while you work.
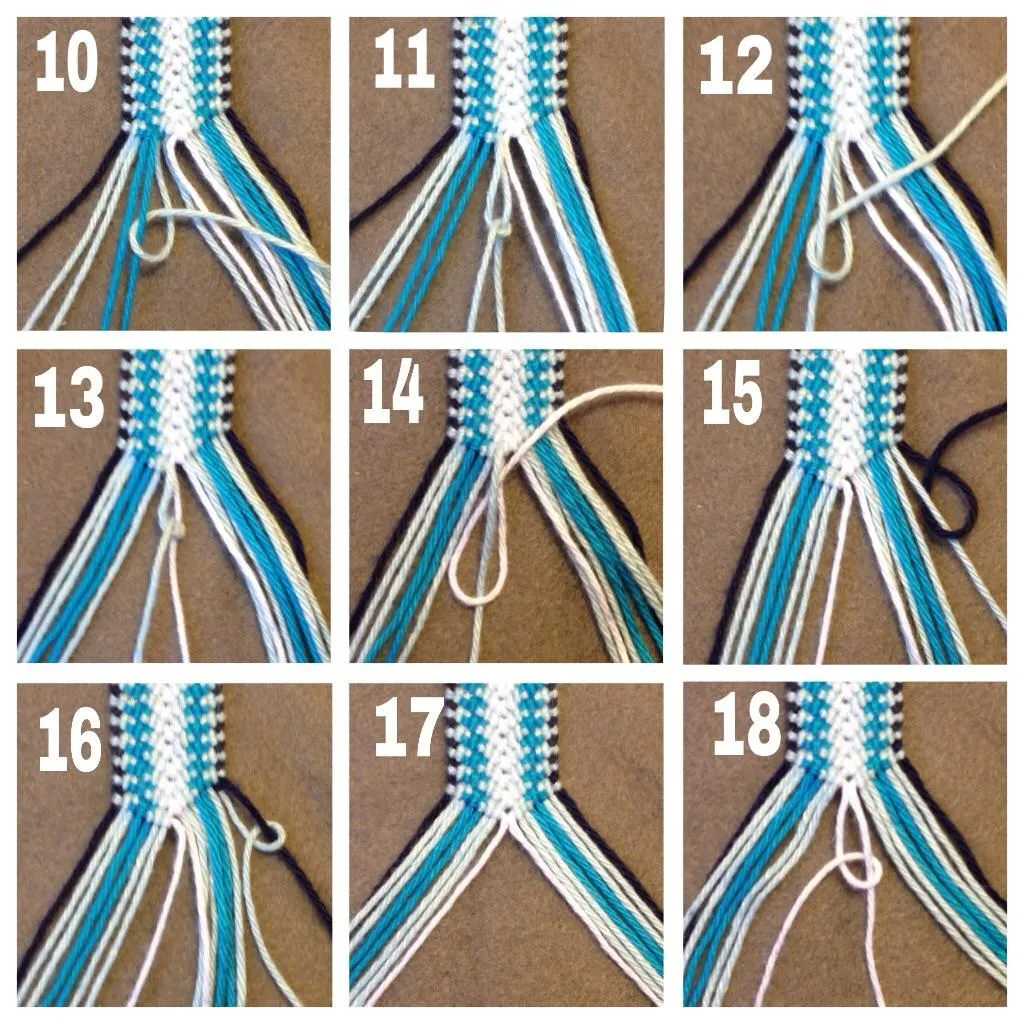
- Start Braiding or Knotting: If you’re using the basic knotting technique, take the leftmost strand and make a “4” shape over the next strand, then pull it through the loop. Pull tight! Repeat this with each strand.
- Keep Knotting: Continue this knotting method until you reach your desired length, usually around 6-8 inches.
- Finish Off: Once complete, tie a knot to secure the end. Cut off any excess floss, leaving about half an inch.
- Wear and Share! Tie the bracelet around your wrist, and don’t forget to gift one to your friend. They’ll cherish it forever!
Also Read This: Signing in to LinkedIn as a Guest
4. Different Patterns and Designs to Try
Ready to take your friendship bracelets to the next level? Here’s a selection of fun patterns and designs that you can try:
- Basic Knot Pattern: This is your standard go-to. It’s simple and perfect for beginners!
- Chevron Pattern: Create a V-shaped design by alternating colors. It adds a stylish twist to your bracelets.
- Diamond Pattern: This intricate design involves creating diamond shapes with alternating colors. It’s a bit more challenging but very rewarding!
- Heart Pattern: Perfect for friends! This design forms a heart shape, making it a lovely symbol of your bond.
- Braided Design: Incorporate a braiding technique for a thicker, more textured look. Experiment with different colors for a vibrant effect!
Here’s a quick comparison table to help you choose:
| Pattern | Difficulty Level | Best For |
|---|---|---|
| Basic Knot | Easy | Beginners |
| Cheron | Medium | Stylish Friends |
| Diamond | Hard | Advanced Crafters |
| Heart | Medium | Gift Giving |
| Braided | Medium | Textured Designs |
Feel free to mix and match these designs or even create your own. The possibilities are endless, and it's all about expressing your unique style!
Also Read This: Why OK.ruâs Video Library Is One of Its Most Exciting Features
5. Tips for Making Your Friendship Bracelets Last
Creating friendship bracelets is not just about the fun of making them; it’s also about ensuring they last as a token of your friendship. Here are some tips to help your bracelets withstand the test of time:
- Choose the Right Materials: Opt for durable threads like embroidery floss or nylon. These materials are less prone to fraying and breaking.
- Secure Your Knots: Use double knots when finishing your bracelet. This ensures that it won’t unravel easily.
- Avoid Excessive Moisture: Water can weaken your threads. If you’re wearing your bracelet during activities like swimming or washing hands, take it off to keep it in good condition.
- Store Properly: When not wearing your bracelet, store it in a cool, dry place. Avoid rolling or folding it tightly, as this can cause creasing.
- Limit Exposure to Chemicals: Lotions, perfumes, and cleaning agents can damage the threads. It’s best to apply these products before putting on your bracelet.
By following these tips, you can ensure that your friendship bracelets stay vibrant and intact, symbolizing the bond you share with your friends for a long time.
6. Conclusion and Sharing Your Creations
Making friendship bracelets is a delightful activity that not only expresses creativity but also strengthens bonds with friends. Once you’ve crafted your bracelets, don’t keep them to yourself! Here are a few ideas on how to share your creations:
- Social Media: Share pictures of your finished bracelets on platforms like Instagram or Pinterest. Use hashtags like #FriendshipBracelets to connect with other crafters.
- Host a Bracelet-Making Party: Invite friends over for a fun crafting session. Everyone can make their own bracelets and share tips.
- Create a Bracelet Exchange: Organize an event where friends can swap bracelets. This adds a personal touch and diversifies your collection!
- Showcase in Local Craft Fairs: If you’re up for it, consider displaying your bracelets at local fairs. Not only will you share your work, but you may also inspire others!
In the end, the joy of making and sharing these bracelets lies in the memories and connections they represent. So, gather your materials, unleash your creativity, and let the friendship bracelets speak your heart!