Behance is a platform where creative professionals showcase their work. It's a great place to connect with other artists and potential clients. Whether you're a graphic designer, photographer, or illustrator, Behance allows you to present your projects in a visually appealing way. The platform also offers feedback and appreciation features, making it a supportive community for creatives.
Preparing Your Project for Upload
Before you hit that upload button, it's crucial to prepare your project properly. This preparation will help your work stand out and attract attention. Here’s how you can get ready:
- Choose Your Best Work: Select projects that showcase your skills and creativity. Quality matters more than quantity.
- Organize Your Files: Make sure your images, videos, or other materials are organized and easy to access.
- Create a Compelling Description: Write a brief overview of your project, explaining its purpose and your creative process.
- Gather Feedback: If possible, get input from friends or colleagues before uploading. Fresh eyes can spot issues you might miss.
By following these steps, you’ll ensure your project is well-prepared for a successful upload.
Also Read This: Complete Guide to Installing a Dorman 924 091 Panel on YouTube
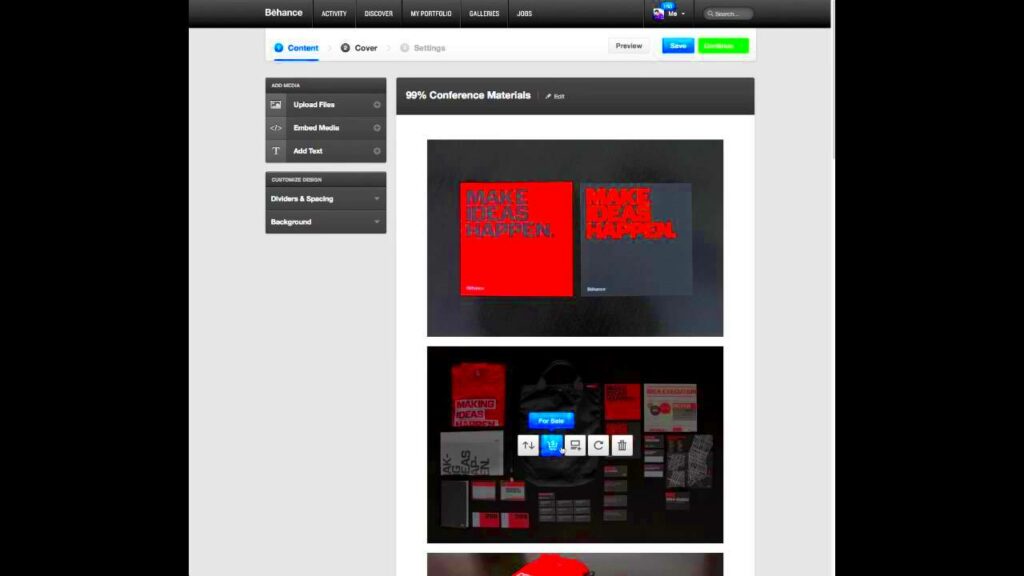
Steps to Upload Your Project on Behance
Uploading a project on Behance is straightforward. Just follow these steps:
- Log into Your Behance Account: If you don’t have an account, you’ll need to create one first.
- Click on the “Create a Project” Button: This option is typically located in your profile menu.
- Upload Your Files: You can drag and drop files or browse your computer. Behance supports various formats, including images, videos, and PDFs.
- Add Titles and Tags: Give your project a catchy title and use relevant tags to help people find it.
- Write a Detailed Description: Explain your project. Include your thought process and any challenges you faced.
- Customize Settings: Choose whether you want your project to be public or private and select any other settings as needed.
- Preview Your Project: Make sure everything looks good before you publish.
- Hit “Publish”: Once you’re satisfied, click the publish button to make your project live.
And there you have it! Following these steps will ensure that your project gets the attention it deserves on Behance.
Also Read This: How to Chromecast from Dailymotion for Seamless Streaming
Adding Project Details and Descriptions
Once you've uploaded your project to Behance, the next step is to add important details and descriptions. This part is crucial because it helps viewers understand your work better. A well-written description can grab attention and make your project more engaging. Here are some tips on how to do it effectively:
- Be Clear and Concise: Start with a brief overview of your project. What is it about? What inspired you?
- Explain Your Process: Share insights into your creative process. This could include your research, techniques used, or any challenges you faced.
- Use Visuals: If possible, include behind-the-scenes images or sketches to give viewers a glimpse into your workflow.
- Highlight Key Features: If your project has standout elements, make sure to mention them. This could be unique design choices, colors, or materials.
- Invite Feedback: Encourage viewers to leave comments or questions. This interaction can lead to valuable connections.
By carefully crafting your project details and descriptions, you’ll not only inform your audience but also create a more engaging experience for them.
Also Read This: Exploring the Characters and Abilities in My Hero Ultra Rumble
Customizing Your Project Settings
Customizing your project settings on Behance is an essential step to ensure that your work reaches the right audience. Behance offers various options that can enhance your project’s visibility and engagement. Here’s how to customize effectively:
- Set Privacy Options: Choose between public or private visibility. A public project allows everyone to see your work, while private projects are only viewable to selected people.
- Select Appropriate Tags: Tags are important for searchability. Use relevant tags that describe your project’s theme, style, and medium.
- Choose a Cover Image: Select an eye-catching cover image that represents your project well. This image is the first thing viewers will see.
- Link Related Projects: If you have other projects that relate to the one you’re uploading, link them. This encourages viewers to explore more of your work.
- Enable or Disable Comments: Decide if you want feedback on your project. Enabling comments can foster interaction with your audience.
Customizing these settings ensures that your project is not only attractive but also reaches the right people.
Also Read This: Why Is YouTube Screen Small on TV and How to Fix Display Problems on Smart TVs
Reviewing and Finalizing Your Project
Before you publish your project on Behance, it's crucial to review and finalize it. This final step helps you catch any mistakes and ensures your project shines. Here’s how to effectively review your project:
- Check for Typos: Read through your descriptions and details carefully to catch any spelling or grammatical errors.
- Preview Your Project: Use the preview feature to see how your project will look once published. Make sure everything appears as you want it.
- Gather Feedback: If you have time, ask a friend or colleague to review your project. Fresh eyes can provide helpful insights.
- Adjust Visual Elements: Ensure your images and videos are in the correct order and that they load properly.
- Final Touches: Add any last-minute changes or enhancements to your project. This could be additional images or a refined description.
Taking the time to thoroughly review your project before publishing can make a significant difference in how it’s received by your audience. Once you're satisfied, hit that publish button and share your creativity with the world!
Also Read This: Can You Subscribe to YouTube Using a Yahoo Account
Sharing Your Uploaded Project
Now that your project is uploaded and polished, it's time to share it with the world! Sharing your work effectively can significantly increase its visibility and engagement. Here are some strategies to help you promote your project:
- Social Media Platforms: Share your project on social media channels like Instagram, Facebook, and Twitter. Use engaging captions and relevant hashtags to reach a broader audience.
- Networking Groups: Join creative communities and groups related to your field. Share your project there and ask for feedback. This can also help you connect with potential collaborators.
- Email Newsletters: If you have an email list, consider sending a newsletter to your subscribers featuring your new project. Include images and a brief description to entice them to view it.
- Behance Community: Engage with other creatives on Behance by liking and commenting on their projects. They may return the favor and check out your work.
- Link to Your Project: If you have a personal website or blog, create a post about your project and include a link to it. This drives traffic from different sources back to your Behance profile.
By actively sharing your project, you'll increase its chances of being seen and appreciated by a wider audience.
Also Read This: How to Download Licensed Images from Adobe Stock and Ensure Legal Use
FAQs About Uploading a Project on Behance
As you navigate the Behance platform, you may have questions about uploading projects. Here are some frequently asked questions that can help you out:
| Question | Answer |
|---|---|
| What file formats can I upload? | Behance supports various formats including JPG, PNG, GIF, and MP4 for videos. |
| Can I edit my project after publishing? | Yes, you can edit your project at any time by going to your project settings. |
| How do I make my project private? | You can select the privacy option during the upload process or edit it later in your project settings. |
| Is there a limit on the number of projects I can upload? | No, you can upload as many projects as you like on Behance. |
| How can I get more views on my project? | Engage with the Behance community, share your project on social media, and use relevant tags to improve visibility. |
These FAQs can help clarify some common concerns and make your experience on Behance smoother.
Conclusion on Uploading Projects Successfully
Uploading a project on Behance is an exciting opportunity to showcase your creativity and connect with other professionals. By understanding the platform, preparing your project, and following the steps to upload, you set yourself up for success. Remember to add detailed descriptions, customize your settings, and share your work widely. Engaging with the community and responding to feedback can also enhance your experience and lead to new opportunities.
With these tips and strategies in mind, you’re now ready to upload your projects and let your creativity shine on Behance. Happy sharing!