Canva is a fantastic tool for creating beautiful designs, and one of its most useful features is the ability to attach images to shapes. Whether you're working on a personal project or a professional design, this feature allows you to frame your images in unique ways. It’s not just about placing pictures inside shapes—it’s about creating visual interest that can make your design stand out. If you're unfamiliar with how this works, don’t worry! We’ll walk through everything step-by-step to help you get the most out of Canva’s shape feature.
How to Attach an Image to a Shape in Canva
Attaching an image to a shape in Canva is a simple and straightforward process. Here’s a step-by-step guide to help you get started:
- Open a new design: First, choose your template or create a custom size canvas for your design.
- Choose a shape: On the left panel, select "Elements" and scroll down to the "Shapes" section. Choose the shape you’d like to use.
- Resize the shape: Drag the edges of the shape to adjust its size according to your design needs.
- Insert your image: Drag an image from your uploads or the Canva image library onto the shape. The image will automatically attach itself to the shape.
- Adjust the image within the shape: Double-click the shape to reposition or resize the image inside it to fit perfectly.
This process makes it easy to get creative with your designs, adding a unique flair to your visuals.
Also Read This: Promoting work on Behance
Benefits of Using Canva's Shape Feature

Canva’s shape feature offers several advantages when working on designs:
- Enhanced creativity: Shapes give you the ability to frame your images in exciting ways, boosting the visual appeal of your designs.
- Time-saving: Instead of using advanced editing software, Canva’s simple drag-and-drop method lets you achieve professional-looking designs in minutes.
- Consistency in design: You can create cohesive visuals by using shapes repeatedly, ensuring your design elements match and flow together.
- Customizability: Shapes are flexible; you can resize, rotate, and adjust them to suit your project’s needs, offering total creative control.
With the shape feature, even those without design experience can craft visually appealing graphics quickly and easily.
Also Read This: Optimal Posting Frequency on Behance
Step-by-Step Guide to Image Masking in Canva
Image masking in Canva allows you to blend your images into shapes in a more dynamic way, offering endless creative possibilities. Whether you’re crafting a poster, social media post, or even a presentation slide, mastering this feature can elevate the overall aesthetic of your design. Let’s walk through how to mask an image in Canva.
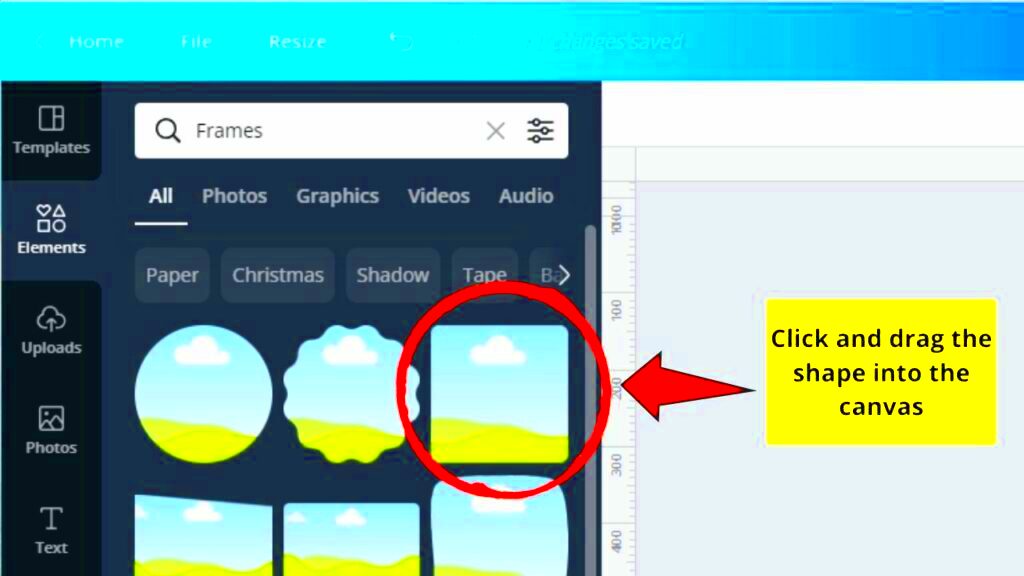
- Select a shape or frame: First, navigate to the "Elements" tab on the left side of the Canva editor. You can choose from shapes or frames, depending on the effect you want. Frames are ideal for complex designs.
- Add your image: Once your shape or frame is selected, upload your image or use one from Canva’s extensive image library. Drag the image into the shape or frame, and it will automatically fit within the selected element.
- Adjust the positioning: Double-click the image within the shape to adjust its size and position. You can zoom in, rotate, or move the image until it fits perfectly inside the shape.
- Fine-tune with filters: To add a personal touch, apply filters, brightness, or contrast settings to enhance your image after it's masked within the shape. These options are available in the top toolbar once you’ve clicked the image.
- Save or export: Once satisfied with your design, click the download button to export it in your desired format (JPG, PNG, or PDF).
Image masking in Canva is an easy yet powerful tool to add sophistication to your designs without needing advanced graphic design skills.
Also Read This: Canva Image Width and Height Adjustment
Common Mistakes and How to Avoid Them
Even though Canva makes image masking and using shapes simple, it’s still easy to make a few common mistakes. Being aware of these will help you avoid frustrating outcomes.
- Incorrect image size: One of the most common mistakes is using an image that’s too small for the shape. This leads to pixelation when the image is stretched. Always choose high-resolution images to avoid this issue.
- Poor alignment: If your image isn’t properly aligned within the shape, it can look awkward. Double-click the image to adjust its position and ensure it’s centered or placed as intended.
- Overcrowding your design: Using too many shapes or images in one design can create visual clutter. Stick to a minimal approach to ensure your design remains clean and professional.
- Ignoring brand consistency: If you’re working on a professional project, it’s crucial to ensure that the shapes, colors, and overall aesthetic match your brand’s identity.
Avoiding these mistakes can save you time and ensure that your designs look polished and professional.
Also Read This: Maximize Your Earnings on Rumble
Best Practices for Creative Designs with Shapes
Using shapes creatively can transform a simple design into something eye-catching. Whether you’re framing an image, adding icons, or creating unique layouts, following some best practices will help you make the most of Canva’s shape features.
- Balance shapes and images: Use shapes to guide the viewer’s eye. For example, place important information within shapes to make it stand out, but ensure there’s enough space around the elements for the design to breathe.
- Play with transparency: Adjusting the transparency of shapes allows you to create layered effects, which can add depth to your design. This is particularly useful for backgrounds or subtle highlights.
- Stick to a color palette: Choose shapes that align with your design’s color scheme to maintain visual harmony. Canva offers built-in color palettes, but you can also customize your own.
- Combine shapes for custom designs: Don’t limit yourself to just one shape. You can combine multiple shapes to create custom icons, layouts, or even logos. Experiment with layering, rotations, and resizing to get unique results.
By following these practices, you can add a creative touch to your designs, making them more engaging and professional-looking.
Also Read This: How to Display a GIF on Behance
Alternatives to Canva for Image Masking
While Canva is a popular choice for image masking due to its simplicity and ease of use, there are other tools available that offer different features or more advanced options. Whether you’re looking for more flexibility, specific design capabilities, or just a different platform, here are some alternatives to consider.
- Adobe Photoshop: Photoshop is the go-to software for professional designers. It offers advanced masking tools, layer control, and precise editing options. If you need detailed control over your design, Photoshop is a top choice, though it comes with a learning curve.
- Figma: Figma is an excellent tool for UI/UX designers, offering features like masking, vector editing, and collaborative design. It’s cloud-based, so multiple team members can work on the same project in real time.
- Pixlr: If you’re looking for a browser-based tool with more advanced editing options than Canva, Pixlr is a great alternative. It has layers, masks, and many of the features found in professional software, without the need to install anything.
- Crello (now VistaCreate): Similar to Canva in terms of ease of use, VistaCreate offers design templates, image masking, and a variety of visual assets. It’s ideal for social media graphics, presentations, and more, making it a good Canva alternative for simple tasks.
- GIMP: GIMP is a free, open-source image editor that offers advanced masking features similar to Photoshop. It’s a great option if you’re looking for powerful software without the cost.
Each of these tools has its strengths and caters to different user needs. Depending on your level of expertise and specific design requirements, one of these alternatives may be better suited for your projects.
Also Read This: Removing YouTube from Your Smart TV for a Streamlined Experience
Frequently Asked Questions
Here are some common questions users have about attaching images to shapes in Canva, along with brief answers to help you navigate this feature:
- Can I edit an image after attaching it to a shape?Yes, you can double-click the image within the shape to reposition, resize, or zoom in and out. Canva allows you to fine-tune the image to fit perfectly within the shape.
- Are there limitations on the types of shapes I can use?Canva offers a wide range of shapes, from basic geometric forms to more complex frames. You can use any of these to attach your images, and you can resize or adjust them as needed.
- Can I use Canva’s shape feature for free?Yes, many of Canva’s basic shapes and features are available in the free version. However, some premium shapes and additional design options may require a Canva Pro subscription.
- How do I remove an image from a shape?To remove an image, simply select the shape and hit the delete key, or drag a new image into the shape to replace the old one.
- Can I attach multiple images to a single shape?No, each shape in Canva can hold only one image. However, you can use multiple shapes to create a collage effect with different images.
Final Thoughts on Canva Image Attachment to Shape
Canva’s image attachment to shape feature is a simple yet powerful tool for designers of all skill levels. Whether you’re creating content for social media, designing a presentation, or working on a personal project, this feature allows you to enhance your visuals with ease. Its flexibility and ease of use make it ideal for beginners, while its creative potential continues to appeal to more advanced users.
By following the steps and tips outlined in this guide, you can unlock more creative freedom in your designs. And if Canva isn’t the right tool for your specific needs, there are plenty of alternatives available, each with its own unique features.
In the end, whether you’re using Canva or exploring other platforms, attaching images to shapes adds a professional touch that can elevate your design. Experiment with different shapes, images, and layouts to see what works best for your creative vision.