Canva has transformed the process of image creation and editing by making design tools available to all. As someone who loves crafting narratives through visuals I was particularly intrigued by the idea of blending images. It's an artistic approach that lets you merge two pictures together, fusing their distinct attributes into a work of art. This method goes beyond just looking good; it aims to stir feelings and convey a story through imagery. Whether you're aiming to produce eye catching visuals for social media or create exquisite prints grasping the art of blending images in Canva unveils a realm of opportunities.
Understanding the Basics of Image Blending
Before getting into the steps of merging images it's important to understand the core concepts. Image blending entails stacking two or more images on top of each other and modifying their opacity and placement to achieve a smooth transition. Here are a few key ideas to remember.
- Layers: Each image you add becomes a layer. You can arrange them in different orders to achieve various effects.
- Opacity: Adjusting the opacity helps control how much of the underlying image is visible. Lowering the opacity can create soft blends.
- Blending Modes: These modes change how colors in the images interact with each other, allowing for creative effects.
Once you have a good grasp of these fundamentals, the possibilities for creativity in your designs are limitless.
Also Read This: Create Personalized Spotify Wrapped Templates with Canva
Steps to Blend Two Images in Canva
Merging two pictures in Canva is an easy task that can greatly enhance your designs. Follow these steps to master this skill:
- Log into Canva: Open Canva and either create a new design or select an existing one.
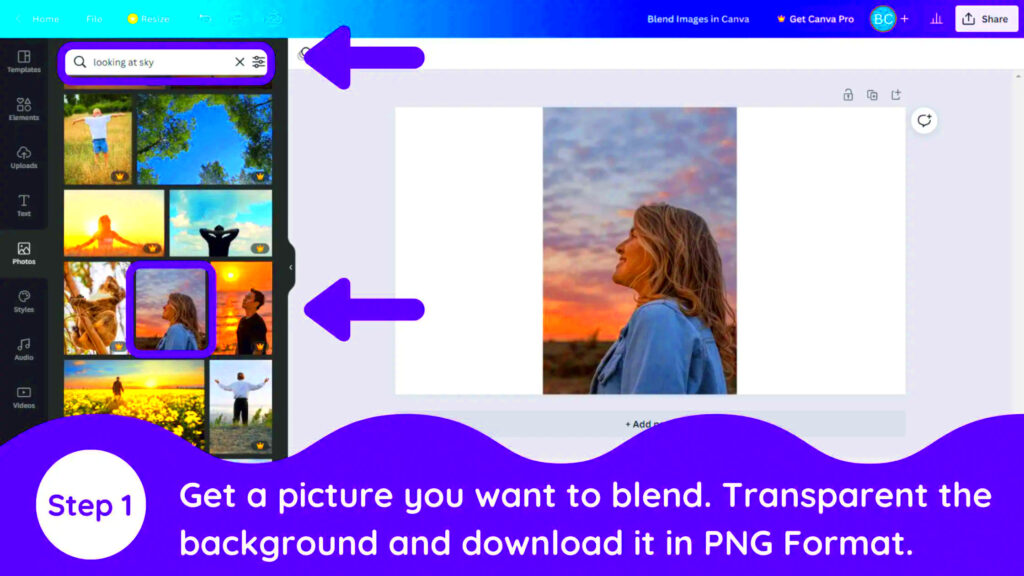
- Upload Your Images: Click on the “Uploads” tab on the left side and upload the two images you want to blend.
- Add Images to Canvas: Drag both images onto the canvas. Position them as you like, ensuring they overlap slightly.
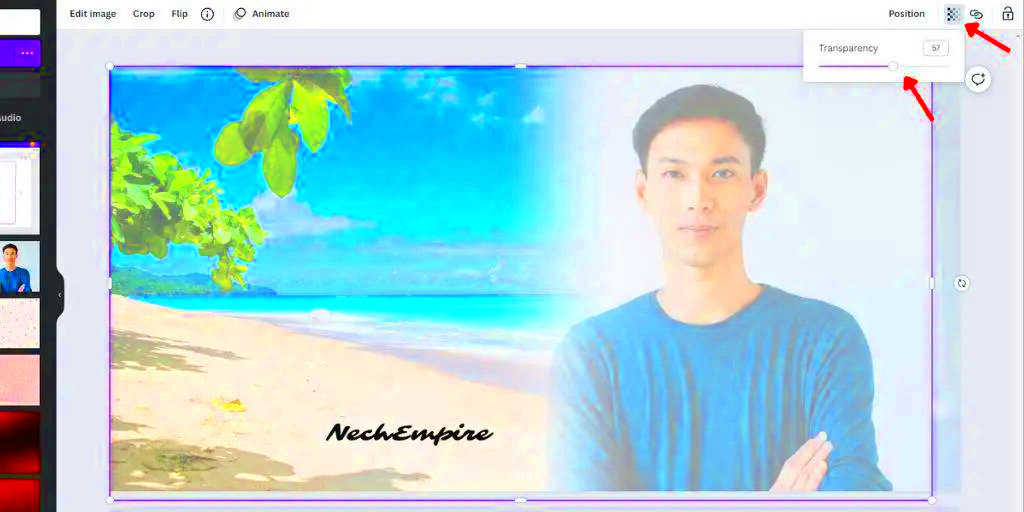
- Adjust Opacity: Select the top image, click on the transparency icon (checkerboard), and adjust the opacity slider to see the bottom image blend through.
- Experiment with Blending Modes: With the top image selected, click on the “Effects” tab and explore blending modes to find the one that enhances your design.
- Fine-tune Your Design: Move and resize the images as necessary to achieve your desired look.
- Save and Share: Once satisfied with your design, click on the download button to save your blended image. Share it on your preferred platform!
By going through these steps you’ll discover that merging pictures in Canva is a fun and fulfilling process. Every creation showcases a glimpse of your artistic individuality adding an extra touch of uniqueness to it.
Also Read This: CoryxKenshin's Future on YouTube: What You Need to Know
Tips for Achieving a Perfect Blend
Crafting the mix of visuals is akin to whipping up a tasty recipe it takes the ingredients and some practice. Throughout the years I’ve picked up a few tricks that have improved my designs in Canva. Here’s what I’ve discovered to work well.
- Choose Complementary Images: The first step is to select images that work well together. Think about the colors, themes, and emotions they convey. For instance, if one image is bright and cheerful, try blending it with another that has softer tones.
- Play with Color Harmony: Make sure the colors of your images complement each other. You can use color palettes to guide your choices. Websites like Coolors.co can help you find harmonious colors that enhance your blend.
- Adjust the Position: The placement of your images is crucial. Don’t hesitate to move them around until they feel just right. Sometimes, a slight shift can change the entire feel of the blend.
- Utilize Filters: Canva offers various filters that can help unify the look of your images. Applying the same filter to both images can create a consistent tone, making them blend more seamlessly.
- Trust Your Instincts: Finally, trust your creative instincts. If something feels off, don’t hesitate to experiment until it looks good to you. Design is personal, and what resonates with you might be different from others.
Keep in mind that mixing is a creative endeavor. Embrace the journey and dont hesitate to stumble and make errors during the process. Every try brings you closer to honing your abilities.
Also Read This: How to Change and Upload Your Facebook Profile Picture
Common Mistakes to Avoid While Blending Images
When I began merging pictures I stumbled quite a bit. Now with hindsight I can pinpoint some typical traps that newcomers often fall into. Here are a few to be cautious of.
- Overlapping Too Much: While blending involves layering, overlapping images excessively can make your design look cluttered. Instead, find a balance that allows each image to shine.
- Ignoring the Background: The background plays a vital role in blending. Using a busy or distracting background can take attention away from your images. Consider using a solid color or a subtle pattern.
- Forgetting to Adjust Opacity: A common mistake is neglecting to adjust the opacity. Too high, and your images may clash; too low, and the blend loses its impact. Finding the right balance is key.
- Not Experimenting: Sticking rigidly to your initial idea can stifle creativity. Don’t be afraid to try different combinations and adjustments. Sometimes, the best designs emerge from unexpected changes.
- Neglecting Details: Small details matter. Make sure to check for any edges or lines that look unnatural after blending. Spending a little extra time on these can significantly enhance the overall quality.
By paying attention to these errors you can enhance your blending abilities and produce images that are more refined and visually pleasing. Keep in mind that even seasoned designers encounter obstacles along the way; it’s an aspect of the creative process.
Also Read This: How to Announce Your Career Milestones Effectively on LinkedIn
Creative Ideas for Using Blended Images
Once you become proficient in merging pictures the potential is limitless. From what I've seen incorporating blended visuals can bring a touch to different endeavors. Here are a few imaginative concepts to spark your creativity.
- Social Media Posts: Blended images can make your social media posts stand out. Use them to highlight a theme or create a visually appealing narrative.
- Event Invitations: Whether it’s a wedding, birthday, or corporate event, blending images can add a personal touch to your invitations. Combine images of the venue with personal photos for a heartfelt design.
- Website Banners: If you run a blog or an online store, consider using blended images for your website banners. They can create an engaging first impression and draw visitors in.
- Wall Art: Blended images can be transformed into stunning prints for your home. Create a unique piece of art by combining favorite travel photos or cherished memories.
- Educational Materials: If you’re an educator or content creator, blending images can enhance your materials. Use them to create infographics or visually appealing presentations that captivate your audience.
Here are some ideas for adding images to your work. The important thing is to unleash your imagination and enjoy the process of experimenting with this art form. Each blend will reveal fresh avenues, for self expression.
Also Read This: How the Rumbling Begins in Attack on Titan
FAQs about Canva Two Image Blending
When I started exploring image blending using Canva I found myself with a lot of questions. It’s natural to feel somewhat disoriented, when embarking on a new endeavor. To assist in clearing up some of the uncertainties I’ve put together a collection of commonly asked questions that may reflect your own experience.
- Can I blend more than two images in Canva?
Absolutely! While the focus is often on blending two images, you can layer multiple images together. Just remember to keep an eye on the composition to avoid a cluttered look. - What if my images don’t blend well together?
Not every image will blend perfectly, and that’s okay. Try adjusting the opacity or experimenting with different blending modes. Sometimes, the right combination takes a bit of trial and error. - Are there specific image formats that work best?
In Canva, JPG and PNG formats are widely used for image blending. PNGs are great for images with transparency, allowing for smoother blends. Always check the quality of your images to ensure the best results. - How can I improve my blending skills?
Practice is key! Spend time experimenting with different images, techniques, and styles. Watching tutorials or joining online design communities can also provide valuable insights and inspiration. - Is there a limit to how much I can blend?
While there’s no hard limit, it’s essential to maintain a balanced composition. Overdoing it can overwhelm the viewer. Focus on clarity and purpose in your designs.
These frequently asked questions can help you navigate the realm of blending images. Keep in mind that every artist has to begin and your inquiries are an essential part of the journey.
Conclusion and Final Thoughts
As I conclude this exploration of CanvAs image blending capabilities I encourage you to embark on your own creative endeavors. Merging images not enriches your design abilities but also offers a way to tell your own story. Through every blend you’ll uncover methods tackle obstacles and evolve as a designer. So gather your images let your imagination run wild and relish the journey of blending!