When I began using Canva I was taken aback by the sheer number of image size options. It felt similar to standing before an expanse of water unsure of where to plunge in. Each platform and purpose necessitates an image size and grasping these measurements is vital, for giving your designs a polished appearance. Whether you're crafting a media post a brochure or a presentation being aware of the size guarantees that your work shines and effectively communicates its intended message.
Canva provides a range of templates to cater to various requirements simplifying the process of selecting the appropriate size. However there are instances when we require dimensions and that's when being aware of image sizes proves valuable. For instance when I was tasked with designing an image for a wedding invitation I was pleasantly surprised to discover that Canva permitted me to enter precise dimensions. This versatility enabled me to create a piece that seamlessly, fit into the envelopes.
To put it simply grasping image dimensions is beneficial for
- Ensuring clarity and quality
- Avoiding unnecessary cropping
- Making designs visually appealing
Exploring Recommended Sizes for Social Media Posts
Social media is like a busy market place where eye catching visuals can make or break how your brand is seen. I often catch myself scrolling through my feeds and noticing how a perfectly sized image can grab my attention while an image that doesn't fit well gets drowned out. In the sea of content. Each platform has its own size guidelines that are worth remembering.
Here are some of the standard image sizes:
| Platform | Image Size |
|---|---|
| Instagram Post | 1080 x 1080 pixels |
| Facebook Cover | 820 x 312 pixels |
| Twitter Header | 1500 x 500 pixels |
Getting the dimensions right not only makes your images look fantastic but also boosts engagement. I discovered this lesson the hard way when I shared a story featuring a blurry picture due to ignoring the suggested size. These days I always double check the size before sharing and it has truly transformed the outcome!
Also Read This: How to Earn Money on Rumble
Choosing the Right Size for Print Materials
Crafting materials is a lovely way to engage with your audience be it through flyers, brochures or business cards. However it's crucial to select the image size to guarantee that your prints appear crisp and polished. I still remember the thrill I felt while creating my brochure; that excitement quickly transformed into worry when I discovered that my pictures were blurred because of improper sizing.
When it comes to printed materials, these are some standard sizes frequently used.
- A4 Flyer: 210 x 297 mm
- Business Card: 85 x 55 mm
- Poster: 24 x 36 inches
When creating designs for print keep these key points in mind
- Resolution Matters: Aim for at least 300 DPI (dots per inch) for clear prints.
- Check Color Mode: Use CMYK color mode to ensure colors appear as intended.
- Bleed Area: Include a bleed area of at least 3 mm to avoid white edges.
Following these tips can help you avoid mistakes and there's something truly satisfying about having a beautifully crafted print material in your hands.
Also Read This: Why Do YouTube Videos Keep Stopping and How to Fix Playback Issues
How to Customize Image Sizes in Canva
Canva is an amazing tool that brings design within reach for all. However one aspect that tends to be overlooked is the option to tailor image dimensions. I still recall the thrill I experienced when I discovered how to modify image sizes it was like opening a secret passage in a well known space. By adjusting image dimensions you can unleash your creativity and make sure your designs fit seamlessly, into their intended spots.
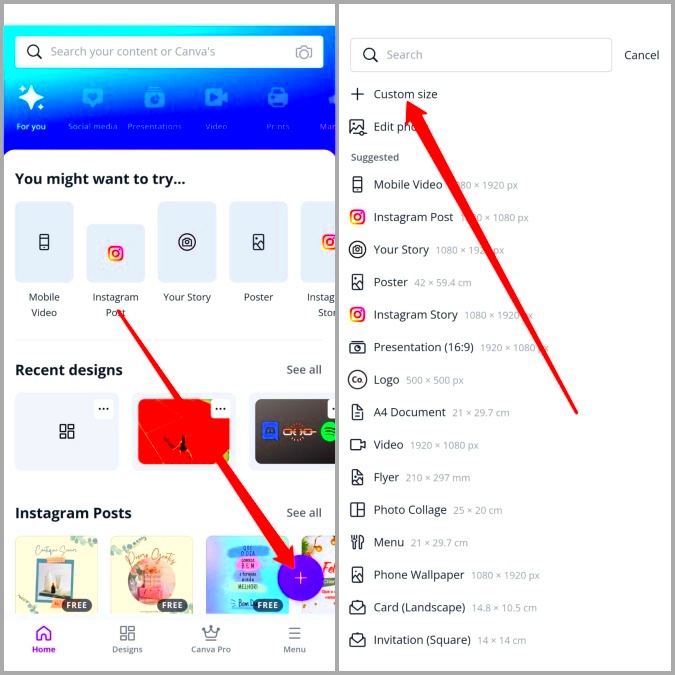
If you want to change the dimensions of an image in Canva just follow these easy steps:
- Open your design in Canva.
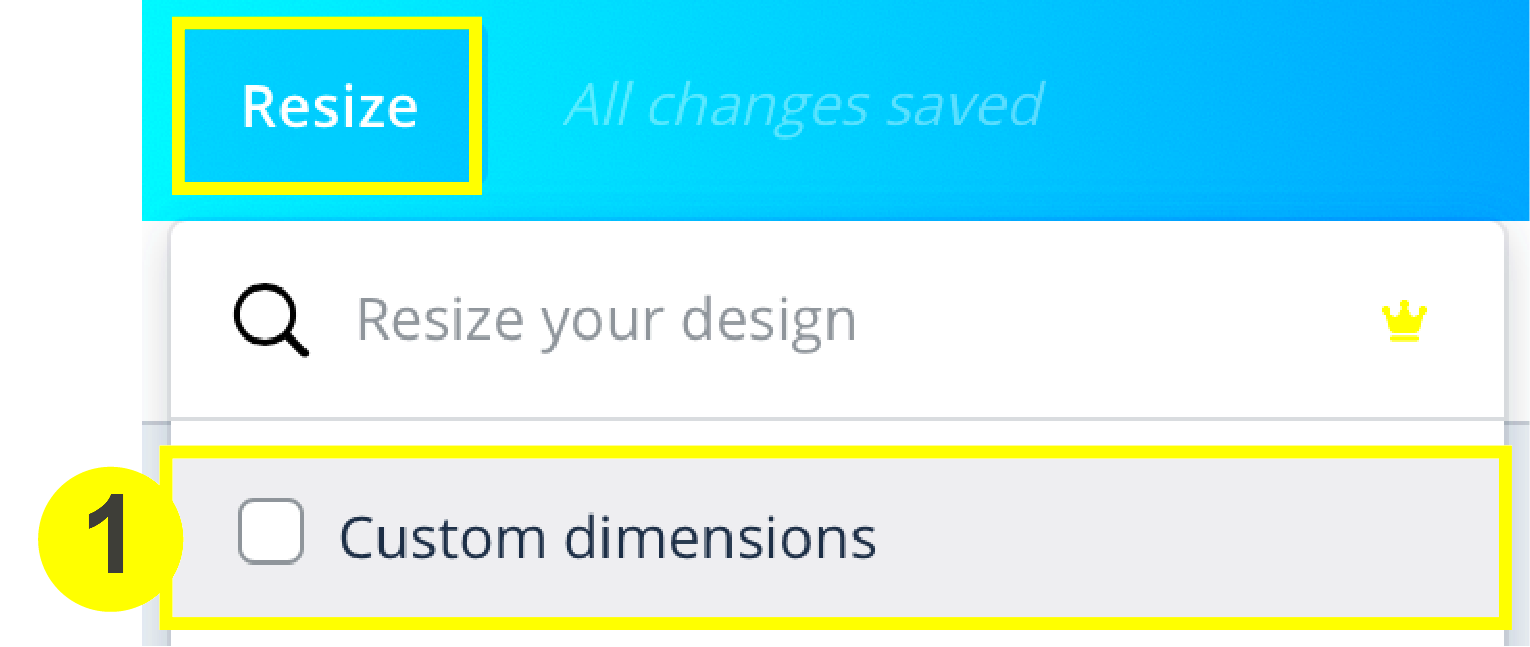
- Click on the “Resize” button located at the top of the editor.
- Enter your desired dimensions in pixels, inches, or millimeters.
- If needed, select "Copy & Resize" to create a new design while keeping the original.
This tool comes in handy when adapting content for different platforms or print formats. I remember designing a post for social media and later wanting to use it as a poster. With a quick adjustment of the size I was able to save myself a lot of time and effort.
Remember to consider the ratio of your images to prevent any stretching or distortion. When your images are properly sized they not only appear more visually appealing but also communicate your message more clearly. Its similar to dressing appropriately for an event; everything falls into place perfectly!
Also Read This: Stunning Watch Party Makeup Tutorials on Dailymotion
Checking Image Size in Canva Before Downloading
Have you ever grabbed an image only to discover it doesn't fit quite right? It's an annoying situation that many of us can relate to. I remember a moment when I saved an image for a presentation only to find out it was too small and appeared all pixelated on the big screen. To steer clear of these kinds of blunders it's crucial to verify the image size in Canva before hitting that download button.
Here’s how to check the image size:
- Open your design in Canva.
- Click on the “File” tab in the top left corner.
- Select “Show Dimensions” to view the current size of your design.
By taking these measures you can make sure that your pictures align with the necessary standards. It’s a quick verification that can help you avoid any awkward situations.
Moreover if you feel that the size isn't exactly fitting you have the option to adjust it effortlessly before downloading. Make it a practice to verify the measurements; it's similar to checking your wallet for essentials before heading out—smart and comforting!
Also Read This: How to Download Content from Behance
Tips for Optimizing Image Quality with Correct Sizes
As an individual passionate about crafting visuals I understand how crucial it is to maintain high image quality. You definitely don’t want to share a design that appears pixelated or fuzzy. Fortunately enhancing image quality by using appropriate sizes isn’t as challenging as it may seem. It can be a matter of implementing some straightforward suggestions that I’ve picked up throughout my journey.
Here are a few key suggestions to enhance your image optimization.
- Choose the Right Resolution: For digital use, a resolution of 72 DPI is usually sufficient, while for print, aim for 300 DPI.
- Use High-Quality Images: Start with high-resolution images. Low-quality images will only look worse when resized.
- Check Image Dimensions: Always double-check your dimensions before downloading to ensure they meet your needs.
- Utilize Canva's Filters and Adjustments: Sometimes, a little tweaking can enhance image quality significantly.
Looking back on my past encounters there was a time when I distributed a flyer that I believed was flawless until I laid eyes on its printed version it appeared washed out and lackluster. Ever since that moment I have committed myself to following these suggestions and I have noticed a significant enhancement in the quality of my creations. Keep in mind that an image can truly make a difference in grabbing attention!
Also Read This: How 123RF Makes Professional Design Accessible
Common Issues with Incorrect Image Sizes
When I began using Canva for design I was struck by how simple it was to bring visuals to life. However I soon ran into a frustrating issue with image sizes. Its a common hurdle that many beginners encounter and it can yield disappointing outcomes. I vividly recall creating a beautiful poster for an event only to discover later that the image was too small resulting in a blurry and unpolished look. This experience imparted a lesson, about the significance of getting image sizes correct.
Here are a few problems you may come across when dealing with image sizes.
- Pixelation: When images are too small for the required size, they can become pixelated, making them look unprofessional.
- Cut-off Edges: If the dimensions don’t match the platform's requirements, important elements might get cut off, ruining the design.
- Long Load Times: Large images can slow down website load times, frustrating users and driving them away.
- Color Distortion: Incorrectly sized images can cause colors to appear washed out or inconsistent, which can detract from your brand identity.
To steer clear of problems I consistently take the extra step to verify image sizes before wrapping up any design. It saves me a lot of time and frustration down the line. Paying attention to detail can really make your designs stand out making sure they deliver the message you want and showcase your effort.
Also Read This: How to Get a Job on Behance Navigating Job Opportunities and Freelance Work
Frequently Asked Questions about Canva Image Sizes
As someone who uses Canva I frequently look for information regarding image sizes. What appears to be a straightforward subject can become quite intricate due to the diverse specifications across different platforms and formats. I've compiled a list of inquiries that I think many of us have come across during our design experiences.
Here are some frequently asked questions:
- What are the best dimensions for Instagram posts? The ideal size is 1080 x 1080 pixels for square posts, while landscape images should be 1080 x 566 pixels.
- How can I resize an image in Canva? You can use the “Resize” option in the toolbar to enter custom dimensions or choose from preset sizes.
- Why is my image blurry after downloading? This usually happens if the original image was low resolution. Always start with high-quality images.
- What’s the difference between DPI and PPI? DPI (dots per inch) refers to print quality, while PPI (pixels per inch) is more relevant for screen displays.
Tackling these inquiries has made my journey in design more seamless and pleasurable. I urge everyone to look for solutions to their questions and feel free to delve into Canvas support area. Its a goldmine of information that can elevate your design abilities.
Conclusion on Canva Image Size Best Practices
As I conclude this exploration of the nuances of Canva image sizes I find myself contemplating the valuable lessons I’ve gained. Getting your images sized right can really make a difference between a well put together design and a lackluster one. I’ve certainly had my moments but with every misstep I’ve become wiser and more self assured in my skills.
Here are some key tips for optimizing image sizes in Canva.
- Always check the required dimensions for the platform you are designing for.
- Utilize high-resolution images to ensure clarity.
- Experiment with custom sizes when needed, but be mindful of the aspect ratio.
- Preview your designs before downloading to avoid surprises.
By remembering these tips you can craft stunning and impactful designs that connect with your audience. Each design showcases your imagination and hard work, so lets make them meaningful! Enjoy the design process!